|

| Print this page - use Landscape |
Search the WeetHet Pages |
|||||||||||||||||||||||||||||||||||||||||||||||||||||||||||||||||||||||||||||||||||||||||||||||||||||||||||
| WeetHet is being updated! - Current articles will slowly move to www.tweaking4all.com For excellent webhosting that is reliable and affordable, we highly recommend: LiquidWeb |
||||||||||||||||||||||||||||||||||||||||||||||||||||||||||||||||||||||||||||||||||||||||||||||||||||||||||||
|
On this page...
Overview
Besides the very comfortable pricing, it's a very easy
router to get installed. Between receiving the box and having it all
up and running, took me about 5 minutes. Great! Besides connecting the usual cable set, it was just
a matter of following the "wizard" step-by-step. The built-in DHCP and standard settings enabled Internet access in no-time. Wireless LAN worked instantly with my D-Link
PCMCIA card, on my laptop I only needed to set the proper SSID (networkname). Another great surprise: MSN Messenger worked properly. In this case I'm happy to say that it DOES support MSN Voice and Video in it's standard config. In a nutshell: Not much left to wish with this baby. UPDATE: With a new firmware (0.24) release (boy! These guys are quick!) some con's are eliminated; - NAT can be switched OFF
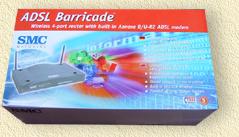
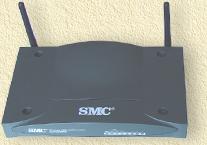
Always fun to take a peek in the box, so what's in there?
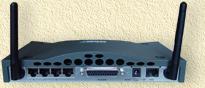
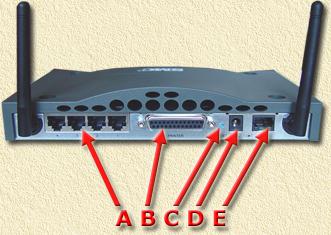
Besides the two leaflets, nothing unexpected in the box .... Note for the 7404WBRB (the ISDN version): A little surprise was the fact that for my ADSL connection (KPN) I had a RJ-11 connector, where as the modem has an RJ-45 socket. Hmmm,... SMC informed me that I can insert the RJ-11 into the RJ-45 without any problem ... to my surprise, it does indeed work. This does not seem to be the case with the POTS/Analog version, where a regular RJ-11 connector can be found. Connectivity at the back of the SMC router:
Connecting is pretty straight forward, as you can see in the example below:
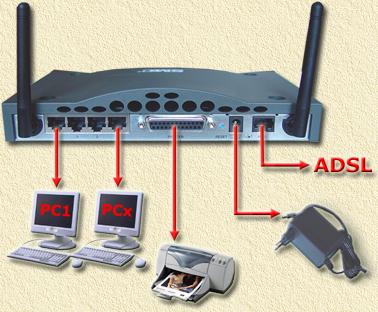
Step 1: Connecting
ADSL Step 2: Start
with one PC Step 3: Configuring
the PC for DHCP use Tip: In case you are using a proxy, DISABLE it NOW! Note: Users of Windows 95, 98 and ME: You should shutdown your PC now. Step 4: [Optional] Connect
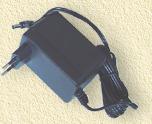
you printer Step 5: Connect
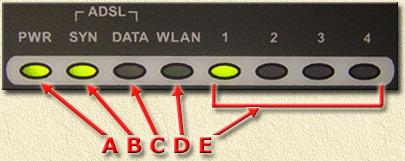
power supply Note: Windows 95, 98 and ME user: Switch you PC ON again. Several lights of your router will start blinking now:
If you followed the steps above, then first the PWR will light up, quickly followed by the LAN port light on which you connected your PC. The light SYN will, if you connected ADSL properly, first start blinking and after a short will stay ON. If this is NOT the case: check the connections and the cables you used. Configuring for the first time Configuration of the router, as displayed below, is focusing on MXStream (ADSL provider by KPN). BBNed users (also Dutch) will see a reference in the text to BBNed specific settings. DIALUP ADAPTER ISSUES If you already had an (A)DSL modem installed that uses a dialup adapter, then please remove it to avoid confusion! You can optionally disable this dialup connection, however, we do recommend REMOVING the dialup connection(s). Use Internet Explorer to disable the dialup connections. Go to TOOLS -> INTERNET OPTIONS -> CONNECTIONS. Check the option "Never dial a connection" and click "OK". DOWNLOAD MANAGER ISSUES Before we continue a tip: Disable all download managers (like FlashGet, GetRight, etc). Commands executed on the router use the EXE extension, which triggers download managers. In my situation, I had FlashGet running. Showing this popup each time an EXE has to be executed. In case this happens to you, either fully disable the download manager or click "Cancel" in the popup.
OK, so now we can continue ... Let's first check if DHCP did what it is supposed to
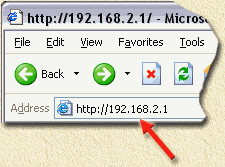
do. Your PC should have gotten an IP-Address in the 192.168.2.100 ... 192.168.2.199 range. If this is NOT the case, then please REBOOT your PC. Step 1: Open the
web interface
The SMC web interface will now open and show the login screen:
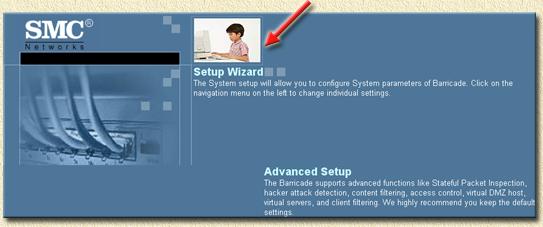
Step 2: Log in Step 3: Go to "Setup
Wizard" Note: BBNed will do NO SUCH THING. See the BBNed specific setting at the bottom of this page.
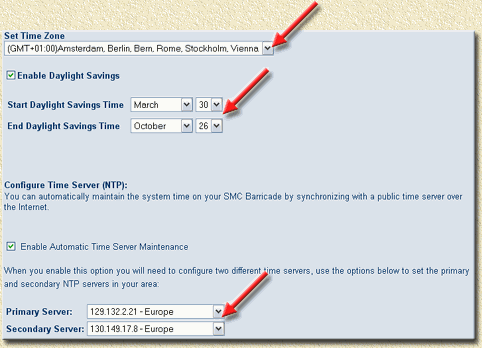
Step 4: Time settings
First set your time-zone at the "Set Time Zone" field. Residents of Holland, Germany, and Belgium choose "(GMT+01:00) Amsterdam, Berlin,...". You can enable daylight saving, if you want to. Check the field "Enable Daylight Savings". For Europeans; set "Start Daylight Savings Time" to "March", "30". Do the same with "End Daylight Savings Time", using "October" and "26". This is not 100% accurate, as usually, the last weekend of March and October is being used for this ... You can also use an NTP
server. An NTP server is basically an Internet service allowing
to keep your clock in sync with some kind of atomic clock. Now click "Next" (lower right corner). Step 5: (A)DSL
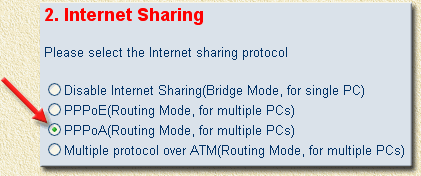
connection settings Select "PPPoA(Routing Mode, for multiple PCs)" and click "Next" (lower right corner).
Step 6: Internet
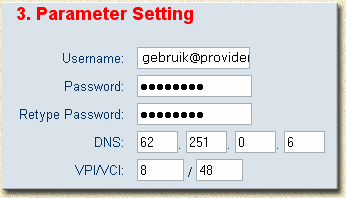
Provider (ISP) data
Enter "Username" (some provider require an "@...." text!) and "Password" (twice). Enter the primary DNS server's IP-addres. Check with the documentation you received from your ISP or take a look at our DNS List. The VPI/VCI for all KPN
based connections (in the Netherlands) is: 8 / 48 (as
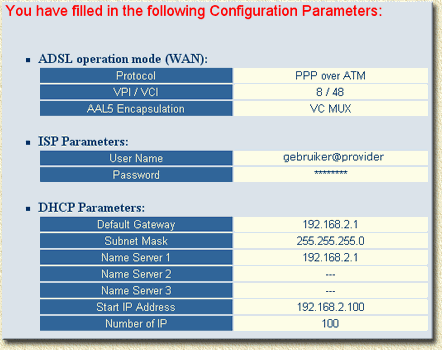
show above). Click "Next". Step 7: Settings
overview
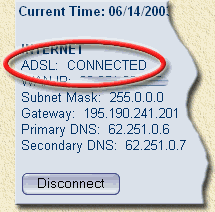
Click "APPLY". The router will now reboot. The SYN light will blink briefly and then remains ON - you're online now. Before do our first Test-Drive, we want to check the status. Again use a browser and visit http://192.168.2.1 (if you have closed the browser) and login again by clicking the "LOGIN" button. Now we select the option "Advanced Setup". In the navigation bar (on the left) choose "STATUS". A new screen appears showing your current status.
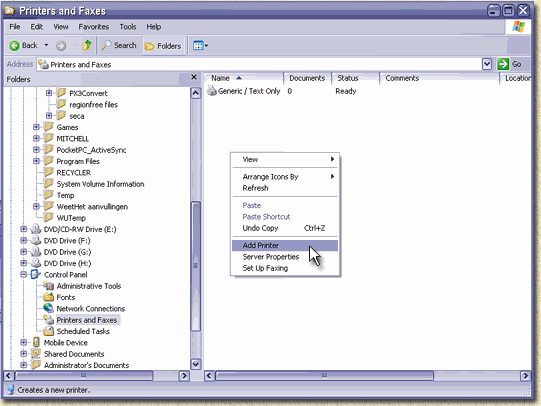
In case you DO NOT see this (ADSL: CONNECTED), your connection is NOT OK. First try what happens when clicking the "Connect" button! First check if the SYN is ON. If not: Check the ADSL cable! Next check "WAN" - "ATM" (also in the navigation bar on the left) and verify your ISP settings. If all is well, then you can start surfing, visit a nice website like for example http://www.weethet.nl :-) One of the cool features of the SMC 7404 WBRA (or WBRB) is the built in printer server. Note: you do not need a special printer driver for this! In the past, when you wanted to share a printer over the network, this would involve sharing the printer on one PC. This PC had to be ON, all the time otherwise printing from other PC's wouldn't work. Now this problem is solved ... the sharing is done by the router ... Connect the printer (parallel-port) to the router if you haven't done so. Note: Repeat the steps below on all involved PC's. In Windows we will now add a new printer. Open "Control Panel" - "Printers" and choose "Add new printer". In certain situations we do find a specific icon for this. In other situation you might not find one of these ... in that case click in the printer-folder with the right mouse button and select "Add Printer" from the popup menu:
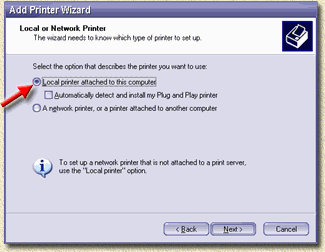
The "Add Printer Wizard" will now open. Click "Next". In the window "Local or Network Printer" select the option "Local printer attached to this computer" and click "Next".
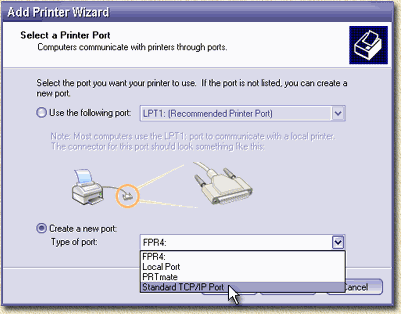
In the next window we must choose a printer port. We will create a new port here! Check "Create a new port" and select the type "Standard TCP/IP Port". Click "Next" again.
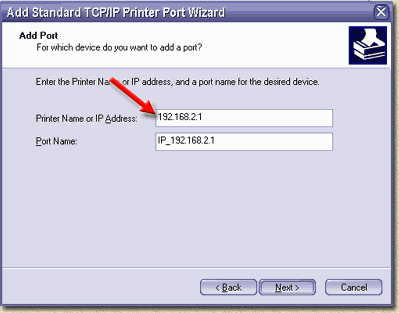
And again, yet another wizard is being started, in this case the "Add standard TCP/IP Port Wizard". Click "Next". In the next window you ONLY enter data into the "Printer Name or IP Address" field. Enter the value 192.168.2.1 (the IP-address of the SMC router).
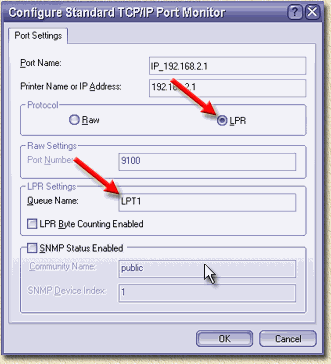
The second field, "Port Name", will be completed automatically by Windows. Again, click "Next". The next window, "Additional Port Information Required", requires you to enter some specific settings. Choose "Custom" and click "Settings...". Check "LPR" and enter "LPT1" at the "Queue Name:" field.
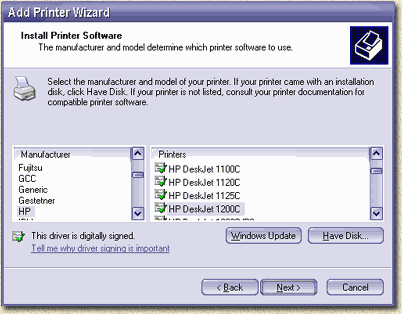
Now click "OK". Click "Next". A brief summary of the created port will be displayed now, click "Finish". It takes a few seconds before you come to this window, where you can select printer manufacturer and model;
Now windows could ask you to "Keep existing driver", this happens when you already had a printer of this brand/model on your PC. It's OK to keep the existing one. Click "Next". In the next window you can give the printer a specific name. Windows already offers a suggestion. I usually complete this name by adding "(network)", this way I can see later on that this is a network printer. You can also check "Default Printer", if you want this to be your default printer. Click "Next". In the next window, Windows would like to know if you want to share this printer. Check "Do not share" - the sharing is already being delt with by the SMC, so we do not need Windows to share it again. Click "Next". Finally, windows asks you if you would like to print a test page. It is not required but I would do so anyway,... just to make sure it works. Click "Next". Windows now shows you an overview of the added printer. Click "Finish". Windows will now copy some files and start printing the test page, if you checked "Print test page". The printer is nw installed. The SMC default settings are pretty OK, but we can always do some fine-tuning. Set a Password A router without a password is basically not something you want to have .... Use the browser to go to http://192.168.2.1 and click "LOGIN". Go to "Advanced Setup". From the navigation bar on the left, choose "System" - "Password Settings". Do not enter anything in the "Current
Password" - since there is no password by default.
Click "APPLY". So now, nobody will be able (almost) to change settings in the router without the password. Note: WRITE DOWN THE PASSWORD! Enable Firewall A password limits access to the router, but how about those sick puppies out there that feel the need to hack into your network? Note: real hackers do most likely not try to "attack" your network. Usually only "wannabe's" try to access a home network ... using other people's tricks,.. so they are no real hackers. To limit their access to your network, we can enable the built in firewall of the SMC7404WBRA/B. Again go to http://192.168.2.1, click "LOGIN" and click "Advanced Setup". From the navigation on the left choose "Firewall". On the right check "Enable", and click "APPLY". The firewall is up and running. Wireless LAN settings For details on protecting Wireless LAN, please read this page. In particular the part about protecting your network. Always ON For those of you that have somekind of server running
(for example Web or FTP), should consider enabling the "Always
ON" feature
(as of firmware 0.24). BBNed: First time configuration THIS PART IS ONLY FOR BBNED USERS! BBNed uses a slightly different configuration compared to KPN. Follow these steps: After login, select "Advanced Setup". In the navigation bar on the left, choose "WAN". Below "WAN" some options appear. Choose "ATM". Now enter these values:
Click "Apply". The router reboots. The SYN light will blink shortly and the stay ON, you're online now. Please continue reading HERE. |
||||||||||||||||||||||||||||||||||||||||||||||||||||||||||||||||||||||||||||||||||||||||||||||||||||||||||||