| Print this page - use Landscape |
Search the WeetHet Pages |
|||||||||||||||||||||||
| WeetHet is being updated! - Current articles will slowly move to www.tweaking4all.com For excellent webhosting that is reliable and affordable, we highly recommend: LiquidWeb |
||||||||||||||||||||||||
|
On this page ...
Before we begin ... Make sure both FlaskMPEG 0.6 and Cinema Craft Encoder are installed on your PC. If this is not the case, please consult the "Installation of FlaskMPEG and CCE" page for details. Rip the VOB's to your Harddisk Before we start the proces of converting, we first rip all VOB-files to the harddisk. The entire process is described on the SmartRipper page. Once the copying process is complete, we can nog go to the next step; the conversion process. Transcoding ... After "ripping" the DVD, we can start FlasKMPEG. Select from the "File" menu, the option
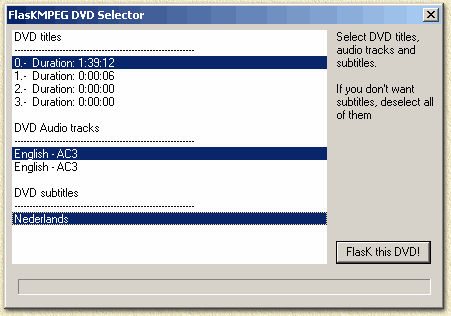
"Open Media". In file dialog, select the IFO file of the DVD you just ripped - usually VTS_01_0.IFO - and click the "Open" button. FlaskMPEG will show you the available DVD Video-tracks, Audio-tracks and optional subtitles. Make your selection ... Note: When selecting subtitles, FlaskMPEG will render the subtitles into the movie. You will not ever be able to remove these again!
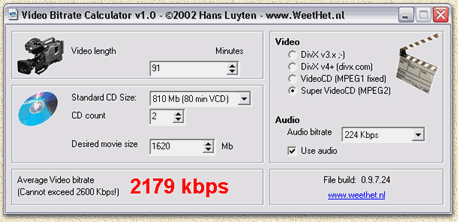
In this example, we choose the main movie (DVD titel '0', duration 1 hour and 39 minutes = 91 minutes) - usually the largest duration indicates the main movie. After making the right choices, click the "FlasK this DVD!" button. Just a brief intermezzo: let's calculate the desired bitrate, since we now know the duration of the movie. Note: if you're unfamiliar with "bitrates" or you're looking for a "Bitrate Calculator" then please take a look at the "Bitrates - What is it and why do I need it?" page, where you can also find the WeetHet Video Bitrate Calculator. So we now know that the movie duration is 91 minutes, using the WeetHet Video Bitrate Calculator we see that the maximum video bitrate should be set to 2179 kbps when converting this DVD to Super VideoCD, using 2 CD's of 80 minuten. 2179 kbps is a decent bitrate for Super VideoCD, so we choose Super VideoCD formaat for this example. Using VideoCD would have cost us 2 CD's too,... but it would offer a not so great video quality. Note: Not all DVD-players are compatible to Super VideoCD. If you equipment can't playback Super VideoCD, regular VideoCD might be an alternative that would prove usefull. Note: Audio in a proper qualit should have an audio bitrate of 224 Kbps. Also a CD for VideoCD or Super VideoCD offers more storage space - choose the right "CD Size". On other thing: choose the proper "Video" format and proper "CD Count".
OK, back to FlaskMPEG, where we now must enter some video-data. Depending on the type of DVD, and choosing the maxmimum values allowed by the Super VideoCD standard (lower resolution and bad audio is allowed with this standard!) - we choose:
For European DVD's (region 2) we use PAL, for American DVD's (region 1) use NTSC. Select from the "Options" menu, the option "Global Project Options (Export Movie Settings)".
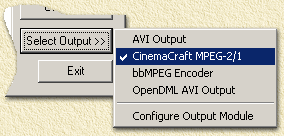
Now select the "Audio" tab: check "Decode audio". A "Sampling frequency" select "44100" (remove the checkmark at the "Same as input" option). At the "Post processing" tab, we check "HQ Bicubic Filtering" and "Keep aspect ratio". Optional you can check "4:3" for normal television dimensions, or "16:9" for widescreen TV. At the tab "Files": we can enter a filename, foir example "mymovie.mpg". Click "OK" now. In the lower right corner of your screen, you will now find a button called "Select Output", in the "FlaskMPEG Control Panel" window. Click it and select "CinemaCraft MPEG-2/1".
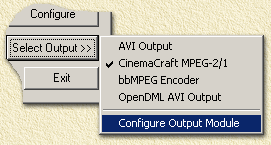
Click "Select Output" once more and now select "Configure Output Module" so we can configure the encoder properly.
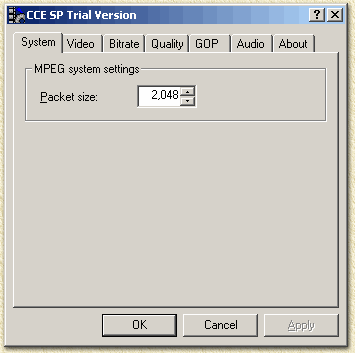
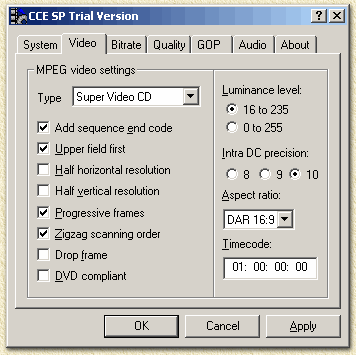
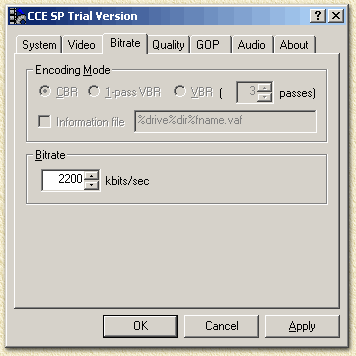
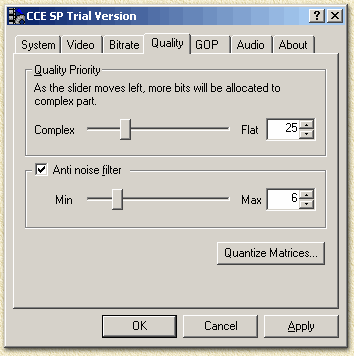
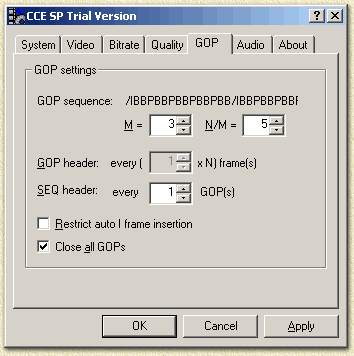
The configuration window of Cinema Craft Encoder will now appear. Copy these setting:
Note:
Note:
Note: we do not use the "Quantize Matrices" button.
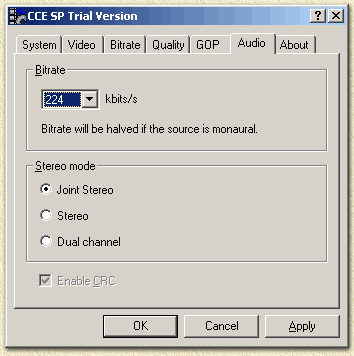
Note: You can enter any bitrate you like for audio (minimim 32 kbps and maximum 384 kbpx), however 224 or 192 kbits/s are common bitrates for reasonable (192 kbps) to good (224 kbps) audio quality. Click the "OK" button, so we return to FlaskMPEG. In the "FlaskMPEG Control Panel" we now click the "Flask it!" button ...
The progress dialog now appears and the conversion starts/ You can optionally disable (uncheck) the "Display Output" to gain a bit of speed (not much though). Note: My AMD Athlon 1300Mhz, running Windows XP, takes about 3 hours to convert a DVD movie to VideoCD and about 3,5 to 4 hours for a Super VideoCD. Once conversion is completed, we need to do two final steps. First we need to cut this huge 1600 Mb large file into two chuncks. Read the "Cutting MPEG2 using Womble MPG2VCR" page. The cut result can now be put on CD using Nero. Tip: In order to check quality; You can playback the file without burning it on a CD though. Use a software DVD player like PowerDVD to playback MPEG2 (Super VideoCD), for MPEG1 (VideoCD) you can do with Windows Media Player. |
||||||||||||||||||||||||


