On this page ...
| Program
Chain |
| Index |
 No
change here. No
change here.
After selecting a videotrack, we cannot change anything here.
|
| Angle |
 Angle
1. Angle
1.
Here you can select a different "Angle" although
most DVDs do not have more than one angle stored.
|
| |
| DeCSS |
| Use ASPI |
 OFF
(not checked). OFF
(not checked).
Here we can enable the use of the ASPI layer (usable for both SCSI
and IDE devices - however, by default, not available in Windows
2000 and Windows XP). I never used it with DVDx.
|
| DeMacroVision |
 ON
(so with a checkmark!). ON
(so with a checkmark!).
MacroVision is a copy-protection - distorting the movie so you cannot
copy it with a VCR, see "What
is MacroVision?" for details.
|
| Key search |
 Each
VOB/CELL. Each
VOB/CELL.
Needed for decoding CSS. Use "Each VOB/CELL". See
"DivX rip intro"
and "SmartRipper"
for details.
|
| |
| Audio |
| Dolby suround |
 ON
(so with a checkmark!). ON
(so with a checkmark!).
Here we can optionally set Dolby Surround mixed down for your DivX
or (S)VCD movie. Always nice to have a slightly better sound with
your movie - it requires a bit more cpu power, but I guess it's
worth it.
|
| Audio track |
 English
AC3 6Ch. English
AC3 6Ch.
Here we set the audio track to be used for your movie rip. I usually
choose the English language. AC3 is not always an option, and indicates
that the original sound-track supports 6 channeld, which will be
mixed down to two channels (stereo). Note: sometimes there are more
than 1 english channel, usually the second one is the same with
an additional voice-over by (for example) the director giving some
commentaries.
|
| Audio 48 to 44.1 KHz |
 High
quality (slow). High
quality (slow).
This options allows you to set the mixdown quality when converting
48Khz audio down to 44.1Khz audio. I always select High Quality
- it takes a bit more time, but it's worth it.
|
| Volume |
 3. 3.
This setting allows us to increase or decrease audio volume. Sometimes,
the audio, when using "1", is simply to soft. When
selecting a value larger than 3, audio starts to distord
(due to clipping). Try some experimenting with this value - I usually
use 3.
|
| |
| Subtitle |
| (Subtitle) |
 None
or your language. None
or your language.
The subtitles of a move, can be disabled ("None")
or enabled (for example "Nederlands"). Note that
subtitles are rendered into the movie pictures and cannot ever be
removed!
Sometimes, for example with DivX, it can be usefull to rip subtitles
later, for example for use with MicroDVD - see als "Ripping
Subtitles".
|
| Subtitle Offset |
 0
or 800. 0
or 800.
This is the position (vertically) of the subtitles. Using a value
of "0" will render the subtitles in their normal
position. However, in some movies subtitles move up and the down
again, I hate that, so I enter a value of "800"
making sure the subtitles are positioned at the bottom.
|
| Original color |
 ON
(so with a checkmark!). ON
(so with a checkmark!).
Some subtitles appear with either a weird color or are printed extremely
bold. Incase you are ripping such a DVD - uncheck (disable) this
option!
|
| |
| Misc |
| iDCT |
 FPU
(best quality). FPU
(best quality).
This indicates which type of algorithm should be used for resizing
each frame. I prefer good quality, so I always choose "FPU".
The option "MMX" is a bit faster, but you pay for
this speed by loosing some of the quality. There are also processor
specific FPU options like for the Pentium 4 ("P4")
and (mostly Intel) CPU's that support SSE ("SSE").
|
| Overlap |
 0. 0.
When a movie is going to span 2 or more CD's, you might want to
consider making an overlap of "2" to "3"
seconds. This will give the viewer a brief moment to return to the
movie after you swapped CD's. If you plan to put a movie on a single
CD (as with DivX) then select "0"
|
| Audio Video Synchronisation |
 OFF
(so NO checkmark here!). OFF
(so NO checkmark here!).
This option is very usefull with DivX movies (working with DivX:
ON). The video and audio signal will be synchronised frequently.
With DivX, MPEG4 and MP3 tend to "walk away" from each
other and the movie get's out of sync, this option prevents just
that.
|
| Shutdown the computer when job is
done |
 OFF
(so NO checkmark here!). OFF
(so NO checkmark here!).
Converting to either (Super) Video CD or DivX can take quite some
time, that's why most of us have their computer do this work at
night. Once the conversion is completed, the computer will be shutdown
by DVDx. However: I really would like to know if something goes
wrong with either the conversion or my PC, so I usually convert
movies when I'm awake and at home.
|
| |
| Luminace
filter |
| Enable |
 OFF
(so NO checkmark here!). OFF
(so NO checkmark here!).
Luminance filter is being used to either increase or decrease luminance
of a movie. I rather see the original so I'm not ever using this
option.
Note: increase/decreas = Offset + Gain.
|
| Gain |
 128. 128.
The luminance gain where 128 = no change, <128 = lower luminance
and >128 = increase luminance.
|
| Offset |
 0. 0.
The is the offset value for gain, Note that GAIN + OFFSET = real
gain. Default this value is set to 0.
|
| |
| Output
frame rate |
| (Frame Rate) |
 25
(PAL) or 29.97 (NTSC). 25
(PAL) or 29.97 (NTSC).
The framerate is different for each TV-system. Often Region 1 DVD's
are NTSC and Region 2 DVD's in PAL format. DVDx does NOT automatically
set this value! Make sure the proper value is set. By the way: DVDx
(not always perfect) can convert between the two framerates, but
it is not advisable due to some possible side-effects.
|
| Detect prog. 24Hz |
 ON
(so with a checkmark!). ON
(so with a checkmark!).
Checks if the non-NTSC standaard 24 Fps framerate is being used.
Check it to make sure ...
|
| Force 24Hz |
 OFF
(so NO checkmark here!). OFF
(so NO checkmark here!).
Check this option in case you are sure the DVD is using the 24 Fps
framerate, but you know autodetect didn't find it. This only works
if you have "Detect prog. 24Hz" checked as well.
|
| |
| Save
your DVD drive |
| Size (MB) |
 10
or more. 10
or more.
During the ripping process, DVDx will very frequently access your
DVD-Rom player. To save your DVD-Rom drive, DVDx offers the posibility
to use a caching buffer. This not only will save your DVD-Rom drive
but will increase performance as well. You can enter any number,
depending on the memory or harddisk space available in your PC.
Mine has 512 Mb so I usually use a 100 Mb buffer. Caution: a large
buffer (>10) can cause some unpleasent effects if you're using
the "overlap" option.
|
| Location |
 RAM. RAM.
Determine where the buffer should be: in memory (RAM = Fast)
or harddisk (less fast). If you don't have to much memory
(<128 Mb), then choose harddisk.
|
| |
| Deinterlace
Filter |
| (Deinterlace Filter) |
 None. None.
This is used to remove interlace on a movie (those weir horizontal
stripes next to a quick moving object in a movie). Usually this
is not needed. But if you feel the need to de-interlace, preferably
choose either "Even Field" or "Interpolate"
- this usually renders the better quality (there will be quality
loss anyway!). You can try "Odd Field" but usually
this is not a good option, so test it first ...
|
| (Video
Format) |
| (Formaat) |
 Depends
on the desired format. Depends
on the desired format.
We can choose "Avi (DivX,YUX,...)", "Video
CD (MPEG1)" and "Super Video CD (MPEG2)".
|
| |
| AVI Specific: only
available with the option "Avi
(DivX,YUV,...)"! |
| (Audio Format) |
 Depends
on the desired format. Depends
on the desired format.
Here we can choose the audio format. Choose:
- "disable": for no audio
- "Store to WAV": for later conversion of the sound-track
- "Use LAME": for DivX with MP3 for
those without an MP3 codec
- "Use ACM": for any other format supported by
the Windows codecs (including Radium
MP3 for DivX).
|
| Audio xxx |
 xxx
is either "Lame" or "ACM". xxx
is either "Lame" or "ACM".
Click this button to set some specific settings for Lame or
ACM iinto detail. For DivX I usually use Radium
or Lame with stereo 96 Kbps. Other audio formats are
not advisable. |
| Enable Video |
 ON
(so WITH a checkmark). ON
(so WITH a checkmark).
Optionally one could disable )= no checkmarh) video conversion - what
every the use of that might be. |
| Video Codec |
 DivX DivX
Here we schoose the video codec we want to use. Since we need
AVI for DivX, you will need to select the DivX codec here. Select
a codec with "DivX' in it's name. Click the button "Configure...."
to do detailed settings like bitrates etc.
Note: Some MPEG1 and MPEG2 codecs appear
here as well - rather use the building MPEG algorithms or use Cinema
Craft Encoder for "Video CD (MPEG1)" or "Super
Video CD (MPEG2)". |
| |
| MPEG Specific:
only available with "Video CD (MPEG1)" and "Super
Video CD (MPEG2)" |
| Video Bitrate |
 using
Video CD: 1150 Kbits using
Video CD: 1150 Kbits
 using
Super Video CD: max. 2600 Kbits - prefered: 2376
Kbits using
Super Video CD: max. 2600 Kbits - prefered: 2376
Kbits
Here we set the MPEG bitrate. For Video CD the standard defines
a fix 1150 KBits bitrate. Super Video CD allows a variable bitrate
with a 2600 Kbits maximum (prefered: 2376 Kbits).
|
| Audio Bitrate |
 224
Kbits 224
Kbits
For Video CD we use 224 Kbits, for Super Video CD this can be a value
between 32 Kbits and 340 Kbits. For Super Video CD is 224 KBits a
good choice too. |
| Motion Search |
 Good
or High (Slow) Good
or High (Slow)
Here we set the search for changes in a sequence of frames. Compression
is partially based on storing changes between two following frames.
The better this is done, the better the compression without quality
loss. |
| Calculation |
 MMX
or MMX + 3DNow MMX
or MMX + 3DNow
CPU calculation mode, choose "MMX" for CPU's that
support MMX (most CPU's, mostly Intel), "MMX + 3DNow"
for those using an AMD CPU, and "Normal" for the
rest with crappy CPU's. |
| DCT/iDCT |
 MMX
or FPU (best quality) MMX
or FPU (best quality)
The quality of the rsizong algorithm. "Integer" uses
discrete numbers only, while "MMX (fastest)" uses
MMX-specific CPU routines and "FPU (best quality)"
uses real numbers (best). MMX is usually the way to go. |
| |
| Expert Settings
(* = not availabel with "Avi (DivX,YUV,...)") |
| Rate control padding start* |
 30% 30%
These values control the bitrate (padds some zero in the video stream
when the bitrate is too low). You have to change theses values to
avoid video underflows. Change these value if you want to optimize
the output size but tuning them is hard . |
| Rate control padding max* |
 90% 90%
Use this to avoid underflow. Rather not change this. |
| Mux Rate* |
 using
Video CD: 1.4 % using
Video CD: 1.4 %
 using
Super Video CD: 5.6% using
Super Video CD: 5.6%
Use this to avoid underflow. Rather not change this and use the defaults. |
| VBV buffer size* |
 using
Video CD: 20 KB using
Video CD: 20 KB
 using
Super Video CD: 112 KB using
Super Video CD: 112 KB
This value is not documented so don't change it. |
| Pulldown 3:2* |
 OFF
(so NO checkmark here!). OFF
(so NO checkmark here!).
Tranforms an NTSC movie with 23.976 Fps to 29.97 Fps. |
| Export (AVI+Premiere) |
 RGB24 RGB24
Video format passed to the Adobe Premiere plugin (compatible with
the Video Server) and to the AVI codec. Only RGBxx and
YUY2 are supported for AVI. YUY2 is in fact a 4:2:2 YUV format
(very good for DivX encoding). The internal MPEG encoder works only
with 4:2:0 this setting is ignored. |
| |
| Export Settings |
| Resolution |
 DivX:
what ever you like, however it's better to choose Video CD
or DVD format DivX:
what ever you like, however it's better to choose Video CD
or DVD format
 Video
CD: 352x288 (PAL) or 352x240 (NTSC) Video
CD: 352x288 (PAL) or 352x240 (NTSC)
 Super
Video CD: 480x576 (PAL) or 480x480 (NTSC) Super
Video CD: 480x576 (PAL) or 480x480 (NTSC)
The resolution of the result movie. Preferable stick to what standards
define. using DivX gives you some slack for your "own"
formats - With (Super) Video CD I'd stick to the standard. |
| Zoom |
 (Super)
Video CD : None (Letter Box 4/3) (Super)
Video CD : None (Letter Box 4/3)
 DivX
: Custom DivX
: Custom
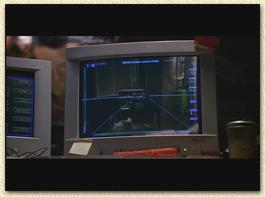
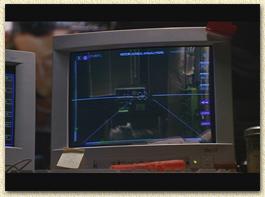
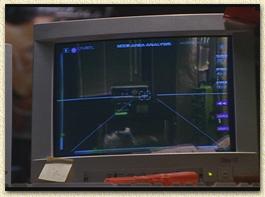
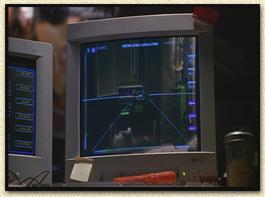
Here we can set the "adaption" of an image. The
"None (Letter Box 4/3)" uses the original screen-sizing,
which is often used with (Super) Video CD. For DivX
one rather use "Custom". Below you'll see some
snapshots to see the difference (base on a 16/9 movie):
|
None (Letter Box 4/3)
The image aspect ratio remains as the original.
Very suitable for Video CD, Super Video CD
and DivX.
|
 |
|
Medium (4/3)
Aspect ratio is not changed, but: a part of the image disappears,
you'll see that (compared to "None (Letter Box 4/3)")
that a part of the mug (right bottom) and the monitor (left)
disappeared.
Personally I think this is not an option.
|
 |
|
Pan Scan (4/3)
Even more zoom. Aspect Ratio is slightly off. Even more items
are gone.
Personally I think this is not an option either.
|
 |
|
Full (16/9 or 4/3 input)
Here the image as streched so it fills the entire screen.
Nice for owners of a widescreen, but useless for others.
|
 |
|
Custom
Usefull for DivX. The blakc bars on top and bottom of a movie
are take away. Once you close the "Output Settings"
window, you can use the little green bars to change the settings.
|
 |
|
| Resize |
 MMX
BiLinear or SSE BiCubix MMX
BiLinear or SSE BiCubix
Scaling is done using a particular "formula" (lagorithm).
The Bilinear algoritme looks at clusters of 2 x 2 pixels, while
BiCubic is more acurate by using clusters of 4 x 4 pixels. However
the difference is hard to see. You can choose:
Nearest neighbour : nearest pixel.
BiLinear : accurate but slow
BiLinear MMX: accurate but fast (Intel or AMD CPU's)
BiCubic : very accurate and very slow too
SSE BiCubic : very accurate and not too slow (Pentium
3 or Athlon CPU's)
Pseudo BiCubic : sloppy and slow
|
| Max frames |
 Click
the "Whole" button so all frames are selected or
enter a value of the maxmimum of frames. Click
the "Whole" button so all frames are selected or
enter a value of the maxmimum of frames. |
| Time to Encode |
 The
total movie time (playback time of the movie) is to be encoded. The
total movie time (playback time of the movie) is to be encoded. |
| Estimated Size |
 No
settings here either. (only used with Video CD and Super Video
CD) Indicates the final files size. This value can be influenced
by "Video Bitrate", "Audio bitrate"
and "Format" (choosing Video CD or Super Video CD). No
settings here either. (only used with Video CD and Super Video
CD) Indicates the final files size. This value can be influenced
by "Video Bitrate", "Audio bitrate"
and "Format" (choosing Video CD or Super Video CD). |
| |
| Volume
don't exceed |
| Size/Settings |
 Infinite
or a standard CD format Infinite
or a standard CD format
Here we set the maximum file size. Once a file reaches this size,
a new file will be started for the remaing rest. You can either select
a standard CD size, or select a custom setting by clicking "Settings".
I always use "Infinite" for (Super) Video CD
and later cut the file using Womble
MPEG2VCR. For DivX I mostly use "80 min ISO Data
CD". To calulate bitrates and sizes, see also WeetHet
Bitrate Calculator. |
| |
| Misc |
| Ignore Overwrite message |
 OFF
(so NO checkmark here!) OFF
(so NO checkmark here!)
If enabled, existing files will be overwriten without warning. |
| Render every 0=none |
 25 25
Every 25 frames a so called "keyframe" is being rendered
(full image) which makes it easier when using fast forward/backward
or when jumping in movies. Downside is that the file becomes a little
bit bigger. Choose a value between 10 and 25. Entering
zero means no keyframes which is not advisable. |
| |
| Premiere
plugin encoder |
| (plugin) |
 Not
enabled or an Adobe Premiere Plugin Not
enabled or an Adobe Premiere Plugin
Usually you will not use an Adobe Premiere Plugin for DivX
- choose "Not enabled". For Video CD or
Super Video CD the Cinema Craft Encoder providers
a better image quality and is sometimes even faster. The "Video
Server" is of use with TMPGEnc and CCE.
TMPGEnc however seems to be not superior to the
internal DVDx encoder. CCE is however faster and
produces excellent image quality - however as a plugin it does not
alwys work properly, the VideoServer is then needed. See Intro
to Videoservers for more info.

|
| Multi Pass |
 OFF
(so NO checkmark here!) OFF
(so NO checkmark here!)
Allow the audio and video to be read in 2 pass. You can use it if
you
encode with TMPGEnc and do a 2Pass VBR. UNCHECK this if you
do CBR or one pass VBR. I can't tell you to much about this - haven't
tried it. |


