|

| Print this page - use Landscape |
Search the WeetHet Pages |
|||||||||||||||||||||||||
| WeetHet is being updated! - Current articles will slowly move to www.tweaking4all.com For excellent webhosting that is reliable and affordable, we highly recommend: LiquidWeb |
||||||||||||||||||||||||||
Overview
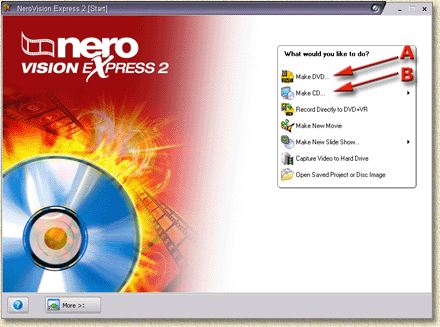
Before we can do anything, we will need to get our hands on Nero Vision Express 2 (NVE2). If you're going to make VideoCD's (VCD) only, then you're ready now as for the Nero part. Depending on the source files, you will need certain audio and video codec to be installed on your PC as well. A rule of thumb here: if you can playback the source files (using Windows Media Player), then you're fine. Starting Nero Vision Express 2 That's easy; look for the icon in the Windows START menu and click it: The following window will appear:
The two arrows (A and B) indicate which option to click to start making a DVD (A) or a VCD/SVCD (B). Click the text "Make DVD ...", and you'll see 2 options appear:
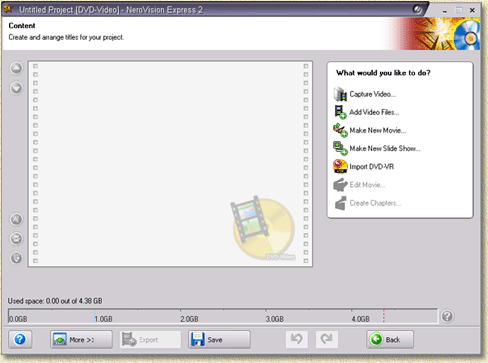
Click the option "DVD-Video". Note: The other option, "DVD Video (VR)", is an option I cannot recommend. It allows you to add/remove video fragments afterwards. However: most current DVD players do not like this format very much. Also: when deleting a scene from a DVD+VR, this scene will only be hidden from the user! Once you click the "DVD-Video" option, this window will appear:
Unfortunately, drag and drop didn't work with the version I was using. I assume that newer version will support this. Click "Add Video files". A file dialog will appear. The version I used supports the following file formats:
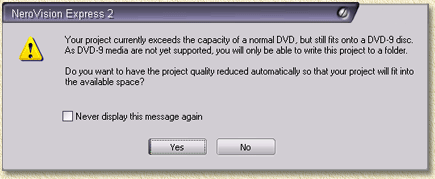
Note: You're not limited to adding only video files. Select the files you want to add and click "Open". The movie will now be imported. Now, it can happen that the files you selected will result in a too big a movie file for a DVD+R/DVD-R to hold. This message will tell you so:
If you didn't add too much, you might be able to fine tune the video bitrate a bit so the files WILL fit on a single DVD. If you click "Yes", Nero Vision Express 2 will try to do it for you. However it might not succeed in this and might show this message:
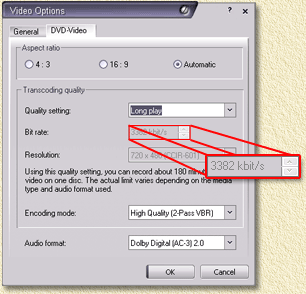
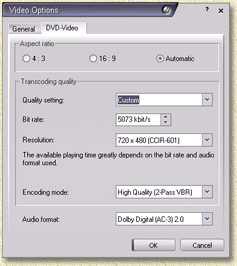
So what can we do to MAKE it fit? Click "OK" so the message goes away. Then click the "More" button (lower left corner): Now some additional buttons will appear, allowing you to fine tune the bitrate by clicking the "Video Options" button: In the upcoming window you can set the target TV system (USA: NTSC, Europe: PAL).
Before going any further: read the value in the "Bit rate:" field (popping out in the picture above, where is says 3382 kbit/s). NVE2 knows 6 predefined Quality settings: Automatic, High Quality, Standard Play, Long Play, Extended Play, Super Long Play and Custom. However your movies could not be squished in there using one of the default settings. Set the "Quality settings:" to "Custom".
You might have noticed that the bitrate went way up (5073 in this example - compared to the 3382 we saw before). Now we start our trial and error game: Start Optimizing: Enter a low value for bitrate, for example 2500. Click "OK". NVE2 will now ask if you want to use this as your default setting. Click "YES". NVE2 will now show you the space needed for burning the movie file(s). For example:
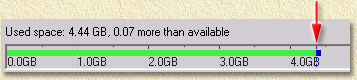
The thin dotted vertical line (just past the 4.0GB point) indicates the maximum you can burn. In this example we see that we're not yet optimally using the available space. Up/Down Optimizing: In case NVE2 shows you right away this screen: slightly increase the value. It's a good strategy to start out with a 500 kbit/s increase/decrease. Once a step fails, decrease the value to about in the middle between the highest successful value and the lowest failure value. So at 3000 it fails. The highest success value is 2500, the lowest failure value is 3000, so now try 2750. If that fails again, try a value in the middle between 2500 and 2750, say 2650. If it succeeds, try a little higher - again, somewhere in the middle between the highest success value and the lowest failed value. Note: NVE2 does not repeat the warning that a file doesn't fit once it's in the mode of "the movie is too big". The bar indicating the "used space" will help you out there. The green part of the bar is OK in the image below. However that little piece of blue is wrong. It's too big:
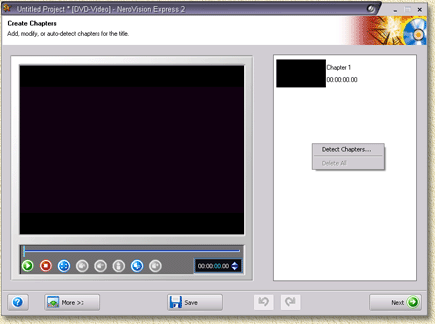
Note: If it fails at a value of 2500 kbit/s (or even below that value), I would recommend removing some of the movie file(s). Although it's optional, I highly recommend creating chapters! It will make watching the movie a lot more comfortable when you have to skip forward/backward during playback. You can create chapters yourself (takes some effort I guess) or have it done automatically by NVE2. Right click the movie file (in NVE2) and select "Create Chapters ..." from the popup menu. A new Window opens;
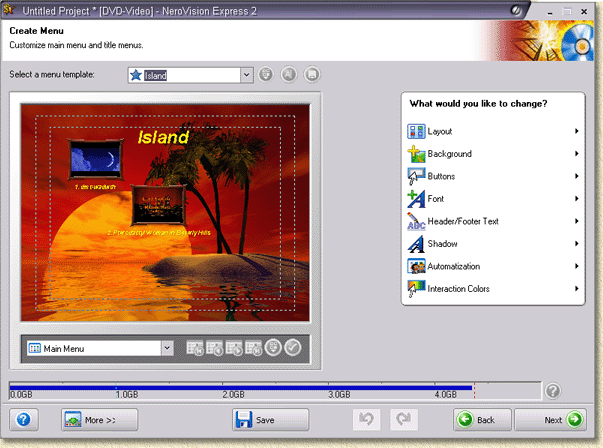
For automatic detection, right click the white area on the right and a popup menu will appear (as shown above). Select "Detect Chapters ...". Or: click the "Auto Detect" button: NVE2 will now start auto detecting "chapters". It will take a couple a minutes (depending on the CPU power your PC of course). Once it done, click "Generate" which will close this window. Now click "Next", and if needed repeat this step for other movie files. Note: It can happen that the chapters/menu's you just made will cause the DVD content to become to big again. In that case you will need to repeat the Fine tuning of bitrates. This will go a bit faster though: lower the bitrate about 20 kbit/s - usually that is sufficient to make it fit - unless you use animated menu's, which requires much more space. OK, so we have video, we have chapters, but we do not yet have a menu. Click the "Next" button. The menu-building window appears:
In this screen you can change quite some settings like background image, position and number of items, font, etc. Now go ahead an edit the menu and/or submenu's. Once you're done editing, click "Next".
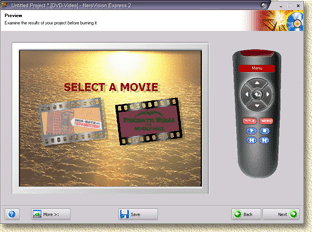
Tip: When double clicking a menu item, NVE2 will bring you to a screen where you can set TITLE and IMAGE for this scene or movie. So we now are ready to go and burn the DVD (or CD if you choose VCD or SVCD).
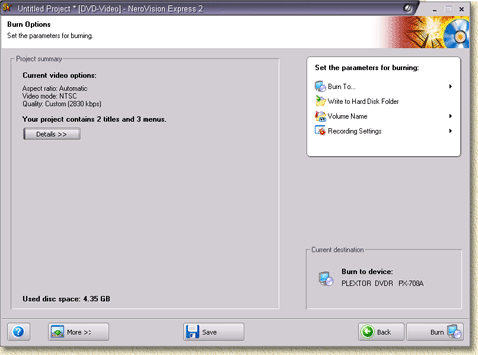
On this page we can do some settings for burning a DVD/CD. Optional you can write the DVD files to a hard disk folder (click "Write to Hard Disk Folder"). To set a volume name, click "Volume Name". To set recording speed, click "Recording Settings". Once everything is set, click the "Burn" button to start the actual burning process. This involves rendering of the main menu en the sub menu's, converting movies/pictures to MPEG2 for DVD, creating the required VOB/IFO/SUB files, and finally the writing to your DVD. This process takes a while. So if you want to start this a night, you can check the option "Shutdown Computer when Finished". That's all ... |
||||||||||||||||||||||||||