|

| Print this page - use Landscape |
Search the WeetHet Pages |
|||
| WeetHet is being updated! - Current articles will slowly move to www.tweaking4all.com For excellent webhosting that is reliable and affordable, we highly recommend: LiquidWeb |
||||
|
On this page ...
What do we need First of all, we need a TiVo. This article is based on a DirecTiVo series 2, that has been hacked using the OS 6.2 hack. Furthermore, we need network connection to the TiVo. So I'm assuming you're using an USB to Ethernet, an USB to wireless, a TiVonet card, or a Turbonet card with your TiVo (this all depends on the model of course). Advantage of using the Sleeper hack is that the proper files are already installed on your TiVo. We basically follow these steps:
Users of the Sleeper Hack do not really need this - since it comes with the hack (however: it doesn't hurt either). Visit the official tyTool homepage or the dealdatabase thread for
the latest version. Download the archive file and unzip the files (I'm assuming you're using TyTools10r4 - which can be found on the downloadspage). Depending on your TiVo, choose the right version of tserver! DirecTiVo's owners choose: TSERVER_Series2_MIPS. We will use FTP to send the files to your TiVo. You can use your favorite FTP program for that. Either use the FTP client build in Windows (not recommended, but it does work) or use a tool like FileZilla or LeechFTP (both a free FTP client). We assume that you decided to use FileZilla. Start FileZilla, enter the IP-Address you found in the field "Address:" and press "ENTER". Next (and DO NOT FORGET THIS!!!) we need to set the transfer mode to BINARY. If you FORGET to do this, executing the scripts will result in a "No such file or directory" error. FileZilla will instantly connect to your TiVo and show a list of folders on the right side ("Remote Site:"). Double click the "var" folder, and then double click the "hack" folder so you end up at a folder called "/var/hack" (just to keep things organized). As of this point, I assume you did too. (any other location will work too - just remember where you put it!) In the box called "Local Site:" you will see your local harddrive, browse through it to find where you extracted the TyTools10r4 files. Once you found the files in the box on the left (Local Site), and you opened the folder "/var/hack" in the box on the right (Remote Site), you can now drag the tserver file (the one suitable for your TiVo) there. Now we need to make the tserver file executable. Once you're done, you can close FileZilla. This step is required for all of you: Download
the TyTools. Again; I'mn asuming you're using TyTools10r4. Note: if you later on get a message saying "invalid attribute: TimeZone ..." then you're probably using an older version of tserver, consider upgrading to this new version! Unzip the archive. And you're done ... Easy ... I copied the files on my D: drive in a folder called TyTools (so D:\TyTools). Step 1: Start the tserver on your TiVo To be able to copy recoirdings from your TiVo to your PC we need communication. All the essential parts are in place we just need to "start" the TiVo application (tserver) and the PC application (TyTool) to get things going. Note: the configuration steps do not need to be repeated the next time you start TyTools. TyTools will save it's settings on exit. There are 3 ways of starting tserver on your TiVo - of which I strongly recommend method 1. Method 1: The easy way by using TyTools. You can start the server through a menu option in the TyTool GUI.
This method is really the easiest to use. To do this you will need to start the Windows part called TyTool (TyTool10r4.exe).
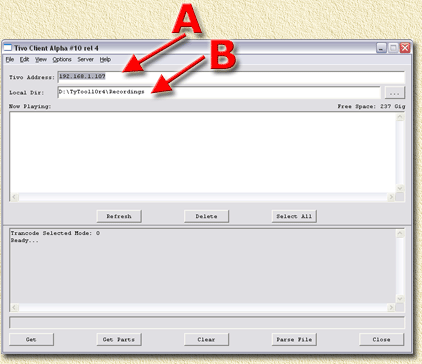
The first step we do is set IP Address (field A) and Download folder (field B). Click the menu "Options" - "Preferences". In the preferences window select "Server".
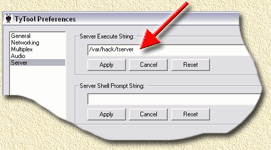
If tserver resides in /var/hack (as suggested earlier) then the command line should be: /var/hack/tserver The second field "Server Shell Prompt String" appears to be doing fine if we do not enter anything there - so leave it be for now. Click the "Close" button. Note: These steps do not need to be repeated everytime you start TyTool - on exit it will save these settings. Now and every next time, we can start the tserver by clicking the menu "Server" - "Start tserver".
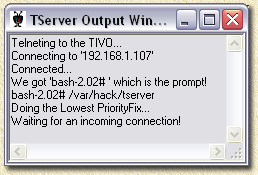
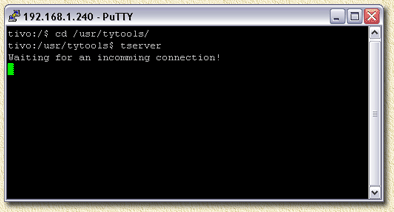
The text "Waiting for an incomming connection!" is showing: looks like the connection is good! In case you would like to stop tserver again, you use the menu "Server" - "Stop Server". Method 2: Manually by using a Telnet session. This method takes more work, but is in essence the same. Open a telnet session, using a telnet application, (for example PuTTY - see our Downloadspage) to your TiVo. In the shell go to the folder using "cd /var/hack/" (again aduming that you have the tserver file on your TiVo in /var/hack). Once connected start the server by typing in the shell (in the Telnet application): tserver (and press ENTER). Your TiVo will respond with: Waiting
for an incoming connection!
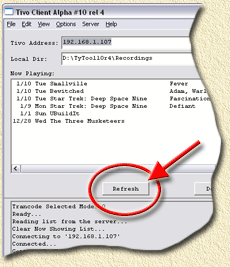
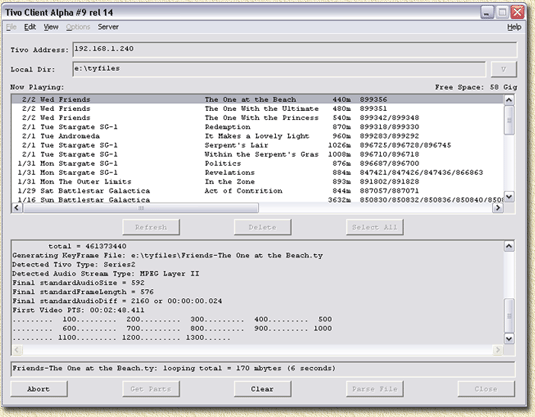
Just like with Method 1 you will need to start the TyTool on your PC as well. Stopping the tserver in the telnet window can be done by using CTRL+C or closing the telnet connection. Method 3: Have TiVo start tserver a boot time.. Since this method seems handy initially, people have reported issues with it. Step 2: Refresh - Get the Now Showing list Now click the "Refresh" button.
tyTool will now try to retrieve the "Now Showing"
data.
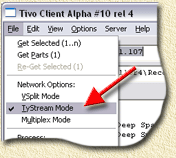
Step 3: Downloading the movies Before we can start downloading, make sure that the
tyTools (PC) is set to "TyStream Mode".
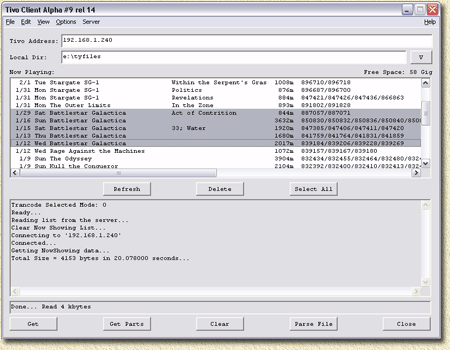
Now select the desired movies/episodes you want to copy.
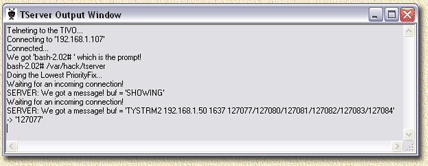
Selection of multiple files works in the usual Windows way. Once you made your selection, click the "Get" button. This will initiate the copying from the so called "ty files" (specific TiVo audio/video format) to your PC (to the folder you set previously). Depending on your connection speed, and the size of the recordings, this can take a while. The connection I use (wired, using an USB 2.0 adapter) takes 3 minutes to copy an episode of friends (including the commercial we do not want). During this download process, the "TServer Output window" will show something like this (similar output can be seen if you have chosen to use method 2):
Step 4: For the impatient - Playback on your PC of Ty-Files After copying these files, you can play them already on your PC. However your PC needs a bit of help there. You need to install the so called TyShow DirectShow filters, which can be downloaded from the TyShow project page or from our downloads page. Keep in mind that this is still in beta phase, but it works! And that's what counts. Extract the RAR archive (use WinRar), and place the files in a folder where you would like to keep them (don't move them around later!). Now double click the "register.bat" file, so the DirectShow filters will be registered. Note Next you open the downloaded Ty file with for example the Windows Media player or my favorite: the Media Player Classic. But you might also want to continue with the next few steps where you can simply create an MPEG movie of it in a few clicks without commercials ... Step 7: Getting rid of the commercials Since we do not care much for the commercials (although my friend Wally will have a different opinion), we would love to cut them out. And this is what we're about to do. From the "File" menu, select "Make Key File(s)". A new window appears. Select the file(s) you wish to process, and click the "Add" button. The selected file(s) will now appear in the "Files to Process:" part of the window. Now click the "Process" button. The window will close and the main window of tyTools will now show the progress:
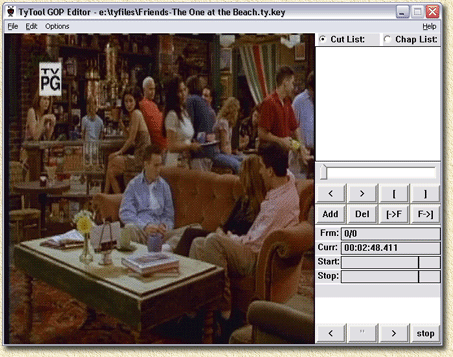
In general, this will take not much time, just a few minutes. Once this is done (indicated by a text like this: "Done with '<path>\<filename>.ty'..." at the bottom of the window) we click the "File" menu again, and now select "Edit Key File(s)". Again a new window will open. Just like before; Select the file(s) you wish to process, and click the "Add" button. The selected file(s) will now appear in the "Files to Process:" part of the window. Now click the "Process" button. After a second or two the so called "TyTool GOP Editor" will appear:
Use the (upper!) buttons "<" and ">" to move through the movie keyframe by keyframe. Holding your mouse button down will make it keep moving. Keep the "Ctrl" key pressed to jump in increments of 10 keyframes. The commercials need to marked with the "[" (start)
and "]" (stop) buttons. Once you marked a commercial area, click the "Add" button so it will be added to the "Cut List:". Repeat these steps until you filtered out all commercials. Once you're done, click the "File" menu and choose the option "Save Cut List", or press CTRL+S. (A popup might confirm this) Now click the "File" menu and select "Exit" (or press CTRL+X) to exit the GOP Editor. Step 8: Creating an MPEG or VOB files TyTools allows us to create either MPG files, or VOB files (for DVD). Option 1: Creating MPEG 2 files Select from the "File" menu the option "Multiplex File(s)". A new window appears (it should look very familiar
by now). Now click the "Process" button.
This will convert the ty-file to a regular MPEG2 file. This goes relatively fast, and will right away cut the indicated clips (i.e. the commercials) from your movie (if you marked them using the GOP Editor). These MPEG files are suitable to create an SVCD or DVD from. The SVCD's can be created relatively
simple using Nero Burning Rom. DVD's is a bit more tricky as you will need DVD authoring software like TMPGEnc DVD Author (recommended) or DVDLab. Option 2: Creating DVD files and menus If you want to create DVD's and you don't care too much about the navigation menu of the DVD, then TyTools helps you out here as well. Note however that tools like TMPGEnc DVD Author (recommended) or DVDLab are a lot more flexible! The process is similar to that of making MPEG 2 files. Select from the "File" menu the option "VOB-Mux File(s)". A new window appears (it should look very familiar
by now). Now click the "Process" button. The window will close and the main window of tyTools will now show the progress (as we have seen before). This will convert the ty-file to a regular VOB file. Again; This goes relatively fast, and will right away cut the indicated clips (i.e. the commercials) from your movie. The next step for building a DVD is to create the menu and merge all of it into proper IFO and VOB files. From the "File" menu select "Create IFO Files/Dirs". A new window will appear. Looks familiar again, doesn't it? Well here we select the VOB file(s) we created before,
which we would like to include our DVD. Select them and use the "Add"
button again to add them to the "Files to Process:"
box. Make sure you add all the VOB's you wish to have on this
DVD! A new window - for menu editing - will open:
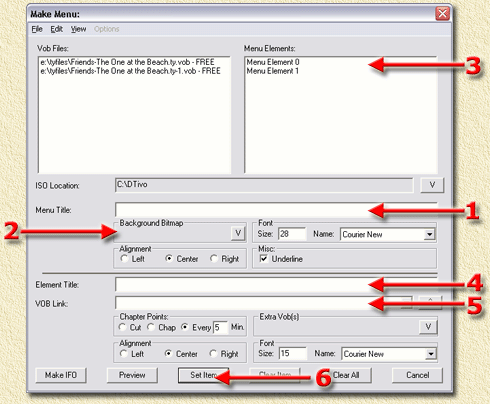
Follow these steps (you can play with the other options after doing these settings): CREATE THE MENU BASE In the field "Menu Title" (1)
you can enter a title for this menu. For example "My DVD 1" or "Friends
Episode 1-10" ... anything
you like. The options "Font", "Alignment", and "Misc" speak for them selves - it sets font characteristics for the menu title. CREATE THE MENU ITEMS Step 1: Select in the section "Menu Elements" (3) the first element. You will notice that in the "Element Title" field (4), the name of the selected element will appear. Enter the name you wish to see in your menu here. For example the movie or episode name. Step 2: From the "VOB Link" drop down box (5) you can select which VOB file is to be linked to this item. In the field "Chapter Points" you can set
the type of sub chapters you want. I'd recommend starting with every
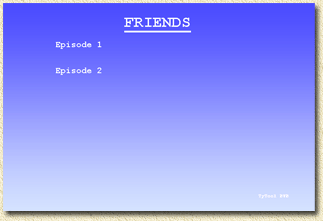
5 minutes. Step 3: Click the "Set Item" (6) button, so the settings you just made for this menu item are stored. You will see the item your selected in Step 1 change in the "Menu Elements" box. Repeat these 3 steps for all the items in the "Menu Elements" box. SET THE PROPER DESTINATION FOLDER Before we continue: set the destination folder for the DVD files by clicking the "V" button at the end of the "ISO Location" field. PREVIEW MENU TyTools offers the option to preview the menu you just made (limited edit options also limit creativity - but it works). Click the "Preview" button to see it (press a key or click a mouse button to make it disappear again):
CREATE THE FILES If you're happy with the menu, click "Make IFO". It will not take much time before tyTools reports "DVD successfully created!". To prevent you make a too big of a DVD, click in the menu "Edit' the option "Vob Size Report". TyTools uses DVDAuthor to render the files, so if you
encounter issues here: it will most likely be DVDAuthor that is causing
this. The resulting files can be found in the newly created "VIDEO_TS" folder. You can burn the DVD using Nero burning rom. In Nero, create a new "DVD VIDEO" (set media type to DVD first, then select VIDEO, click the "New" button). In the window that opens, copy the files from the VIDEO_TS folder you just made to the folder "VIDEO_TS" in Nero and burn it to DVD. |
||||