|

| Print this page - use Landscape |
Search the WeetHet Pages |
|||
| WeetHet is being updated! - Current articles will slowly move to www.tweaking4all.com For excellent webhosting that is reliable and affordable, we highly recommend: LiquidWeb |
||||
|
On this page...
OverView Normally, on a DVD with subtitles, subtitles are stored on DVD as separate video strips, i.e. images, that will be blend into the movie on playback. The advantage is that the DVD-player does not need a character generator to render the images. Also, the text will always remain in the same format as the publisher intended it to be. Downside is that, although not too much, these images take up more space than regular text files. Before we continue; it does not really matter if you first convert the VOB files to MPEG1, MPEG2 or DivX. You can do this afterwards as well. However, ripping the movie to harddisk will be very useful! Naturally we will need the FULL install of VobSub, as it comes with the proper tool to rip the subtitles. You can either download it from WeetHet or visit the VobSub homepage and get the most recent one. After downloading the FULL version, double click the EXE file. In case you downloaded the zipped file, then first unpack it using WinRar or WinZip.
Follow the steps as given by the setup program. If you have tools like VirtualDub, then please consider installing the plug ins for these too. If in doubt: make sure ALL options are checked! After installing VobSub, consider ripping the DVD to harddisk. This might sound difficult, but it really isn't. Depending on the VobSub version you have installed, a shortcut might be available in the Windows START menu (START - PROGRAMS - VOBSUB - VobSub Configure). Start this "VobSub Configure" application. If you do NOT have a shortcut, then open the Windows DOS box and go to the directory of VobSub (default C:\Program Files\VobSub) and type: rundll32.exe vobsub.dll,Configure Either the shortcut or the command line will initiate the VobSub configure tool.
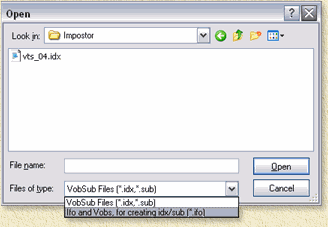
Click the "Open..." button, a file dialog will now open.
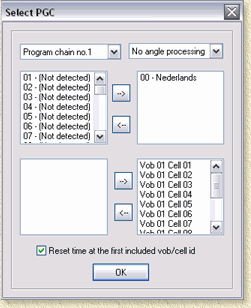
Set the "Files of type" to "IFO and VOBS, for creating IDX/SUB (*.IFO)" and browse to the directory holding the (ripped) DVD files. Usually just one IFO file appears. Select this file and click "Open" (or just double click the file). Then VobSub will ask you where to store the results. I usually do this in the same folder as the (ripped) DVD. Browse to that directory and click the "Make New Folder" button. A new subdirectory appears called "New Folder". Click it once with the left mouse button and press the F2-button. This allows you to rename the folder to something more useful, like say "rippedsubs". Click "OK" once you are satisfied with the selected directory. Now another popup appears, asking you to select a PGC (ProGram Chain) ... by default the settings are OK. Click "OK" to continue.
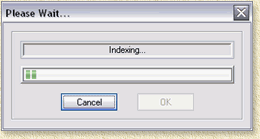
After that, VobSub start indexing the subtitles.
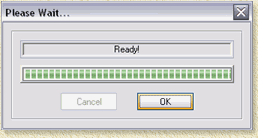
It may take a while for it to complete, this all depends on complexity of the DVD (amount of subtitles etc.) and the performance of your PC. On my laptop it takes a few minutes (a Sager 5660 - Pentium 4 @ 2.8 Ghz). After a minute or so, VobSub indicates that the subtitles have been indexed. Tip: in case you get a "Bad Header" error when ripping from ripped DVD files on your harddisk, then consider ripping them from the original DVD. Before doing so, make sure you playback the DVD with DVD software like PowerDVD first to unlock the disk!
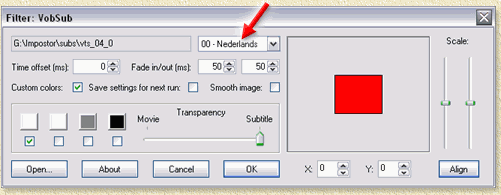
Now it's time for the next step: Creating subtitle files. Click the "OK" button shown in the image above, this window now appears:
First we must select the language you wish to rip, use the drop down list box indicated in the screen shot above, with a red arrow. You can play around with the colors, transparency and position of the subtitles, but for a first try I would leave these settings as they are. Click "OK" to start the copying process - depending again on complexity and your PC performance, this may take a few seconds up to minutes. Once finished, the VobSub window disappears. VobSub will have created 3 new files in the directory you indicated before. These files are named like your ifo file, for instance in our case: vts_01_0.ifo Note: The IFO file is not always included! Rename these 2 or 3 files so that
they have the same name as your AVI file. MYMOVIE.IFO Optionally, you can use WinRar to compress the SUB file. Note: Compressed subtitles (compressed MYMOVIE.SUB to MYMOVIE.RAR) ocassionally causes problems. First of all you will need the proper version of UNRAR.DLL which you can download from the WinRar Website. Extract the EXE and copy the UNRAL.DLL into the C:\WINDOWS\SYSTEM (Windows 9x) or C:\WINDOWS\SYSTEM32 (Windows XP) or C:\WINNT\SYSTEM32 (Windows NT/Windows 2000). Now copy these 2 or 3 files into the same directory as you AVI file and test the movie to see if the subtitles display OK. It does make sense to watch the entire movie, as using Fast Forward in a DivX movie might cause the subs to either stop or run out of sync. As you might have noticed, ripping a subtitle like this is pretty easy and pretty fast :-). |
||||