Welcome to WeetHet!


Managed Web Hosting by Liquid Web

Your IP address:
44.200.168.16
     
 
Print this page
- use Landscape
Search the
WeetHet Pages
WeetHet is being updated! - Current articles will slowly move to www.tweaking4all.com
For excellent webhosting that is reliable and affordable, we highly recommend: LiquidWeb

On this page...

Ulead DVD Pictureshow

DVD PictureShow by Ulead is a very nice and easy to use application to create a VideoCD or DVD holding your photo's (either made with a digital camera or scanned).

In this short guide I'll show you how to create your own Photo-VideoCD or Photo-DVD, which you can playback on your PC and on most standalone DVD-players.

Note: not all DVD players are capable of playing VideoCD.

Note: Read the disclaimer first!

You can download a trail version (limited number of albums and a limited number of photo's per album) at the ULead website. The application is pretty cheap, something like $39.

DVD Pictureshow: Creating your own Photo-VideoCD or DVD
Save your digital photo's

Page overview

Step 1: Have the photo files ready

Naturally one needs photo's to be able to add them to a VideoCD or DVD.

For photo's you can use basically any common file format, like: GIF, BMP, JPEG (also the new JPEG 2000 format!), TIFF , PSD and PNG.

If you want to combine it with video fragments then you're on the wrong page. DVD PictureShow is not supporting movies. You can create a similar disc with for example Nero, see "Photo VideoCD with Nero" for details.

Step 2: Start the application

INSTALL DVD PICTURESHOW

If you haven't installed the application yet, then do so now.

For those who'd rather test the application first, download a trial version at the Ulead's website and finally install the application. The trial version is limited in the number of albums and the number of photo's per album, but it will give you a good impression on what is and what isn't possible.

START THE APPLICATION

After installing, the application should be available in your Windows START-menu. Click "Start" - "Programs" - "Ulead DVD PictureShow" and finally click "Ulead DVD PictureShow".

The first window that appears let's you choose if you would like to create a "VCD 2.0" (VideoCD) or "DVD".

COMPATIBILITY

  • Choose VCD 2.0 if:
    If you do not have a DVD-writer or if you plan to write the photo's on a CDR or CDRW, then please select "VCD 2.0", since the result of a DVD burned on a regular CDR or CDRW is very likely not compatible with your standalone DVD player.
    Capacity: VideoCD allows a maximum of 1900 photo's on it. This does not mean that this much images will fit the CD, it's just a limitation of the specification of VideoCD.

  • Choose DVD if:
    If you do have a DVD-writer and plan to write a DVD (-R, -RW, +R, +RW), rather go for "DVD" as you may experience similar problems as seen burning DVD's on a CDR or CDRW. I haven't had the chance to really test this since I do not own a DVD-writer (anyone donate one?).
    Capacity: DVD allows a whopping maximum of 9801 photo's on a single disc. Once again - this does not mean that this many will actually fit - it's specification limitation!

TV-SYSTEM and other PREFERENCES

In the lower right corner you see a "Menu" button. Click it once with the left mouse button. A popup menu will appear showing you several options, the first being "Preferences" - click it.

This little dialog window shown below now appears. You can copy these settings and click "OK".

The settings shown above are pretty safe settings for users that live in Europe (PAL). Residents of the USA should copy the same settings but check NTSC instead of PAL.

Note: PAL uses a higher resolution and therefor a slightly better image quality.

Ulead DVD Pictureshow preferences
(these settings match the settings for Europe)

PREFERENCES IN DETAILS

Note: it's safe to skip this section and continue to the next ... it's for reference only.

  • TV-System:
    This is used to set the resolution properly for the target TV-system (Europe: PAL, USA: NTSC). Secam users should check PAL.
    Note: most DVD players are capable of playing either formats. Most modern TV-sets can handle both PAL and NTSC.

  • Fit into title safe area:
    Allows you to specify a title safe margin. This is the margin between thumbnail and title text of that particular thumbnail. For the title safe area, as a guideline for different devices, use 12% for NTSC and 10% for PAL.

  • Apply anti-flickering filter:
    Reduces "interlace" flickering, always check this option as it will improve picture quality when displayed on a TV.

  • VCD Player Compliant:
    Check this if you are experiencing trouble with your DVD/VCD player. DVD PictureShow will now use the so called Constant Bitrate (CBR) as defined in the VideoCD standard. If not checked a variable bitrate (VBR) which some DVD/VCD players cannot handle in VCD mode.
    If you plan to add music - this option will limit the capacity of the disc to 70 minutes of playback time! So consider switching it off for that purpose.

Don't forget to click the "OK" button once you're done customizing your settings.

Step 3: Creating Albums and adding Photo's

After you choose either "VCD 2.0" or "DVD" and maybe did some "Preferences" changes, it's now time to actually build your Photo-VideoCD or DVD. Click the "Next" button to get to the "Create slide show" window.

Ulead DVD PictureShow: Create slideshow window

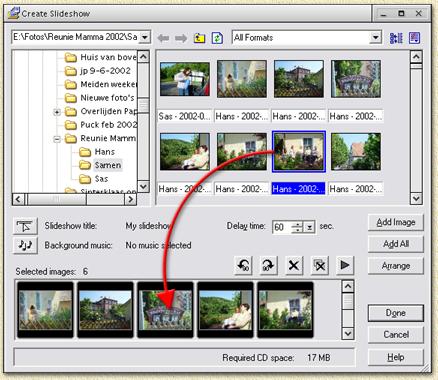
Before we can do anything, you will have to set the source of your pictures first. Usually you get the photo's from files, so make sure the dropdownlist, left from the "Add Slideshow..." button shows "Images from File". Finally click "Add Slideshow..." in order to create your first album of this disc.

A new window appears, allowing you to add individual photo's to an album (naturally, the "Selected images:" bar will be empty at first). This can be done using drag and drop as shown with the red arrow in the image below. Optionally you can select each image one by one and click "Add Image" (double click an image works too!), or add all images in one go by clicking"Add All". The "Arrange" button opens a new window that allows you to modify the order using drag and drop.

Ulead DVD Pictureshow: Add photo's to an album

Tip: You can maximize this window, so you will be able to see more thumbnails. This can be done by clicking the "Maximize" icon or simply by double clicking the title bar (where it says "Create Slideshow").

The screen is basically divided in 3 active areas (A, B and C) and a button area:

Ulead DVD Pictureshow: area's of the window

AREA A:
In this area, you can select the folder that is holding you picture files. Navigation is similar to the navigation you use in Windows Explorer, so that should look familiar.

AREA B:
Will show you the content (i.e.. images) found in the folder you selected in Area A. The images shown can be dragged to the lower part ("Selected images:") of area C.

Area C:
Shows you the pictures you already did add to your slide show, including the options one can set. Here you will find also the additional options:

Option / Button Purpose
Edit title ...
Edit the title of this current album.
Tip: Multi line titles can be done by pressing CTRL+ENTER at the end of each line.
Add music ...
Allows you to add a sound-track to this album. It will be played during playback of the slide show of this album. Supported file formats are WAV, MP3 and MPA. You cannot add audio tracks from an audio CD - you will need to rip it first (see: How to rip to MP3 or How to rip to WAV using Nero).
Delay time
Determines the time each image is displayed when the slide show is played in seconds.
Rotate selected slide left
Rotate image, selected in "Selected Images:" 90 degrees to the left.
Rotate selected slide right
Rotate image, selected in "Selected Images:" 90 degrees to the right.
Remove selected slide
Remove image, selected in "Selected Images:", from the slide show.
Remove all slides
Remove all images from the slide show.
Play selected slide
Play image from the "Selected Images:". Clicking it again will stop playback. Playback will also stop when the "Delay time" has past.


Once you completed this album you can click "Done" and return to the previous screen where you can add more albums by clicking the "Add Slideshow..." button.

An already made album can be opened again by double clicking it in the "Slideshow list".

Tip: In most windows, you will see the amount of Mb used for this CD. For a regular 74 minute CD, 740 Mb will be the max, for a 80 minute CD 810 Mb will be the max. I don't know the max for DVD's ...

Step 4: Define menu layout

So you're done creating albums? OK, click the "Next" button so we can do some theme settings for the menu.

Ulead DVD Pictureshow: Set your favorite menu theme

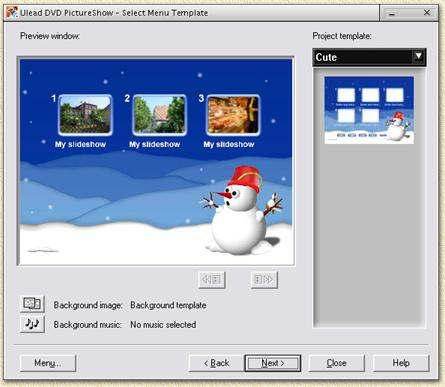
PREDEFINED TEMPLATES

Here we can set the layout of the menus. Below "Project Template" you can select the layout you would like. The drop down box will show you available themes, like "Cool", "Classic", "Business", etc.

In the scrollbar below that you will see thumbnail examples how they look like. Double click the one you like and it will instantly be applied.

CUSTOM BACKGROUND IMAGE and MUZAK

Naturally, the predefined themes are very cool, but most of us prefer their own background image. This can be done by clicking
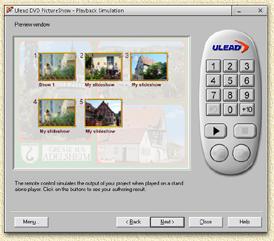
 the Add a new background to your menubutton.

You can also have a background music here. Click to select the soundtrack you want to use. Here we can use WAV, MP3 or MPA format only as seen before.

Tip: for vacation trips I usually buy a really nice postcard and scan that into my computer. Then I make the postcard very light (increase brightness and decrease contrast) as a background.

PREVIEW RESULT

When you've finished the details on the theme, you can now click "Next" and take a look at the preview.

Ulead DVD Pictureshow: Preview the result ...

The remote control on the left allows you navigate (unfortunately some buttons like "skip" etc are missing) your show to see how it will show on a TV.

Click "Next" if you're satisfied, or click "Back" to return to the theme page.

Step 5: Burn that puppy

OUTPUT SETTINGS

We now arrived at the "Output settings" window where we do some final preparations before burning this CD.

Ulead DVD PictureShow: Output settings ...

Item
Purpose
Setting
Output and working folder
Location where Ulead DVD Pictureshow will "render" the CD or DVD image. The value below the input field shows you the amount of disk space needed for this particular DVD or CD (here: almost 600 Mb).
Any disk or folder that has enough space.
Drive
Select your DVD or CD recorder (normally this is selected automatically)
automatically
Recording speed
Burning speed. You can set it to Max if you have burned CD successfully before on this PC at Max speed. Otherwise select a lower value.
Max
Performing writing test
The burn process will be simulated in order to see if speed settings are OK. The CDR/CDRW/DVD will not be written on.
uncheck
Burn-proof disc protection
Depends on your CD-writer, some do other don't support buffer under run protection (Burn Proof is one of them).
check
Disc label
Label of your CD or DVD. Usually a name that either makes sense or is part of a sequence.
title
Copy original image files to disc
This option allows you to save the pictures, additionally, in the original high-res file format. This way the images are stored on the VideoCD or DVD and can later be used for making hardcopy.
Note: if this option is not available, then you might want to check Ulead for an update!
check
Use Joliet file system for VCD
This option allows you to use large filename - for example in the photo filenames that are stored in a separate folder.
check

Now click "Next" to continue.

In the now upcoming window you will have to make sure "Record to CD:" (or "Record to DVD:" for DVD) is checked. Optionally you could use the option to write to image file ("create image file").

Note: if you're writing to a CDRW, it can be usefull to use the "Erase CD" button for cleaning out the CDRW.

Now click the button "Create VCD" (or "Create DVD" for DVD). PictureShow will now render the CD-image. After that, the CD-writer or DVD-writer will burning the CD or DVD. Just be patient :)

After the CD has been completely burned, you can try it on your PC using DVD playback software, or play it on your standalone DVD player to see if it all works.

Tip: You will need a capable DVD playback program to play this CD! Some DVD playback programs do not even support this format!

Don't forget: a copy of the original image files are stored in a folder on the CD - if you check the proper option.


Klik hier om te wisselen naar nederlandstalige pagina's You are currently on the English pages.
Help & AboutWelcome ... !!GuestbookWeetHet HelpGlossary ...Searching the InternetSearching WeetHetAvailable downloadsNews & UpdatesStatisticsDisclaimer!AdvertisingJoin us !!!AwardsAbout WeetHet ...Hansie goes USAWhere is Hansie?First monthsMy new homeGoing outPuck goes USAMy new carSnapshots PuckRandom snapshotsFinally: Spring!Nice warm summerFirst Family visit!CD's and DVD'sMusicAudio-DVD to MP3Music CD to MP3Music CD to WAVCopy Music CDYour own Music CDMusic from the InternetChanging MP3 VolumeNero Burning RomBurn BIN/CUE filesConvert BIN to ISOComputer CDRomBurn ISO filesPhoto VCDPhoto SVCDNero vs Nero ExpressNRG to ISOBurn SVCDSVCD with menuBurn VCDVCD with menuDVD VideoWhat are RegionCodes?What is MacroVision?Video formatsDIKO: 3 AVIs - 1 DVDHow does a CD work?How to burn a CDCreating a DVDConvert BIN to ISONRG to ISOCreating a disk catalogComputer InfoHow does a CD work?Netiquette: E-MailWhat is DivX?What is MP3?What is RAID?What is USB?What are PAR files?Wireless LAN introPC to TV cablesStart XP fasterBoot from USB driveFireWire connect 2 PC'sPhoto SizingGraphics / PhotosPhotoshopPhoto SizingFast car3D buttonsDraw lightningPhotos on CDPictureToTVVideoCD with NeroSVCD with NeroMagix Pictures on CDDVD PictureShowPhoto SizingPhoto SizingGSM / PDAsCompaq iPAQReplace batterySerial craddle to USBGarmin eTrex cableGarmin eTrex plugRound Garmin plugPalmPilotConnect Ericsson GSMGarmin eTrex GPSMobile phonesEricsson RingtonesMusicBoxRingtonesMasterA edit SIMSMSC numbersConnector pinoutsHardware & HacksOverclocking CPU'sGenericAMD CPU codesAMD Slot-AAMD Socket-AProgr. SmartcardsMillenniumAlcatel HackLCD display to PCNetwork cablesBoot from USB drivePC to TV cablesPromise Ultra -> RAIDSoundblaster MIDIResistor colorcodeFireWire NetworkInternetNetwork genericEnabling DHCPWin95/98/ME ClientWin2000/XP ClientMac OS 7/8 ClientMac OS X ClientWell known IP-portsDNS addressesNetwork cablesWireless LAN IntroFireWire NetworkDialup connectionTCP/IP optimized for Win9xPublic IP Address?ADSL / MxStreamADSL in generalHow ADSL worksDNS addressesMXStreamInstallingPSTN EthernetISDN EthernetRouter for MXStreamSMC 7404 WBRA/BeTech ModemRoutereTech RouterSitecom 4S routerVigor 2200E routerSolving problemsAlcatel HackHack the modemPassword CalculatorPurpose of the LEDsSolving problemsFirmware upgradeDNS addressesWell known IP-portsMapping PortsAutoPortMappingConnection sharingPossibilitiesWinRoute (software)Network Win95/98/MENetwork Win2000/XPNetwork Mac OS 7/8Network Mac OS XWell known IP-portsWireless LAN IntroNetwork cablesRoutersSMC 7404 WBRA/BeTech ModemRoutereTech RouterSitecom 4S routerVigor 2200E routerInternet by SatelliteHow does it work?Brief intro ...Overview variantsStandardBySky methodTwo-Way InternetInstalling cardsWhich satellite-card?PC requirementsHarmonic CyberstreamPentam. Pent@VisionHauppauge DVBs NexusTechnotrend PCLineEOL problemsNew driversMounting a dish (Astra)Dish size?EON ChecklistTransponders EOLRamdisk for FazztYour own webpageNavigation solutionsInsight and solutionsApyCom apPopupMenuD.Binard PopupMenuPopupMenu generatorPopupMenu flatTips and TricksE-Mail linkE-Mail FORMBookmark this pageIcon for my webpage'Page back' link?Jumping within a pageEscape from framesUse frametitleControlling framesAuto redirectFixing 100% problemChange link colorText in the statusbarFixed backgroundText over imagesBrowser safe colorsUsing the .htaccess fileSpecial charactersWhere to downloadIRC using mIRCInstalling mIRCDownload Movies etcFAQMovies from InternetMovie QualityWhat are PAR files?LeechGuyLeechGuy editoreMuleWinMXE-MailNetiquetteQuote of the dayMiscellaniousHack Arescom NetDSLWireless LAN IntroFireWire NetworkWell known IP-portsWhat is my IP Address?Search (WeetHet)Searching (Internet)WeetHet DownloadsA few great websitesDNS addressesMicroControllersBasic Stamp IIStarting with the BS2Assembling the kitFullsize scematicsConnection to your PCBS2 to 44780 LCD44780 LCD SnapshotsBS2 to M50530 LCDM50530 SnapshotsHomebrew BS2Smartcards/SIMProgrammer Softw.CardMasterInfinityUSBMasterBurnerMilleniumCard TypesEdit GSM SIMResistor colorcodeMusic / AudioMusic from InternetIntroductionLeechGuyLeechGuy editorWinMXeMuleUsing mIRCBurn BIN/CUE filesConvert BIN to ISOAudio-DVD to MP3How does a CD work?Copy music CDYour own music CDWhat is MP3?Music CD to MP3MP3 CD for Yamakawa?Changing MP3 VolumeMusic CD to WAVSB MIDI interfaceAC3 to WAV/MP3ProgrammingBorland DelphiHansies Delphi ToolsAYeah!CatalogQuote of the dayPopupMenu generatorOverview ASCII chars.Satellite (TV & GPS)Satellite TelevionSatellite TV on the PCTV reception on your PCPC requirementsNew driversPentam. Pent@VisionHauppauge DVBs NexusTechnoTrend PCLinePVA file to MPEG2DirecTV TiVoRemote ControlDirecTiVo to OS6.21: Intro & Images2: TiVo disk in PC3: Install OS 6.24: OS6.2 first start5: SuperPatch & More6: Recordings to PCTyTools - Movies to PCOld: DirecTiVo to OS4Old: Sleeper HackSmartcardsProgrammer Softw.CardMasterInfinityUSBMasterBurnerMilleniumCard TypesWhat is DiSEqC?Mounting a dish (Astra)Dish sizeSRT8000 firmwareGPS NavigationGarmin eTrexDiagnostic modeSerial connectionConnect to iPAQ 36/38xxConnect to PalmPilotThe eTrex connectorThe round connectorHow GPS worksGeoCaching explained ...Internet by SatelliteHow does it work?Brief intro ...Overview variantsStandardBySky methodTwo-Way InternetInstalling cardsWhich satellite-card?PC requirementsHarmonic CyberstreamPentam. Pent@VisionHauppauge DVBs NexusTechnotrend PCLineEOL problemsNew driversMounting a dish (Astra)Dish size?EON ChecklistTransponders EOLRamdisk for FazztVideoVideo guide - start hereIntroductionGSpot: AVI InfoDIKO: 3 AVIs - 1 DVDDownload QualityVideo in generalWhat is DivX?Video formatsRecording TypesWhich AVI codecs?Intro K(S)VCD/KDVDDVD+RW IssuesAbout bitratesVideoServer pluginWhat are RegionCodes?What is MacroVision?RippingAudio-DVD to MP3Photo SizingAVI to MPEGGSpot: AVI InfoDIKO: 3 AVIs - 1 DVDAVI to DVD/(S)VCDWithout SubsD.I.K.O.MainConcept (S)VCDNero Vision Express 2TMPGEnc (S)VCDTMPGEnc K(S)VCDTMPGEnc with AC3With SubTitlesD.I.K.O.MainConcept (S)VCDNero Vision Express 2TMPGEnc (S)VCDTMPGEnc K(S)VCDTMPGEnc with AC3Burning CD NeroBurn VCDVCD with menuBurn SVCDSVCD with menuBurn BIN/CUE filesDVD PlayersCompatibilityAdd DVD playerDVD+RW IssuesIntro K(S)VCD/KDVDVideo ToolsBitrate CalulatorDVD RippingGSpot: AVI InfoFlaskMPEG and CCEVideoServer pluginDVD to DivXIntroductionCalculating bitratesRippingDVDx and SmartRipperDVDx settingsFlaskMPEG method 1FlaskMPEG method 2FlaskMPEG method 3DVD to (S)VCDIntroductionCalculating bitratesRippingDVDx and SmartRipperDVDx settingsFlaskMPEG 0.6 and CCEDVDx and Video ServerDivX to (S)VCDDVD to DVDDVD2OneDVDShrinkDVD+RW IssuesTMPGEnc & CoDIKO: 3 AVIs - 1 DVDMovie Cut & PasteGSpot: AVI InfoMergingMPEG1 and MPEG2Using TMPGEncWomble MPEG2VCRAVI with VirtualDubCuttingNewWith TMPGEncWomble MPEG2VCREasy Video SplitterAVI en DIVXAVI with VirtualDubEasy Video SplitterMovies from InternetIntroductionLeechGuyLeechGuy editoreMuleWinMXUsing mIRCWhat are PAR files?Burn BIN/CUE filesConvert BIN to ISOPictures on CDPictureToTVVideoCD with NeroSVCD with NeroMagix Pictures on CDDVD PictureShowRipping SubtitlesVobsub: fast and easy!SubRip (OCR)Sync subtitlesDisplaying subtitlesDisplaying with VobSubSync subtitlesCreate a MicroDVDPC connected to TVPC to TV cablesATI softwarenVidia softwareTiVo - Harddisk VCRTiVo Series 1What is a TiVo?Opening a TiVoSerial accessDebug Mode accessLinux Bash shellSet the clockDisable dialupDirecTV TiVoRemote ControlDirecTiVo to OS6.21: Intro & Images2: TiVo disk in PC3: Install OS 6.24: OS6.2 first start5: SuperPatch & More6: Recordings to PCTyTools - Movies to PCOld: DirecTiVo to OS4Old: Sleeper HackYamakawa 713/715IntroductionFAQThe Remote ControlSecret codesSet regioncodeSet regionfreeDisable MacroVisionFactory-settingsWhich DVDRom driveFirmware versionChange firmwareDownload firmwareChange backgroundCreate MP3 CDM.U.F.Y. MP3 CD'sHelpForumSearch (WeetHet)Search (Internet)News & UpdatesGlossary ...DownloadsLinksStatisticsAdvertisingJoin us !!!Guestbook

Liquid Web Fully Managed Web Hosting