|

| Print this page - use Landscape |
Search the WeetHet Pages |
||||||||||||||
| WeetHet is being updated! - Current articles will slowly move to www.tweaking4all.com For excellent webhosting that is reliable and affordable, we highly recommend: LiquidWeb |
|||||||||||||||
|
On this page ...
Note: The screenshots used on this page are made on a Windows XP PC, using Nero version 5.5.6.9 Depending on the Windows version and Nero version, the images on your PC might be different! Note: Read the disclaimer first! Copying music CD's may be illegal! Overview
Step 1: Insert the music CD into the CD-/DVD-Rom player To make your first start a bit easier, start with inserting a music CD in a CD-player of your PC. This can be the CD-writer, a regular CD-Rom player or a DVD-player. This way, your first "rip" (copying the audio tracks) will be easier since Nero instantly knows the CD. Step 2: Install (if needed) and start Nero If you just downloaded the trial version of Nero, then
you must install it first. Double click the file you just downloaded.
The file is called "NEROabcd.EXE" where
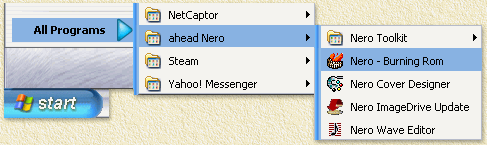
"abcd" indicates the version number of Nero. After installation, we start Nero. Nero is to be found in the start menu at the item "Ahead Nero". Click the Windows "START" button, select "Programms", select "Ahead Nero" and finally click "Nero - Burning Rom". Nero will now start, in case you have a CD or DVD writer, Nero will show you that it found a device capable of writing either of them (in the lower right corner - see second screenshot below).
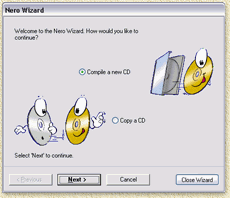
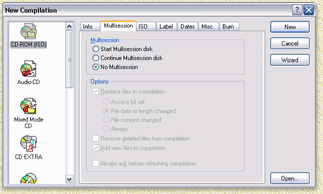
Nero usually starts out with the Wizard (screenshot 1) or the "New Compilation" (screenshot 2) window. Close either windows by clicking the button "Cancel".
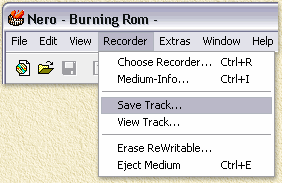
Step 3: Select the proper CD-player Go to the menu "Recorder" and click the option "Save Track...".
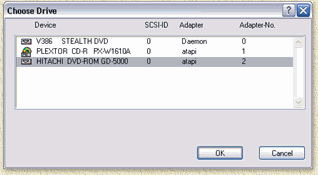
There now appears a window, asking you which CD-player Nero should use, if you have more than one CD-Rom player. On my PC:
Here you see that my PC knwos 3 CD-players. The "V386 Stealth DVD" (a free and excellent virtual CD player, download at CD Daemon), a"Plextor CD-R PX-W1610A" (the CD-writer - you can recognize this beacuse of the "CD-R" text) and a "Hitachi DVD-ROM GD-5000" (my DVD player). Now click once on the CD-player you are about to use - this is the CD-player where you inserted the music CD, and click the "OK" button. Step 4: The CD (Internet) Database Nero will now start to analyse the CD you have in the CD-player:
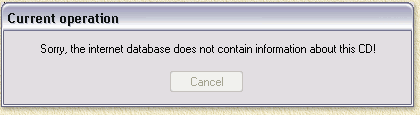
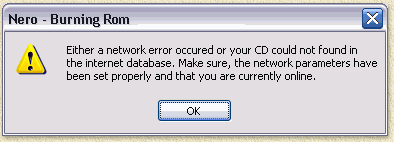
Pretty quick, Nero is finished analysing the CD and will show the CD-Database window. Here you can create a databse of your own CD collection, or get the CD author, titles etc. from the Internet. Information of this CD can be retrieved of a so called CDDB - a very large CD-content database. This can save you a lot of time, typing the titles of songs etc. This data - if available for the CD you have - is being used for generating filenames for your WAV's in the format "band - title.wav" instead of "Track01.wav". So suppose you have the CD of "Anne Clark" and the song you are about to copy is called "Shades", your WAV will be called "Anne Clark - Shades.wav". Which can save you a lot of time later on when looking for that particular song in your WAV collection. Caution: Nero will close this window automatically after a predefined time! So now you have to make a choice. Do I want to retrieve data from the Internet? If the answer is YES, then click the "Access Internet Database" button. Nero will contact the Internet to see if this is a known CD. If Nero does find your CD in the CDDB database on the Internet, it will show the found title(s) in the upperpart of the window. Now click the diserd title and next click the "Selected CD" button to use this data. If the answer is NO, click the "Cancel" button (or wait for Nero to close the window) and continue with Step 5. The unknown CD - OPTIONAL! THIS STEP IS ONLY RELEVANT IN CASE YOUR CD CANNOT BE FOUND ON THE INTERNET DATABASE! It is very well possible that the CD you have can't be found on the Internet yet. These two messages will appear:
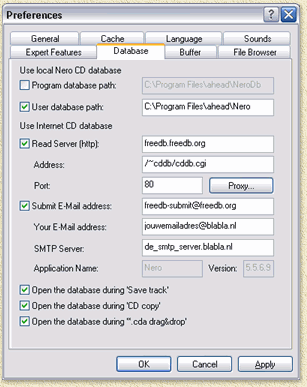
You now have the option to create your own database. Incase you have an original CD, you migh consider sharing the information on this CD with others by uploading the data to the Internet Database. Thousands have done this before you - which is why the database is available. Your contribution is also welcome. You don't have to, but it would be nice. Unfortunally, this requires some qork on your side - which is for most user too much work (unfortunally). To be able to add the CD to the Internet database, you will need to close all windows, so you get back to the basic window of Nero. Now choose "File" - "Preferences" and click the tab "Database". You will see a similar window:
You will need to complete these fields:
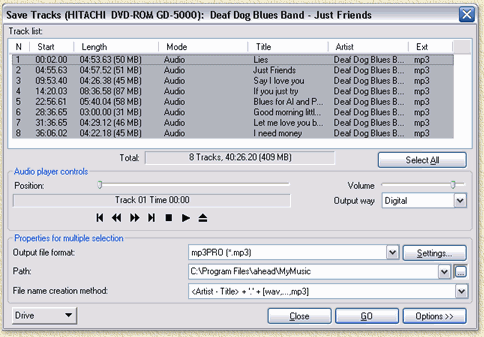
Now click the "Apply' button and the "OK" button. Go back to Step 3. Once you are back at Step 4, you will need to enter the CD data. Try to be acurate and enter as much data as possible. Typo's and titles like "Unknown" or "CD number 10 of Hans' collection" are not usefull to anyone. Step 5: Select the desired songs In this example I use the CD of the "Deaf Dog Blues Band" (Hi Ton!), which is the CD I inserted into my CD-Romplayer, After clicking the "Selected CD" button, as described in Step 4, the following window will appear. In this window all songs of that particular CD are displayed and selected.
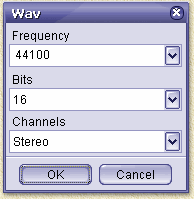
Now you can selecteer the songs you would like to convert to an WAV, using the left mouse button (or click the "Select All" button if you want them all). When selecting 2 or more songs, keep the CTRL toets pressed while selecting your songs. Windows explorer works in a similar fashion. Step 6: Setting the WAV properties At the field "Output file format:" you can set the desired output format. By default it is set to "PCM Wav file (*.WAV)". Now click the button "Settings..." for detailed settings - the default settings are not good enough for us.
Click the "OK" button. Step 7: Where to store your WAV's? Now you're back in the "Save Track"
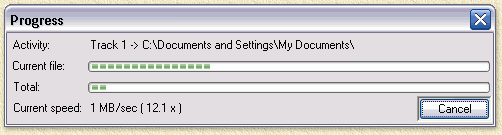
window. If you think you've done everything the way you want it, then click the "GO" button. Nero will now start copying the tracks - while converting them to WAV - to your PC:
The upper progressbar indicates the progress for the current sound-track, the lower progressbar indicates the total progress of the ripping and converting process. Depending on the speed of your PC, the amount of memory and the speed of the CD-player,... it's different for each PC. As soon as the "Progress" window disappears, you can click the "Close" button to quit ripping. If you do not want to quit, and want to rip the next CD, then follow these steps:
|
|||||||||||||||