|

| Print this page - use Landscape |
Search the WeetHet Pages |
||||||||||||||||||||||||||||||||||||
| WeetHet is being updated! - Current articles will slowly move to www.tweaking4all.com For excellent webhosting that is reliable and affordable, we highly recommend: LiquidWeb |
|||||||||||||||||||||||||||||||||||||
|
On this page ...
Before you start with this page, make sure your ADSL
connection is up and running. This page only deals with sharing the connection!
Note: if you do not wish to purchase WinRoute and/or your server PC is a really old one (i.e. 386 etc.) then you might consider the one floppy-server-router linux distribution called FloppyFW for MXStream. The server does not even need a harddisk and it's FREE! Note: Another good alternative is hacking the Alcatel modem or buying a Router. Note: WinRoute is not the only software router around, there are other, however I prefer WinRoute because it does not need client software and is very stable! Update: Tiny Software is no longer distributing WinRoute, Kerio is doing this. TIP: WinRoute could cause issues with Windows XP. Overview
Note: Before you start; I assume you are going to use Variant 3, differences for Variant 2 are indicated separately. Kerio Software - the creators of WinRoute - offer a free 30 trail version which can be downloaded from their website. Click the "Try it!" button to start downloading (I used the WinRoute Pro version). After downloading you can double click the file "WRP41EN.EXE",
which initiates the setup. The file name might be different in the future
since this reflects the WinRoute Pro 4.1 build 25. Since we are busy anyway, we might as well give the
server PC an fixed IP-address. Since we are going to be using the 192.168.1.x-ip-range
I suggest we give the server the IP-address 192.168.1.1. This can be done
by opening the "properties" of the "Network Neighborhood"
and opening the "TCP/IP" settings of the network-card
connected to the hub. Enter IP-address"192.168.1.0" and
subnetmask "255.255.255.0". Your PC, unless you are using Windows 2000, will now want to restart: Do it, even if your are using Windows 2000! Reminder: I assume you have MXStream (or other Internet connection) installed and working! Automatic settings for the client PC's WinRoute can make life definitely easier on you by setting the settings for your client PC automatically. The basic settings we are about to use:
1. We are about to use DHCP. DHCP is used to automatically assign an IP-address to your client PC as soon as this client PC boots. The biggest advantage of this is that we do not need to write down an IP-usage plan and we do not need to configure out client PC's manually. 2. We are about to use a private IP-address range. This means that we are using an IP-range free for private use only. In this situation I choose the 192.168.1.x range. We will use the subnetmask 255.255.255.0 for this, which means that only the IP-addresses in our private range (192.168.1.x) can be seen or see us. The zero indicates that the 'x' in 192.168.1.x can be any value between 0 and 255. This way we can use up to 255 IP-addresses 3. We will use the WinRoute server as a DNS server. DNS - Domain Name System - is used to convert an URL
(i.e. http://www.weethet.nl) to a understandable IP-address (i.e. 213.244.186.133).
This is very important for surfing the Internet, that's why millions of
DNS-servers can be found on the Internet. These servers maintain a sort
of list matching name and IP-address. 4. We will use the WinRoute server as Default Gateway. Rough translation: we will use WinRoute as a central access point to the Internet. All these settings are done for each client automatically by WinRoute as soon as a client PC's logs into our private network (LAN - Local Area Network). WinRoute setup - Interface Table First we must start the administrator console of WinRoute, this is done by double clicking the WinRoute icon in the Systray.
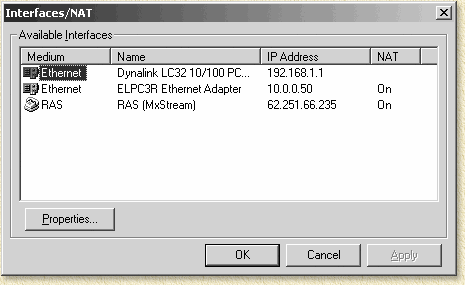
A window will open asking you the "Administrator" password which is default blank, so don't enter a password and simply click "OK". The Interface Table of WinRoute is used to set traffic-directions. Select the menu "Settings" - "Interface Table ...", a window appears;
In this window we see all network related connections. In this particular example we see two network-cards (Ethernet) and one dial-up connection (RAS). Now it's important to activate address-translation (NAT
- Network Address Translation) so we can share one IP-address over multiple
computers. This can only be done to connections to the outside world,
so do not activate this on the network-cards of your LAN! Make sure you
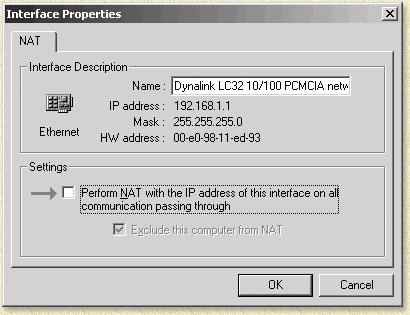
activate NAT on the RAS ONLY! For Ethernet connection this window appears, make sure NAT is not checked:
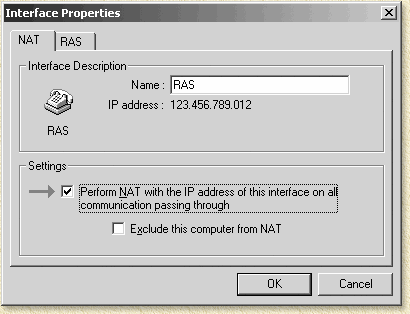
At the red arrow shown above you must make sure "Perform NAT" option is unchecked, click "OK". Repeat this for the RAS connection, here we need to do some settings like activating NAT:
Here you MUST check the "Perform NAT" option, next select the "RAS"-tab.
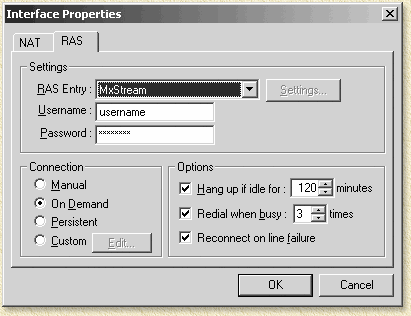
At the entry field "RAS Entry" you can select the name of the dialup-connection used for MXStream. Enter your username and password at the fields "Username" and "Password". Here we can also set how fast we would like to get connected
using the "Connection"-section of this window. In the "Options"-section we can also set:
Once your settings are finished, click "OK". We are now done setting the "Interface
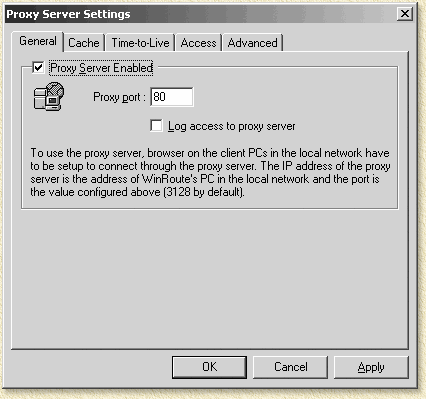
Table ..." click "OK" to continue. WinRoute setup - Proxy Server (optional) To improve Internet access speeds you can use a so called proxy server. A proxy server is basically a complex cache - saving requested pages so they are retrieved faster if called on again. This does not only improve surfing speed but saves bandwidth on your ADSL connection. The use of a proxy is optional, you can activate it like this (works for both variants); Select the men "Settings" - "Proxy Server ...":
Check "Proxy Server Enabled", and (optional) enter a "Proxy port" value of "80", the default value will work just fine too ("3175"). Another common value would be "1010". How do I use the proxy server with the client PC? WinRoute setup - DHCP settings For assigning IP-addresses to your client PC's, we need
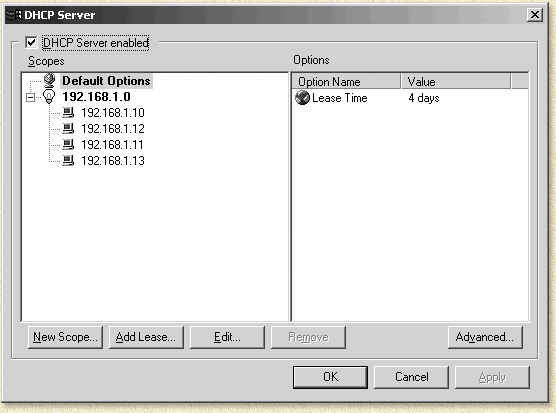
to activate the WinRoute DHCP-server.
As you can see I checked the option "DHCP Server
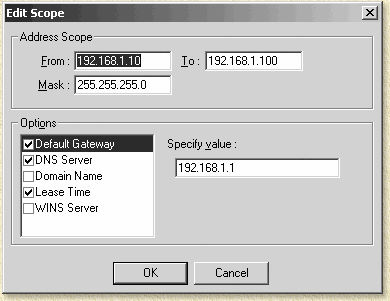
enabled" and I already defined an IP range. Note: you can use an alternative IP-number-plan, specially when you are using variant 2. Use for the server "10.0.0.150" and set an IP-range of "10.0.0.150" to "10.0.0.199". This enables the other users, in variant 2 only, to directly access the ADSL modem connection. Here we enter our private IP-range. Type at the "From" field "192.168.1.10" and at the "To" field we type "192.168.1.100" - with this range we can handle 90 PC's, which appears to be more than sufficient for a home network don't you think? At the "Mask" field we enter "255.255.255.0". Now check the "Default Gateway" option and enter at the "Specify value" the value "192.168.1.1". We have now set our WinRoute server as the default gateway. No check the "DNS Server" option and enter at the "Specify value" the value "192.168.1.1". All DNS request will now be handled by WinRoute. Optional we can also check the option "Lease Time": here you indicate how long a specific client PC is allowed to use an IP-address, which is not required for a small home network, but you can set it if you want to. Basically it looks like this:
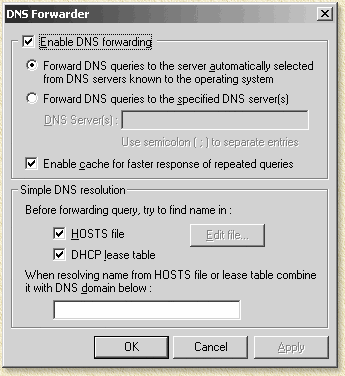
Click "OK" and "OK" to confirm these changes. WinRoute setup - DNS Forwarding Select the menu "Settings" - "DNS Forwarder" and verify these settings, click "OK" when done.
Note: before testing you will need to configure you PC first (Window 2000/XP, Windows 95, 98, and ME)! After a reboot of you client PC, except for Windows 2000 clients, (note: the server should be running and both PC's should be connected to the same LAN hub) we can monitor the IP-assignment in WinRoute. In WinRoute select "Settings" - "DHCP Server" or click the "Change Settings of DHCP Server" button.
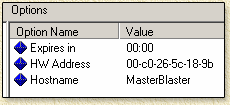
In this window we will see what IP-addresses have been assigned to which PC's;
Caution: the IP-address in the screen shot - 192.168.1.0 - must be in fact 192.168.1.1 (thanks Pieter, for noticing this!). The client PC, which you just booted should be in here as well (do wait for Windows to have completed it's startup). Click any of the displayed IP-address with an computer icon in front of it to see additional data in the right pane of this window:
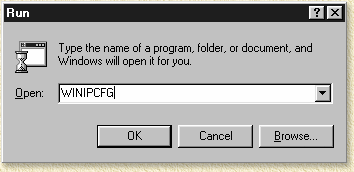
Additionally you can verify this on the client PC's. Click "START" - "Run", type "WINIPCFG" and click "OK".
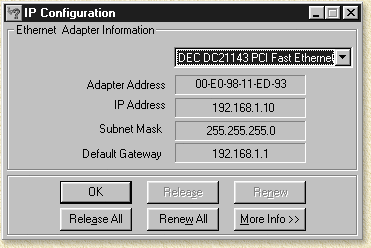
You might be required to change the selected network card by using the dropdownbox to the network-card connected to your LAN. Similar settings should appear, with 'xxx' being a number assigned by WinRoute:
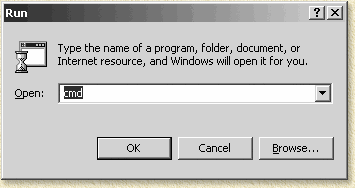
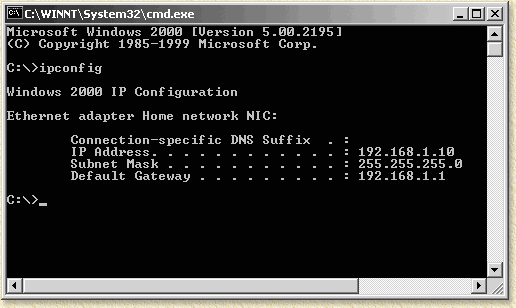
By clicking the "Release" button, a new IP-address will be request from WinRoute (most likely the same number as it becomes a new free IP-address). Windows 2000 is a bit more primitive, strangely. Click "START" - "RUN", type "CMD" and click "OK", a DOS prompt will open now.
In the DOS prompt type: "IPCONFIG" and press the ENTER-key. Similar info will appear:
Similar settings should appear, with 'xxx' being a number assigned by WinRoute:
If you would like to see more info, type "IPCONFIG /ALL" and press enter. This will show something like this:
Now you can also see that our WinRoute server handles DHCP, DNS and is the default gateway.
|
|||||||||||||||||||||||||||||||||||||