|

| Print this page - use Landscape |
Search the WeetHet Pages |
||||||||||||||||||||||||
| WeetHet is being updated! - Current articles will slowly move to www.tweaking4all.com For excellent webhosting that is reliable and affordable, we highly recommend: LiquidWeb |
|||||||||||||||||||||||||
|
On this page ...
Overview
Magix Pictures on CD and DVD supports several formats. The right format choice depends on the equipment you have to create the CD/DVD and what type of equipment you have for playback of the CD/DVD. Check the table to see what format suits you best:
Note: neither of these formats (only in Magix Pictures on CD and DVD) will allow you to store, additionally, the original pictures on disc in a seperate directory. If you're looking for a program that does support this then look for the less flexible Ulead DVD PictureShow or the spartanic Nero Burning ROM.
You may get pictures from several sources like the Internet, your scanner, your digital camera, drawing them yourself, webcam, etc. One thing they all have in common for use with Magix Pictures on CD and DVD:
Other formats are NOT supported and need to be converted first. Usefull tools for this are Ulead Smartsaver (my favorite), XnView (free and great image browser too) and ACDSee. TIP: MPEG1 and MPEG2 movies are also allowed!
Sorting pictures: Think in terms of Albums Once you collect the pictures you will have to start to think in terms of so called Albums (as you would do when putting printed images into a photo-album). Note: Each album can hold a maximum of 99 pictures! This is a limitation of the defined VCD, SVCD and DVD standards! Also: an album cannot contain subalbums! I usually create a directory where I copy all my pictures to. Then I create sub-directories with the name of the albums I wish to use later on. Using a tool like XnView or ACDSee allows me to quickly sort all these images to the appropriate directories. For example a tree could look as such (C:\MY PICTURES will be considered "root" of your new Photo VideoCD album):
etc. This will make life a little bit easier; later on we can drag the entire content of a directory to Magix Pictures on CD and DVD.
Let's start Magix Pictures on CD and DVD Naturally it helps, if we first install the application
(if you haven't done that already). Note: If this is not the case, then most likely "autorun" has been disabled on your computer. No problem. Just go to the Windows Explorer and open de drive letter of your CDRom that holds the Magix CDRom. There you will find START or START.EXE. Double click that file so the dialog starts. In this fullscreen dialog you will see a button called "INSTALL". Click it and the installation will start. Follow the instructions presented to you. After installation has finished, you can close the dialog screen by clicking the "EXIT" button. Now go to the Windows START-menu and start the application by choosing "Program Files" - "Magix" - "Magix Pictures on CD and DVD" - "Magix Pictures on CD and DVD". The main window will open:
The window at first looks a bit strange - not really a Microsoft Windows style application. On the other hand: most video related applications tend to use their own interface type anyway so why not. Note: The window is NOT sizeable! It's fixed to this size, and as far as I can guess the minimum screensize for this application is 1024 x 768 (commonly a 17" monitor). I personally think this is a downside to the program, as I'm using a 1280 x 1024 screen, but you'll get used to it I guess.
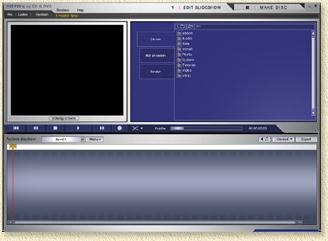
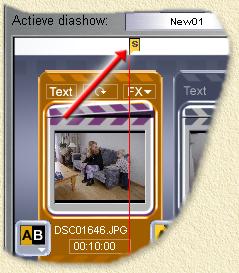
As soon as you started Magix Pictures on CD and DVD, the application created the first initial album. This will also happen when you decide to start compiling a new CD or DVD (in the menu click NEW in the upperleft corner of the screen will create a new project). In this example ("New01"):
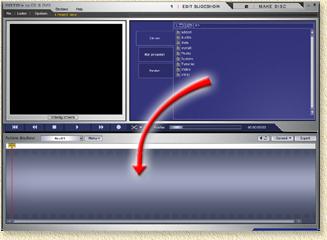
In the upper right corner you see a blue section of the window. This is where you can drag and drop the pictures from, to the "storyline" that you will find int the lower half of the window (as indicated with the red arrow).
This blue part of the screen has three tabs:
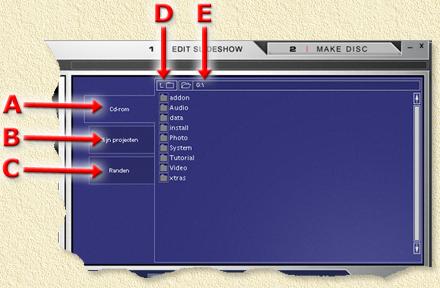
The three available tabs are Files (A), Projects (B) and Borders (C). A. Files; here we select our pictures from, which we can drag to the timeline. B. Projects; here we can find previously stored albums (i.e. "menus" also refered to as "albums"). C. Border; Borders can be added to the pictures by simply dropping them on the images in the storyline. The button "D" brings you one directory level up, i.e. from for example C:\A\B\C\ to C:\A\B\. If you would like to change the diskdrive you are working on, then keep clicking this button until a list of all your drives appears. "E" is just an icon indicating that the text after this icon is the path where you are currently at. As of now you can start filling the album, by dragging the images from the upper rightcorner (the blue part of the screen) to the storyline. Don't forget: don't add more than 99 items on the story line! If the order of slides should be changed: drag and drop within the storyline is supported as well, as long as you remain on the same page. I.e. the storyline does not automatically scroll when you are moving beyond the first or last visible slide. Tip: You are not limited to drag each picture at a time, you can also select multiple files and drag them to the storyline. Not only that; you can also drag them using the Windows Explorer. Just keep in mind that, when using the Windows Explorer, when you are dragging multiple files, that your mouse is positioned over the first picture you want to have in the storyline.
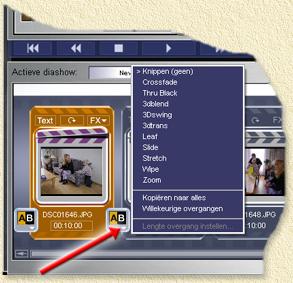
After adding some pictures you might notice
the little AB buttons between the images: Clicking on the little white triangle on the right lower side of that button will popup the transition menu where you can choose from: Cut (remove picture), Crossfade, Thru Black, 3D Blend, 3D Swing, etc etc.
Play a little bit with these effect. You can take a look at a preview by clicking in the whitebar above the storyline, somewhere in the middle of the image of which you would like to see the effect (see arrow in image below). Tip: The application comes with a cool demo file showing the capabilites of this program! Take a look at it, it's amazing what you can do ...!
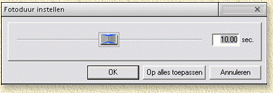
Now click the PLAY button ( Tip: If you would like to copy this particular transistion to ALL slides in this album, then click the little white triangle again and choose "Copy to all". Changing playback time of a slide This is done pretty easy. Below each image you see the duration time. In the image above: 00:10:00, meaning 10 seconds. Click the value and a popup appears showing you a slider where you can change playback duration.
Tip: you will notice the "Apply to all" button. This will copy the duration set to ALL slides in the slide show. After filling the first album (or menu) you can create yet another album by clicking the MENU button and choosing the option "New Slideshow" (or press CTRL + N). Repeat the steps as seen in the paragraph (go back to the beginning by clicking HERE).
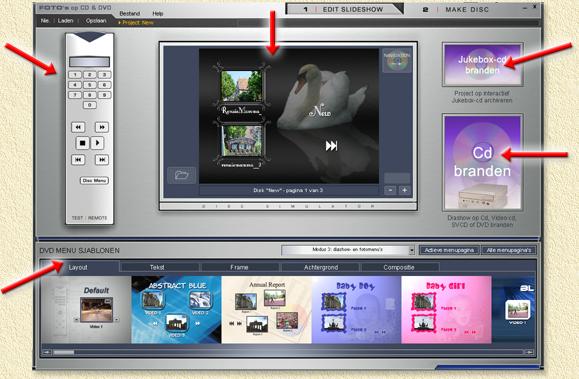
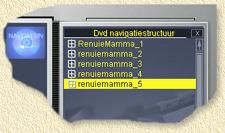
Create menu's Once you have created one or more albums, it's time for creating some navigation menu's. Magix Pictures on CD and DVD offers great flexibility here again. Click on the tab "MAKE DISC" in the upper right corner. This (or something similar to this) window will appear.
The red arrows indicate (start upper left corner, turning clockwise):
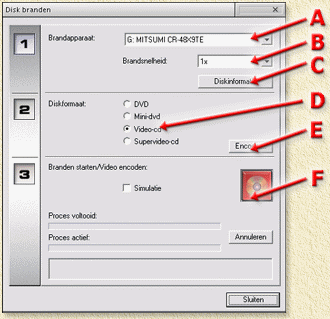
To test your creating, simply use the buttons of the remote control. Use PLAY to start the show ... or press the SPACEBAR on your keyboard. Burn your production to CD or DVD Simply press the ENTER key on your keyboard, or click the "Burn CD" button as previously indicated. If you have used the navigation button, this "Burn CD" button will not be visible. To make it visible click the NAVIGATION button again. A window will popup:
A and B will show you which CD or DVD burner it found and at what speed it will burn. The indicated speed (B) might be very low because either your drive is not supported properly or you haven't inserted an empty disc yet for the writer to identify it's maximum speed. The button C will show you info on the inserted blanc disc in the CD/DVD-writer. Discformat is choosen with the radio buttons at D, where button E allows you to set some advanced settings on the used MPEG encoder (quality mainly and some other expert settings). Tip: For SUPER VIDEO CD - Open the ENCODER OPTION (button E) and click in the new window on the advanced button to see if DEINTERLACE is checked. If you cannot click the button then either first uncheck the "INTERLACE" option. The red button F will initiate the actuall burning of the CD or DVD. After clicking this button it's all a matter of waiting. However: since the CD or DVD is first being rendered on your harddrive, a popup may notify you that more space is needed. In that case select another temporary directory for rendering the show.
|
|||||||||||||||||||||||||
 Pictures
must be in either JPEG (JPG) or BITMAP (BMP) format!
Pictures
must be in either JPEG (JPG) or BITMAP (BMP) format!