|

| Print this page - use Landscape |
Search the WeetHet Pages |
|||||||||||||||||||||||
| WeetHet is being updated! - Current articles will slowly move to www.tweaking4all.com For excellent webhosting that is reliable and affordable, we highly recommend: LiquidWeb |
||||||||||||||||||||||||
|
On this page...
Introduction The main target here is to convert a serial craddle to an USB craddle including charging via USB. Why? Well, first of all, all my serialport on my PC are taken and even worse: my laptop does not have a serialport at all. Second of all, I have like 9 power-adapters in use just for my computer equipment. One less would save me a wallsocket and additional cable cluttering. What do we need? We need a serial craddle (duh!), a USB cable (or at least the connector - I got mine for $5 at eBay), a good soldering iron with a fine tip, a screwdriver (I think it's torex 5 or 6 - I managed just fine with an el-cheapo mini screwdriver set) and patience. A multi-meter might become in handy for testing shortcuts etc. Overview:
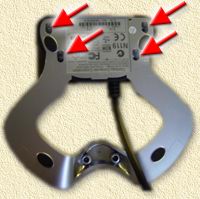
The Compaq (or should I say HP/Compaq or HP?) craddle is not very easy to open. !!!Disconnect the power supply and the serial cable first!!! STEP 1: Remove the screws At the bottom of the craddle, you'll find 4 screws (indicated in the image below). These are (I think) so called Torex/safety screws. Most screw drivers will not fit. So you either need to be lucky (I used a very cheap mini screwdriver) or you need to have suck a screwdriver (I think it's Torex 5 or 6 - I don't have one either).
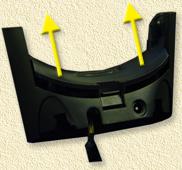
STEP 2: Disassemble the craddle After removing the screws (and yes it's not easy getting thos screws out) you will be able to split the craddle in two parts: the metal part (silver-colored) and the plastic part (black). Put the metal part aside, we won't need it for now. Focus on the black plastic part. It sonsists out of 2 parts, in the image below you see how to top part can be remoce, gently move it upwards.
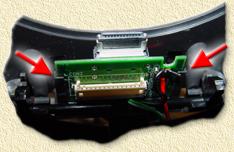
STEP 3: Taking out the electronics You will now see the little PCB/electronics of the craddle stuck between two sliders:
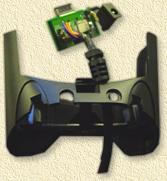
Gently take out the PCB - as we need it to do some soldering.
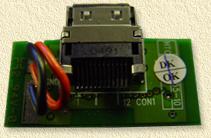
Here you see the little PCB in detail. Disconnect the serial cable that is located on the otherside. We won't need it anymore (you can keep it there if you like).
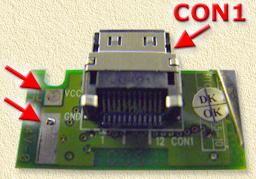
Charging via the USB connection First we need to remove the power connector. You might be wondering why ... well, if we keep the powersupply connected, power might reverse to your USB port potentially damaging your computer. In the image below you see two arrows on the left, the cables that are connected there (red and black) are for the powersupply connector. Use a soldering iron and remove them - there is no need for them anymore. In the image I also indicated CON1, which is the connector to the iPAQ.
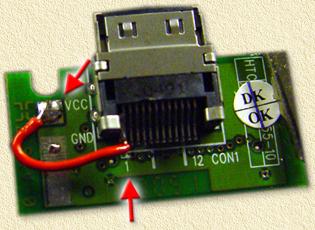
Next step is to make the powersupply work through for the iPAQ connection. Solder a little wire between PIN1 (the most left one, seen in the image above) to the VCC (where you removed the red wire from - the upper connection in the image above). Here you see my result:
The red arrows show you the VCC pin and the PIN1 of CON1. If you accidentally soldered the wire over PIN1 and PIN2 of CON1 then don't worry, PIN2 is used for the same purpose. So now we have done the preparations for charging via the USB port. Next step will be actually connecting to the USB port. Let's first get familiar with the main parts:
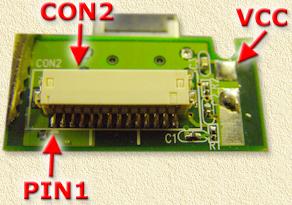
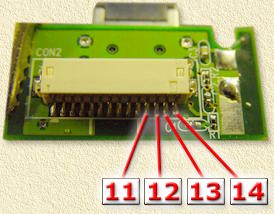
Here we see CON2 (PIN1 indicates the first pin) and VCC (the same connection we used on the otherside for connecting it to CON1). Now we need to do two thing:
We need to work with pins 11, 12, 13, 14, and the pin VCC which we have seen in the previous picture:
STEP 1: Reroute power First solder a wire between PIN14 and VCC. This is needed so the power from the USB will be transfered to the otherside of the PCB (ie. PIN1 of CON1). OK, this part is a bit more tricky so pay attention here. First we need a USB cable or connector
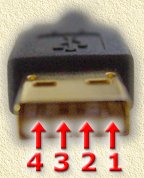
of this type (called USB A): The precise numbering of the pins, (thanks to Hans Bieleman for the tip):
I basically took an existing USB cable (USB A to USB B, cut off the USB B connector and used a multi meter to test which cable is connected to which pin). So which is which then?
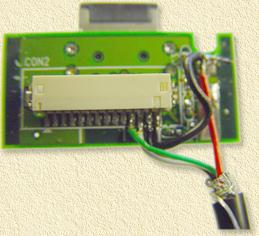
Time to put things together. Solder the contacts as described above. Just a little note here: Since we already soldered a wire between CON2 PIN14 and VCC, the space left to add an additional cable on PIN14 is rather limited. Rather solder USB-PIN4 to the VCC. The result might look as such:
Note: the wire between CON2 PIN14 and VCC is black too, I should have used a red one for that but didn't have any left .... so this may look a little bit confusing, sorry for that ... Since assembly and disassembly of the craddle is not that easy, we first would like to make sure that it all works as planned. Make sure to do the proper settings in you active-sync application (in ActiveSync - v3.5 or newer, download at Microsoft - choose "File", "Connection Settings..."):
Now connect this little PCB to the iPAQ and connect the USB wire to your USB port on the PC. Your PC should first find new hardware (NEW HARDWARE USB), then ActiveSync will notice the iPAQ and you can try some kind of sync (for example delete an Outlook mail and see if it syncs to the iPAQ). If this all works just dandy, then disconnect the USB cable from the PC and remove the PCB from the iPAQ. It's time to re-assemble the craddle. Tip: You can leave the RS232 cable out. Enjoy your new craddle ... |
||||||||||||||||||||||||