| Print this page - use Landscape |
Search the WeetHet Pages |
|||||||||||||||||||||||||||||||||||||||||||||||||||||||||||||||||||||||||||||||||||||||||||||||
| WeetHet is being updated! - Current articles will slowly move to www.tweaking4all.com For excellent webhosting that is reliable and affordable, we highly recommend: LiquidWeb |
||||||||||||||||||||||||||||||||||||||||||||||||||||||||||||||||||||||||||||||||||||||||||||||||
|
On this page ...
Overview
Peer-to-Peer networks come in several forms and shapes. The basic idea is that all "users" are part of a huge network. The user's computer is being tied into the network and can be used for both downloading and uploading. The user can search and download files from basically all users in the peer-to-peer network. However, the user has a "shared" folder, which can be accessed by other users, so other users can download from that shared folder as well. The main trick with eMule is that parts of the files can be taken from basically any client that has the same file. So downloading a movie for example, can originate from multiple clients. This gives a real speed boost,... well, compare to some other similar clients. I personally still think the NewsGuy solution is MUCH faster, but the again, eMule is FREE and NewsGuy isn't. eMule specifically, uses the eDonkey 2000 network. For eMule to work properly, it needs an up-to-date Server List (the so called server.met file) - we'll explain later how to achieve this. eMule can be downloaded from the eMule project site: http://sourceforge.net/projects/emule. Choose the INSTALLER version for download. After downloading the installer version of the latest
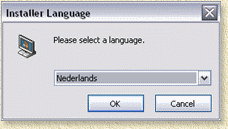
version of eMule, double click the EXE file.
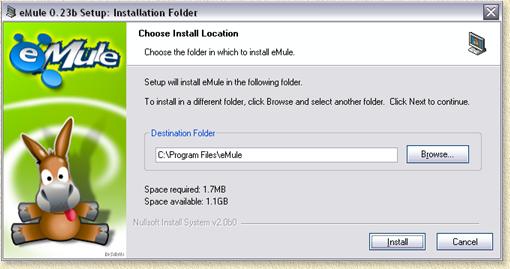
In the now appearing window, select the path you wish to install eMule in;
Usually one uses the default install path, but if you like, you can change it manually or click the "Browse..." button to browse to a location where you would like eMule to be installed. Click "OK" to start the installation.
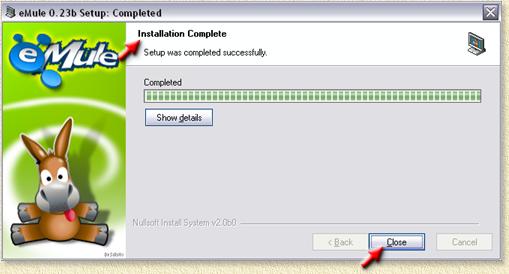
Once the setup window has "Completed" in the title, and in the text, and the "Close" button appears, THEN the setup has been completed. Click "Close" to complete the setup. Preparing for first use - Adding the server list eMule needs a server list, so it know where
to look for files. Adding a fixed list Adding a fixed list is done by downloading
a server.met
list from some website. For example, http://ed2k.webhop.net/
provides a fixed list. Downside of this trick is that sooner or later the server list is useless, so please forget about this plan. Auto-Updating server list eMule also supports the use of server lists that get's downloaded frequently and automatically from some website, again http://ed2k.webhop.net/ provides this feature. However, you will have to configure eMule to use this. First we need to edit the addresses.dat file, found in the eMule directory (usually C:\Program Files\EMule), using for example Windows Notepad. You can enter one of these links (source: http://ed2k.webhop.net/);
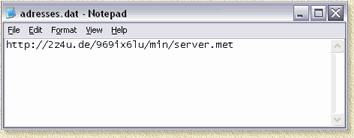
I personally use the ALL SERVERS list. Open the addresses.dat file with Windows Notepad, enter one single line, holding the LINK from the table above, for example;
After entering the link, you can close Notepad. Notepad will ask if you want to save the changes, click "OK". OK, so we added a server list, it's now
time to start eMule. Click "Start" - "Programs"
- "eMule" - "eMule"
(the
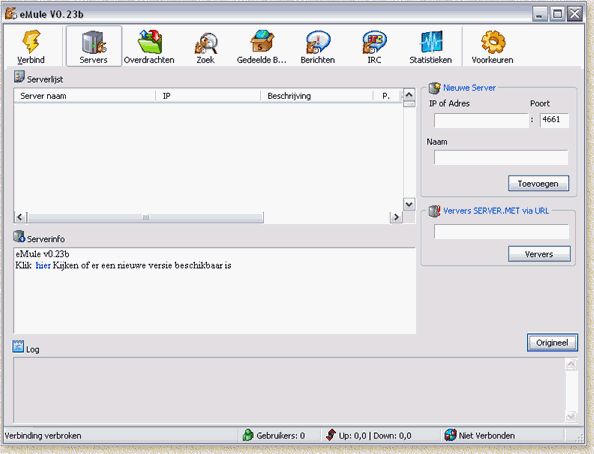
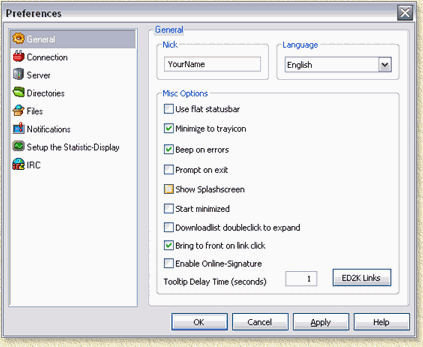
First we do need to do some settings to make life a little bit easier for our next eMule starts. Click on the "Preferences"
icon GENERAL
Only the fields "Minimize to tray icon" which makes eMule minimize to the systray (the window clock in the lower right corner), "Beep on errors" and "Bring to front on link click". Don't forget to enter an nick name at "Nick" - this can be your name or nickname. You can also change language if you want to. Don't forget to click the "ED2K Links" button. This will associate eMule with eDonkey 2000 links on the internet (for example on the ShareReactor website). CONNECTION
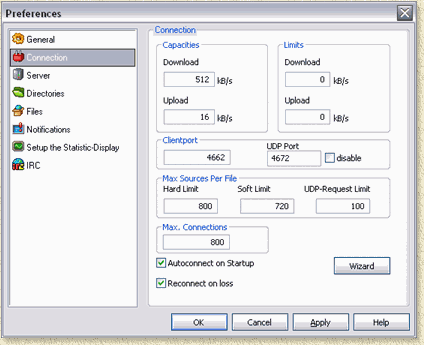
These are the settings eMule gave me after setup. I checked the "Autoconnect on Startup" option, this will save me clicking the Connect button. Tip: take a look at eMule fine-tuning for getting the most out of your connection. SERVER
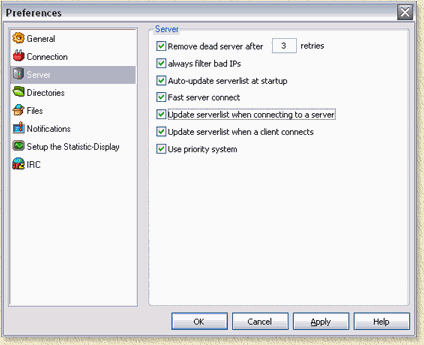
Note: ALL items are CHECKED here! This includes the "Auto-update serverlist at startup" option, this requires you to have an address for automatically downloading server.met files as show in the chapter "Adding a Server list" (in the addresses.dat file). If you haven't edited this file, then do not check this option either!
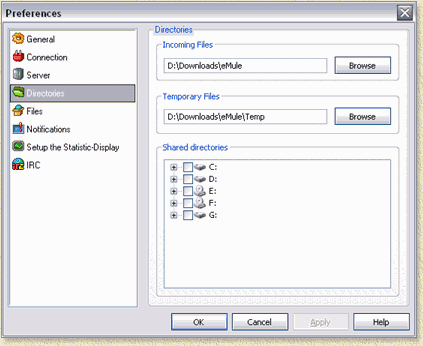
Here you can enter the path you wish to use for "Incoming Files" (where the downloaded files should be stored) and "Temporary Files" (temporary files for eMule). Tip: Make sure the directories are on a disk with sufficient space! The C-drive is not always the best choice! You also can set here the folder(s) you wish to share with other users. It is a nice custom to share at least something with other users. However, be aware not to share personal information/documents with others. I usually set my shared directory identical to the "Incoming Files" directory ... not sure if this is a good or bad idea, but it works for me. THE OTHER OPTIONS You do not need to change those, the default settings will do just fine. Click "OK" to accept the changes. Now Shutdown and restart eMule. If you enabled the auto-update option, the you will see that the server list will be updated and that you are instantly connected. For you to be able to find something on the Peer-to-Peer network, you will need to be connected. Using the Preferences mentioned above,
this should be done automatically. The connection status can be monitored in the lower right corner of the eMule window. These 3 basic status variants can be found:
Once eMule is connected, you can start searching and downloading files. Once eMule is connected, it's time to start our first search for files. Let's just take a random example, we want to look for some cool music hits of the Rolling Stones. First click the search icon
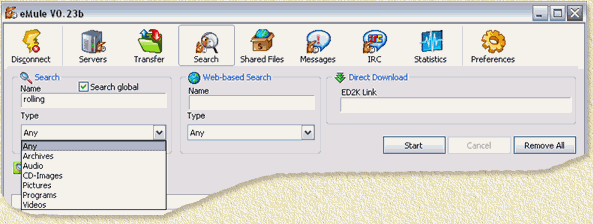
In this window we can enter characteristics of the file we are looking for.
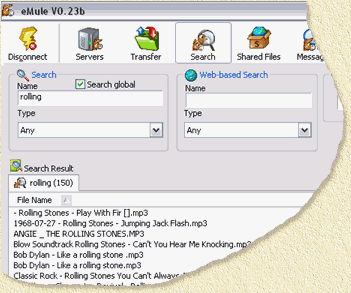
We are going to search in the Peer-To-Peer network. So we limit this search to the "Search" part (left) of this screen. Since we are looking for some stuff done by the Rolling Stones, we now enter something like "Stones" or "Rolling" (without the quotes) in the "Name" field. The reason why I'm not entering "Rolling Stones" is that this might limit the search too much to only filenames that have "Rolling Stones" in it. This would leave files that have something like "Stones" instead of "Rolling Stones" out of the query results. In this example we do know that we are looking for music. However selecting "Type" "All" would work just fine too, we might see some movies and images as well. So it's up to you to decide what you want. I'm going to assume we use the "All" file type. Now it's time to click the "Start" button. In the lower half of the window, a new tab appears.
The label of the tab holds the value we entered in the "Name" field. Between brackets you see the amount of found results - in this case 150 files! Now it's up to you to locate the files you want. Double click that file and it will be added to the "Transfer" page. Downloading will start as soon as at least one users allows you to download. You can double click multiple files. If you are done with your selection, you can either leave the results op, or right click the tab and click "Remove this search results". Optionally, you can remove ALL search queries by clicking the "Remove All" button. On the "Transfer"
page (click the Transfer icon
In this window detailed information is shown on your download requests. The bar, just below "Downloads", allow you to sort on "Filename", "Size", etc, by clicking the table header.
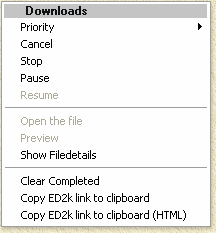
One well hidden feature of the transfer page is the transfer menu, which appears when right clicking the table with downloads.
The options in this menu can be quite useful.
Downloaded and Aborted files: Cleaning up After downloading or aborting a download, you might want to clean up a little bit. Downloaded files can be found in the folder you did set in the "Preference" screen (see Directories). We defined "Incoming" and "Temp". INCOMING Here you will find the completed files. Do what you need to do with these files ... burn them to CD, view them, install them, etc etc. TEMP Here you will find parts of the downloaded files (files that end with .part) and server information files (the .met files). DO NOT DELETE THE .MET FILES! To get the most out of your eMule connection, it is well worth the effort to do some fine tuning.
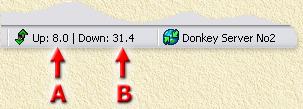
After tweaking eMule (without the tweak the maximum transfer was 12 kB/s download): download almost 32 kB/s! In the image above this text, you will see that A indicates the upload speed (the speed used by others to download stuff from your PC to theirs). B indicates your download speed (you getting files to your PC).
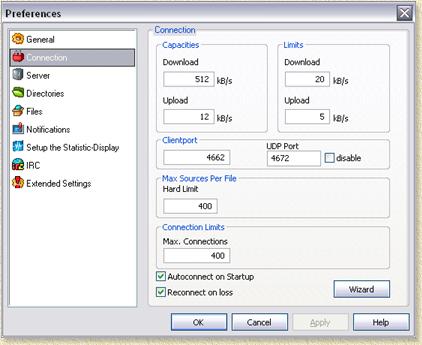
1. Upload and Download speed fine tuning Both uploading of files (others copying files from your PC) and downloading (you copying files from other PC's) is subject to fine tuning. We need to find a nice balans between the both. If this balans is not optimal, then it might be that others can download just great from you PC, but you will not be able to download properly yourself or the other way around. For MXStream (basis) I use these settings:
Here "Capacities" and "Limits" play an important role. I have to admit that the field "Capacities - Download" is a bit too much, but not that important here. What is important are the fields in "Limits", for you to be able to do some simple web surfin' beside downloading with eMule forces you to make sure that "Limits - Upload" should not be too high, I choose to use 4 or 5 kB/s ... for MXStream basis. Note that the value in "Limits - Download" strongly depends on the value in the field "Limits - Upload" !!! For example, an upload limit of 4 kB/s implies a maximum download of 16 kB/s. The same with 5 kB/s which limits download to 20 kB/s ... Tip: for a nice speedy download, with MXStream basis, I used "Limits - Upload" = 8 kB/s and "Limits - Download" = 32 kB/s. My average download speed is 28 kB/s, not even close to the speed of the LeechGuy solution AND you will not be able to do any browsing on your PC, but hey ... downloading with eMule is faster. The optimum is to be found based on trial-and-error, simply try what it does. 2. Server selection If downloading isn't fast enough, then you might consider selecting a different server. When eMule connects, it will choose the first available server, which is not always the best choice. Open the "Server" window and select a server with at least 1000 users and a low ping (< 500 ms). Either double click the server you wish to use or right click the server you want to use. 3. High ID number ? In the status window (the lower part of the "Server" window), you will see your identification number you received from the server you connected to. A lot of myths are to be found concerning this number. The bottom line is that this number is being calculated based on for example your IP-address. Usually this is a 9 digit number. If this is NOT the case (i.e. you received a low number - know as a LowID) then this indicates that either the server is overloaded or that some ports (4461 and 4462) in your PC/Modem/Router/Firewall is not open for use. A LowID also gives you a low priority with other PC's! 4. Much to offer = higher priority! If you have a lot to offer for others, then you will enjoy a higher priority compared to other users who have less to offer. It's a trade-off ... On my PC I use a separate directory for storing all my downloads, this is the same directory I use for sharing files. However, make sure your files are at least useful to others! Do NOT try to fake your way out by dumping a lot of crap in that shared directory! 5. Windows 95, 98 and ME - remove network limitations Windows versions 95, 98 and ME experience limitations on the number of available network connections. Download this registry patch to increase the number of simultaneous connections. Use WinRar to extract the .reg file. Double click the file to apply the patch to the registry. After applying the patch, try to use 256 ("Max. Connections" in the "Connection" window in "Preferences"). Try a lower value incase eMule crashes. Note: Windows 2000 and XP do NOT experience this problem. 6. Select files with a lot of sources When searching for files, only select those files with a lot of sources. The more sources the better the download - in terms of speed and continuity! |
||||||||||||||||||||||||||||||||||||||||||||||||||||||||||||||||||||||||||||||||||||||||||||||||


