|
On this page ...
|
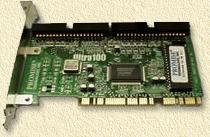
Good news for (future) owners of
the Promise Ultra100
(also sold under different brands like Maxtor):
with a little trick you can convert the Ultra100 to a
Promise FastTrak100 RAID controller.
Typically, these more expensive controllers,
have RAID capacities
which can improve harddisk speed, security or size by combining
drives. More information on RAID
can be found on my "What
is RAID ?" page.
Warning!:
1) This trick will not work with the newer Promise Ultra 100
TX2 controllers!
2) This hack will void warranty of your Promise controller!
3) Read the disclaimer!
|
 |
What do we need?
|
1
|
Promise Ultra100 PCI IDE UDMA100 controller |
|
2
|
resistors 1/4 watt, 120 Ohm (colorcode:
brown red brown) |
|
2
|
pieces of insulated wire |
Further more we need:
- cable cutter or scalpel
- solderingiron
- Promise Fasttrak BIOS software (see floppy)
- Fasttrak BIOS flash-software (see floppy)
- Fasttrak100 drivers (see floppy)
I bundeled the required for the floppy, download
the zip here.
Preperations
-
Make sure the Ultra100 works
OK.
- Make a backup (if you would like to keep the
data)! I used Plextor
CD-RESQ but Symantec/Norton
Ghost and PowerQuest
Drive Image offer similar functionality.
- Windows 2000 users: before you can boot from
a RAID array, Windows 2000 must know this type of controller. The easiest
way to do this is by replacing (updating) the Ultra100 drivers (in Device
Manager) with the Fasttrak100 drivers. Windows 2000 will complain that
these are not the proper drivers - ignore it and continue.
- Make a driver and flash floppy, download
the files here.
- If you are about to reinstall your entire system:
the driver disk of the
Promise Fasttrak100 will be requested by Windows NT4, XP and Windows
2000 setup.
- If you are about to use used diskd (ie. with
partitions on them defined), then make sure to clean this disk by using
FDISK AND REMOVING ALL PARTITIONS ! Do not forget this ! It will save
you a lot of trouble.
-
When soldering the BIOS-chip, make sure to
not overheat this chip: it is heat sensitive!
|
The modification has 2 hardware adaptions
A - solder 2 wires from BIOS chip to
IDE-2
B - Cut two pins of the BIOS chip
and one software adaptions:
C - BIOS flashing of the controller and the drivers of
the operating system you're using.
|
 |
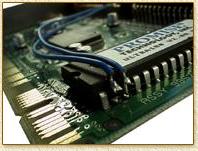
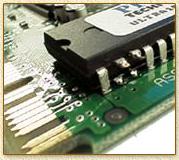
Step 1; Soldering wires to the
BIOS-chip
Follow these simple steps:
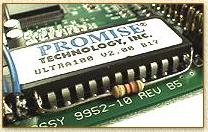
1. Cut pin 2 and pin 3 of the BIOS
chip.
|
Pin 2 and pin 3 are located pretty
easy:

|
|
Now cut pin 2 and pin 3, I used
a scalpel but a small wirecutter should do the job as well.
|
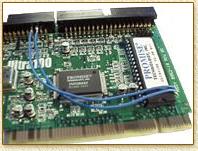
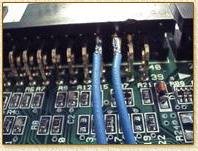
2. Solder 2 wires from the BIOS chip
to the IDE-2 connector
Pay attention here: only
to IDE-2 !!!
Solder a wire from BIOS chip pin 2 to pin 35 of IDE-2,
next solder a wire from BIOS chip pin 3 to pin 33 of IDE-2.
Note: Left, below the IDE-2 connector you will see "IDE2"
(the left connector that is).
Note: Be carefull with the BIOS chip, it's heat sensitive!
Note: Be carefull not to shortcut the BIOS chip with other
pins or the PCB !
Step 2; BIOS flashen
We now need the BIOS file (A:\BIOS\FT100130.BIN)
and the proper flash-software version 1.09 (A:\BIOS\PTIFLASH.EXE) which
should be placed on a floppy (download
files here).
- Insert the controller in to the PC (which is switched
OFF ofcourse).
- Place a DOS boot floppy in the A-drive.
- Switch your computer ON.
- After a while you will see the DOS prompt (A:\>).
If not: reset your computer and check the BIOS of your PC to see if
the A-drive is bootable.
- Type (if you are using the floppy, which you can
download here): CD
BIOS
- Type (mind the capitals in '/Unlimit' this si casesensitive!):
PTIFLASH /Unlimit
- Create a backup of the Ultra100 BIOS.
- Flash the Fasttrak100 BIOS. A filename is required,
type: FT100130.BIN
- The BIOS will now be flashed, after a few seconds
the software will ask you to restart your PC.
During this boot you will see the
FastTrak100 BIOS flash by (if no drives are connected to the controller)
or you will see a message similar to this one:
FastTrak100 (tm) BIOS Version 1.30 (Build 12)
(c) 1995-2000 Promise Technology, Inc. All rights reserved.
No Array is defined ................
Press <CTRL-F> to enter FastBuild (tm) Utility or
Press <Esc> to continue booting...
|
Switch OFF your computer: flashing the
BIOS was succesfull.
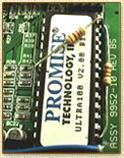
Step 3; adding 2 resistors
It appears to be required for some
drivers, so let's just add these resistors, it is not always required
though - it's up to you what you want - I choose to add them.
Two resistors must be placed over
the BIOS-chip. These are 120 Ohm resistors (brown red brown) from:
-
pin 4 to pin 16 (ground)
- pin 23 to pin 16 (ground)
After placing these resistors,
you can put the controller back in the PC and connect the harddisk(s).
Enjoy your new cheap RAID controller
!
Common questions and problems to
keep in mind
1. The key combination (during boot)
CTRL+F allows you to enter the BIOS settings of the FastTrak100,
here you will also find the automatic setup making setup easier.
2. The controller can still be used similar
to the Ultra100. Create an array for each harddisk holding one disk
per array.
3. You might encounter problems with
FDISK (with large diskcapacity) - Windows2000 setup does not
appear to have these problems.
4. There have been rumours that Seagate
disks don't work well with this RAID solution - it's probably just a
matter of BIOS version updates that will fix this problem.
5. Always use PTIFLASH version
1.09 (download here).
Other versions will not work with the controller and will not support
the /Unlimit option.
6. Partitions that have not been removed
before putting them in an array will cause confusion for both you and
the partitioning software. Most likely you cannot remove these partitions
when in array mode. See problem/question 2 and remove the partitions
with FDISK, reboot and make a new array.
7. Windows2000, XP and Windows NT need
the driver diskette of Fasttrak when installing Windows (download
here).
8. Yes! Windows2000 professional
(the not-server version) supports RAID.
9. The /Unlimit option is case
sensitive.
10. Check the Promise website for common
problem solutions and new tools and drivers: http://www.promise.com.
|