|

| Print this page - use Landscape |
Search the WeetHet Pages |
|||||||||||||||||||||||||||||||||||||||||||||||
| WeetHet is being updated! - Current articles will slowly move to www.tweaking4all.com For excellent webhosting that is reliable and affordable, we highly recommend: LiquidWeb |
||||||||||||||||||||||||||||||||||||||||||||||||
|
On this page ...
Overview
It sounds trivial, but just to make sure we got all we need:
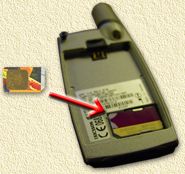
So, we need to get that SIM-card and push it back into the SIM-card-holder. Make sure you insert the SIM in the proper way into the holder. Watch the notch on the SIM-card. Tip: It is very well possible that the SIM will fall just right out of the holder. Bij putting some tape on the back of the holder-card, covering the hole for the SIM-card, the SIM will remain in position. Note that the tape should not be on the same side as the golden contacts of the SIM, and thus not cover these contacts, otherwise the SIM cannot be read.
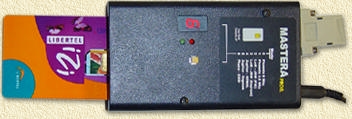
You can either download it at WeetHet (Engels, version 2.14) or at Teledata. Unzip the file (use either WinZip or WinRar). Start the SETUP by double clicking the unpacked "setup.exe". A lot of questions will pass your screen, answer them by clicking the "Next" button (5 times) and finally the "Finish" button to complete the setup. Before we start the Chipcard Reader software, first connect the MasterA to a COM-port (for example COM1). Make sure the MasterA powered ON. Set the MasterA to mode 6. You can now insert the SIM-card (+holder) into the MasterA. Note: Take good care in how to insert the card! The golden contacts of the SIM should point upwards, as shown in the picture below (in all pictures for that matter of fact):
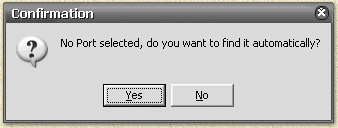
Now you can start the software, just make sure the MasterA is set to mode 6! Start the software, you can find it in the Windows Start menu, at"START" - "PROGRAMS" - "Chipcard reader". If this is the first time you start this program, a dialog will appear:
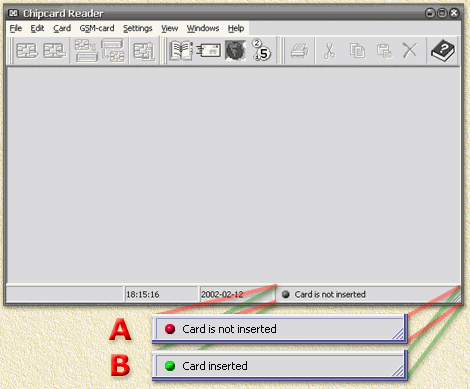
The program has not be set to know at which COM-port the is connected MasterA. Click the "Yes" so the program can discover where to find the MasterA. If that task has been complete, the Chipcard Reader screen appears:
In this picture, you can also see the 2 possible status indications of the inserted SIM-card. Situation A: Nope, the card has not been identified. Please check if: - the card is inserted properly, Situatie B: OK, all looks well, we can start using the program. You probably have seen a brief message indicating that Chipcard Reader has been talking to your SIM-card. Note: Some data you better not change since the will possibly eliminate the particular services and/or functions that you do not want to be eliminated! So unless you're a 100% sure that you know what you are doing, limit editing to the Phonebook only. In order to edit the phonebook, choose the menu "GSM-Card", option "Edit Phonebook" (or press the F5 key). Chipcard Reader will now copy all phonebook entries of your SIM-card (the data on the SIM-card will not be altered or deleted). Now you will see a number of phonenumber-groups:
We see 6 groups:
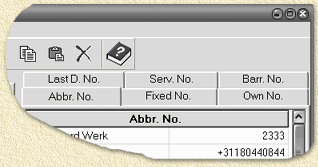
We are about to edit the Phonebook, so click the "Abbr. No."-tab. How to edit? First we need to get familiar with the buttonbar:
After reading the SIM-card, press the button "C" - Card Backup. The program will prompt you for a filename, enter one that makes it clear for you what it is. Click the "OK" button. Later on, when needed, we can restore the SIM-card by clicking the button "D" - Restore Card - just in case we screwed up the settings on our SIM. STEP 2; Make the desired changes Click the button "F" - Edit Phonebook. Now select the tab "Abbr. No.". Simply put; In the right column you can select an item (name or phonennumber) and edit it. Note: The number of characters used for a name is limited! Tip: To distinct between Home, Office and Mobile, you can work with prefixes or suffixes, for example add "/H" for Home, "/W" for Work and "/M" for Mobile. I personally use a prefix for phonenumbers related to my work ("W:") and a suffix for all others. STEP 3; Create a default phonenumber list (optional) You can copy on or more items from the SIM-list (on the right) to this default list (on the left). Select the items you want and click the "Accept" button to copy them. This can be pretty usefull, beacuse you can use "File" - "Save As" to store it in a file, for later retrieval. This way you can copy the list (or a part of it) to other mobile phones. Copying numbers from the default list (on the left) to the SIM-list (on the right) works in a similar fashion. STEP 4; Save changes to the SIM Click the button "B" - Write Card. The phonebook will be written to your SIM. A dialog will show you the copy progress. Once the it's done copying (the dialog disappears) you can remove the SIM and put it back into your mobile phone. Note: If you don't plan to edit anyother SIM's, close the application. Tip: Some mobile phones, copy the entire phonebook (and others) to their own memory and uses this data instead of the data on the SIM. Exeute a "Master Reset" or "Return to Factory Settings". This will clear the local memory and force the mobile phone to read the phonebook from your SIM, so changes are reflected in the Phonebook. |
||||||||||||||||||||||||||||||||||||||||||||||||