| Pagina printen - kies Landscape |
Zoeken in de WeetHet pagina's |
||||||||||||||||||||||||||||||||||||||||||||
| WeetHet is being updated! - Current articles will slowly move to www.tweaking4all.com Voor uitstekende webhosting welke zowel betrouwbaar als betaalbaar is adviseren wij: LiquidWeb |
|||||||||||||||||||||||||||||||||||||||||||||
|
On this page ...
Removing the harddisk from your TiVo OK, so we're ready to open the TiVo and removing the harddisk. Tip: this is a good moment to remove some dust bunnies from your TiVo and the fan inside the TiVo!
Remove ALL the cables from your TiVo (dish, video, audio, power, etc)! Now put the TiVo on a table so you can easily
access all connectors, screws etc.
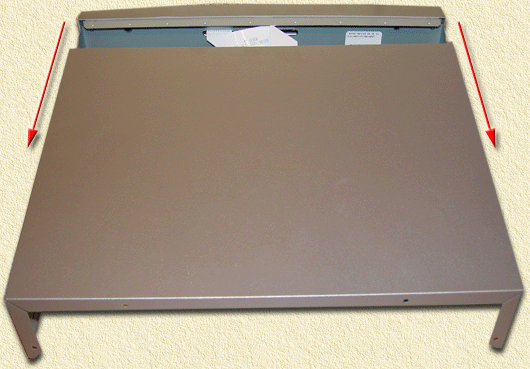
Once you removed the 4 screws, slide the hood of the TiVo to the backside of the TiVo. It might require some force to get it going.
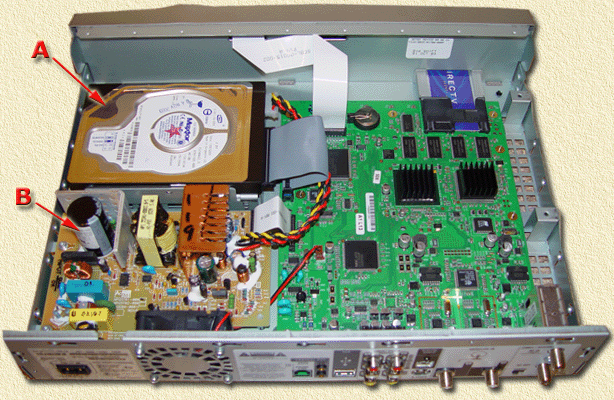
Once you opened, you will see the main components of your TiVo:
Be very careful, avoid touching the power supply (B: the brown colored PCB). Now we have access to the harddrive (A). You will see that an IDE flat cable and a power cable (familiar to those who have opened a computer before) that connect the harddrive to the TiVo mainboard (the green PCB).
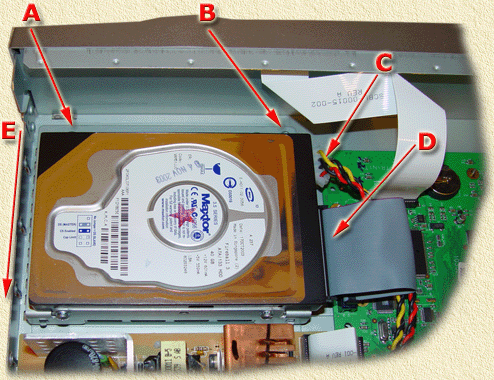
In the image above you see the harddrive. Notice the arrows:
I think the table above explains most of it; Remove the screws (A and B), the power cable (C) (watch out for the white flat cable!) and the IDE cable (D). Now move the harddisk in the direction as indicated by the arrow (E) until you can lift it and take it out. The 4 screws of the harddrive can be removed with a Torx T11 (optional). Once removed, we can continue with the next steps,... Installing the TiVo harddrive in your PC Note: Unlike the previous hacks, we do not need any other harddisks except the one(s) we're going to be using in the TiVo! This PC should have a CD Rom player. Make sure the following requirements are met:
Tip: Verify in the BIOS of your PC that the first boot device is set to CDROM. Usually you can get into the PC's BIOS by pressing the "Del", "Ins", "F1" or "F10" button (at boot time it will usually show a brief message indicating which key to use). Commonly in the "Advanced settings" section of the BIOS you can change the boot device to "CDROM" or "IDE CDROM". If your computer meets these requirements, then it's time to continue to the next step: Connect (if not already there) the first
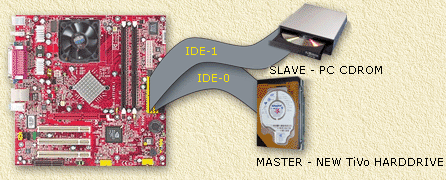
FLAT CABLE to the SECONDARY IDE (IDE-1). Connect the second FLAT-CABLE to the PRIMARY IDE (IDE-0), and the other end of that cable to your CDRom drive. Connect a power connector to the TiVo harddrive, and don't forget the power for the CDRom-drive. Verify that the jumpers of the TiVo harddrive are set to MASTER (if using only one drive), and the jumper on the CDRom drive to SLAVE. Please write down first how the jumper where set, so you can set them back later - if needed. Tip: if you do not have documentation on the jumpers (either a manual or printed on the harddrive itself) then lookup the drive on the Internet on the manufacturers homepage. They usually have an online manual for the drive showing the jumper settings. So basically you have this setup now:
Note: this is just a sketch on how the connections should run - the position of IDE-0 and IDE-1 connectors may differ, depending on the type/brand of mainboard your PC has. Please consult the manual of the mainboard to identify the right connectors, or incase you don't have a manual, look closely on the mainboard. Some mainboard's have text printed next to the connectors.
|
|||||||||||||||||||||||||||||||||||||||||||||


