|

| Print this page - use Landscape |
Search the WeetHet Pages |
|||||||||||||||||||||||||||||||||||||||||
| WeetHet is being updated! - Current articles will slowly move to www.tweaking4all.com For excellent webhosting that is reliable and affordable, we highly recommend: LiquidWeb |
||||||||||||||||||||||||||||||||||||||||||
|
On this page ...
Overview
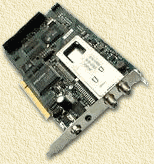
This guide is good to start working with the combination of Europe Online and the Technotrend and look-a-like boards, like Siemens, Galaxis, TechnoTrend and Hauppauge DVB-s & Nexus, even in combination with SuperWeb ! The big downside of these cards, with the exception of Galaxis and Siemens, is that you should not count on any proper support from their helpdesk.
The now following text is based on my own experiences and the experiences of others. I can't guarantee that this is the best, fool proof method of installing. By my knowledge however, this is a very easy and good working method. Note: the entire setup is spread over several pages. This will increase the download speed for the page. Requirements:
In the text below I will refer to Hauppauge for drivers and software. For the Hauppauge look-a-likes similar software is available (all of them done by TechnoTrend) only the names are changed to for example TechnoTrend, Galaxis, etc. Short briefing for the impatient & Step by Step guide The tabel below you can be used in two ways: 1. For the impatient (like me) 2. For the less experienced
Shutdown your computer, if you have not done so yet. Remove the power-cord. Remove the screw and finally remove the "hood" of the PC-case. !!! DO NOT SWITCH YOUR COMPUTER ON UNTIL STEP 7 !!!
This is not to hard to find since most manufacturers
use these color codes to identifcy the slots:
INTERNAL AUDIO EXTERNAL AUDIO
Check, just to be sure, that the card is inserted correctly and not like often happens slightly tilted or not pressed far enough into the slot (the golden contacts on the bottom of the card, should not be visible). Note: your PC is still NOT switched on !
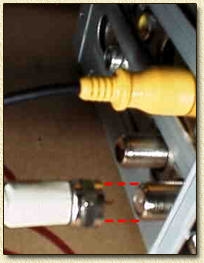
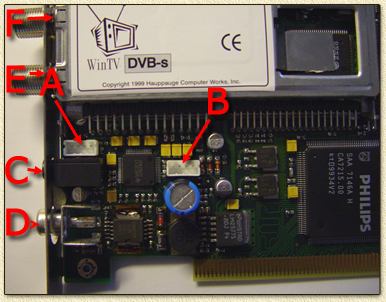
The centre pin of the connector used is simply the same wire used inside the antenna-cable and therefor not very strong. Be gentle! Use connector marked F in the picture below to connect your antenna to. The connector marked E can be used to connect additional satellite receivers (for example an other computer or a normal TV/Sat-receiver). Once again: NOTE THAT YOUR COMPUTER SHOULD
NOT BE SWITHED ON! What ever you do: ALWAYS make sure your computer is switched OFF when connecting or disconnecting the antenna cable !
Do not power your computer yet !
After connecting all cables (including the powercord) you can switch your computer on so it will boot.
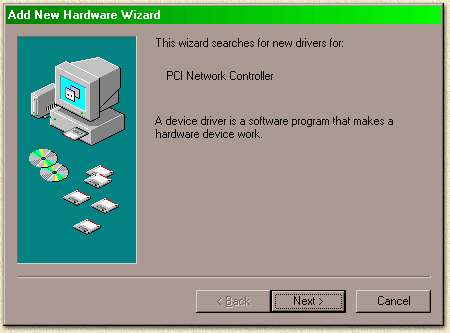
As soon as Windows (Windows 95, 98, 98SE, ME, 2000) starts, it will come up with a notification that it found a PCI device (the DVB-card). The next pictures illustrate this, using Windows 98 SE (Second Edition). Other Windows version will show similar dialogs with the exception of Windows NT.
Select "Next". In the new dialog, check "Search for the best driver for you device" and select "Next". A new dialog opens. Insert the Hauppauge installation
CDRom in the CDRom-drive. Note: Windows 2000 and Windows XP user!!! You will NEED driver version 2.08 or newer !!! Select "OK" followed by "Next". Windows will display a message that it found your DVB card. Select "Next". This last dialog indicates that Windows finished the
installation of the driver. Select "Finish" to complete.
Start "SETUP.EXE" or "SETUP" of the Hauppauge/Technotrend CDRom. There are 2 ways of doing this: 1. double click "My Computer". 2. click the "Start" button of Windows, select "Run..." and type the drive-letter of the CDRom-drive followed by ":\SETUP.EXE". For example D:\SETUP.EXE if D is the drive-letter of your CDRom-drive. A dialog appears, select "Next". In this new dialog, if you want to install the software
on a different location, then do this now by selecting "Browse".
This is not required but some people like to keep things neat and clean.... The installation of the software will now be completed. When setup is finished copying files a dialog will appear in order to complete the network settings (not in Windows XP and Windows 2000). Automatically, while being at "network-installation", another dialog appears (Adapter Properties). Select "OK" - the virtual network driver is installed now - followed by "Exit and Restart". Windows will now reboot (not WinXP and 2K).
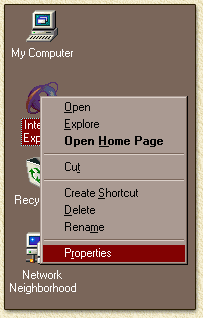
Finally, after Windows finished rebooting, we can check the network settings of the DVB card. This is done by clicking "Network Neighbourhood" with the right mousebutton, and selecting "Properties". A "Network" dialog appears, where we see the "Virtual DVB/IP Network Adapter". Just beneath the Virtual Network Adapter we see the protocol used by the DVB-card: "TCP/IP -> Virtual DVB/IP Network Adapter" - double click this, so we can verify the IP-Address used. This is the way it should be: IP-address = 192.168.2.239. If this is correct, select "Cancel" twice. Network properties will now be closed. Just in case the IP-address is not correct, you can correct this. Note that in private networks, the IP-address might be in the same ip-range as the normal network. Make sure the network ip-range and subnet mask are not th same. Remember the IP-address, as we might need it later on !
REGISTRY TRICK Note: this is a copy of the settings for
the driver version 1.22. MANUAL
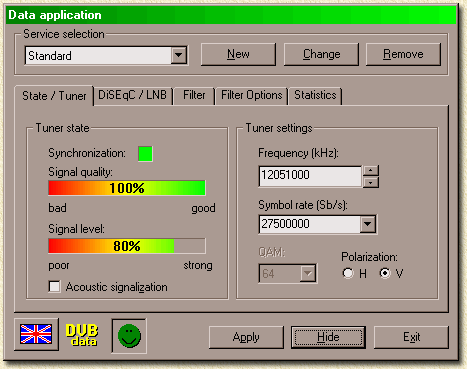
Note the icons in the Systray (in the lower right corener of your monitor, displaying the Windows time as well): - DVBPCI (the DVB server for DVB Data) Now select the tab "State / Tuner" where you can select "New" to add a transponder. Here you will have to enter "Frequency", "Symbol rate" and "Polarization" as shown on the transponder page. As an example we will setup transponder 113. Frequency: 12633250 Select "Apply" and the indicators ("Signal quality" and "Signal level") will show a value now. The exact values aren't that important. The indicator in the SysTray will either display a green (dark or ligh) smiley if reception is OK. A red smiley indicates NO RECEPTION which can be caused by a typo or a badly adjust dish. Select the "Filter"-tab and add, in a similar fashion, the filters as shown on the transponder page. The Radius login, used by Europe Online, requires one additional setting: at the tab "Filter Options" you must check the "Calculate MAC address from the IP address of the dialup connection". The IP-address (0.0.0.0) is not very important, the application will changes this if needed. Repeat this entire "step" to
setup all required transponders. When done, select "Hide". Note: "DVB Data Services" will always be required when internetting!
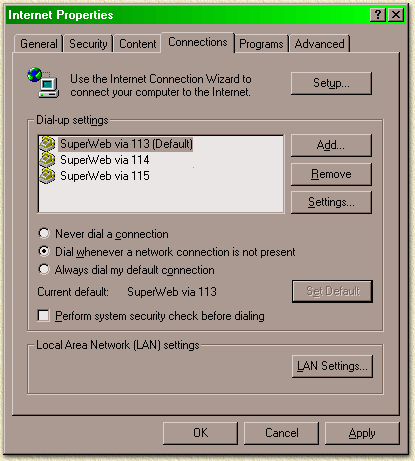
So, now we're almost ready for our first INTERNET Test-drive, but first we need to do the proper settings for the Internet Explorer. Note: similar settings are required for
Netscape, Opera, etc. NetCaptor however uses the Internet Explorer settings.
In the pictures above this text you will notice that I have 3 dialup-adapters in use. Take a look at the Dialup-page for more information and tips. I use 3 dialup-adapters so switching between transponders is easier. Select the dialup-adapter you want to use for Internet by Satellite and select "Settings".
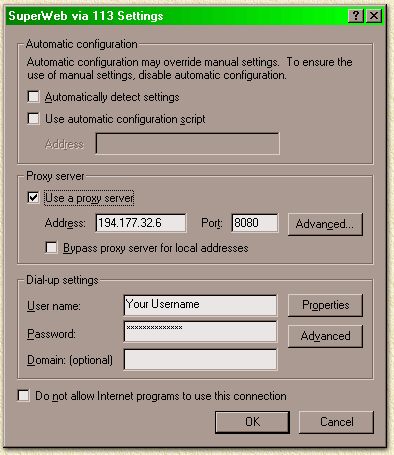
Make sure "Use a proxy server" is checked. Enter the proxy server's IP-address at the "Address" field. This should be the proxy that goes with the transponder you would like to use (take a look at the transponder page). For the transponder 113 the (new!) IP-address should be 194.177.32.11 (in picture above the old ip-address is mentioned). Next step is to enter the proper "Port"
number (8080). Here you can also enter the username and password
for the dialup adpater at the fields "User name" and
"Password". Select "OK" and repeat these steps for each individual Dialup-adapter. If you experience problems mind you to change the same settings for "LAN Settings" as well. When finished, close the window by selecting "OK". Starting your first session
That's it ! Now you can surf by Satellite ... Setup of the TV and Teletext application On this page I will briefly describe how to get all the Radio and TV stations up and running for the DVB TV&Radio application without to much effort. Thank God this a relatively easy. You could have the program to search for the Radio and TV stations but there is an easier way to do this. I made my settings available for download so just about anybody can use it. The Astra settings can be download at either TechnoTrend or Hauppauge - See DVB Drivers for details. Click on the Windows "START" button. Select "PROGRAMS" - "HAUPPAUGE WINTV DVB-s" - "DVB TV & Radio". In the newer release (ie. 1.22) only the options "DVB Data Services" (for surfing the Internet) and "DVB TV & Radio" remain. In the "DVB TV & Radio" application, click on the silver colored binder to select the Astra settings file. The key combination CTRL+O will do the same job. If you downloaded the Astra aettings, you can now select the unzipped TPR-file and select "Open". All Radio and TV settings are now done. 2 remarks:
|
||||||||||||||||||||||||||||||||||||||||||