| Print this page - use Landscape |
Search the WeetHet Pages |
||||||||||||||||||||||||
| WeetHet is being updated! - Current articles will slowly move to www.tweaking4all.com For excellent webhosting that is reliable and affordable, we highly recommend: LiquidWeb |
|||||||||||||||||||||||||
|
On this page ...
Before we start: Collect the proper information Before you start, collect the following information, so installation will run smoothly:
Note: It is possible that your ISP uses just one DNS server, this is not a problem. Note: Most users do not need a PROXY. Step 1: Goto Dialup Networking Double click "My Computer". Double click "Dial-Up Networking". Note: It is possible that "Dial-Up Networking" is not avaible. It is possible that this is not installed with the setup of Windows. Installation is done quickly:
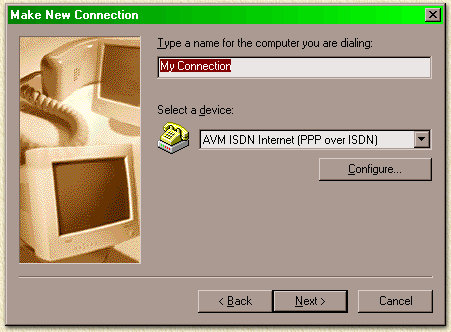
Step 2: Make a new connection Double click "Make New Connection", the next dialog (a welcome dialog might appear, select "Next" in that situation, in order to come to this dialog):
Type at the field "Type a name for the computer you are dialing" a name for easy identification of your ISP. In my example I use "Superweb". SuperWeb is my ISP. Internet by Satellite: If you're using Internet by Satellite, then consider adding the transponder name to the connectionname. For example "Superweb via 113" indicating that you're using "SuperWeb" and transponder 113. It's easier to make several dialup's, one for each transponder. This way Internet Explorer automatically uses the proper proxy (if you made the proper settings in Internet Explorer) Now choose the modem you wish to use for this dialup connection. Most people have just one modem, so the selection is limited to one. If you're using an ISDN adapter, you might have more than 1 option. I use the AWM Fritz! USB which works like a charm. Try to locate an ISDN modem with PPP or RAS connection type. Step 3: Enter telephone data Select "Next". A new dialog appears. Enter the "Area code" of your ISP.
SuperWeb uses a free 0800-number so I use"0800" here. Select the country of your ISP. Once again: enter the data proper for your ISP ! Do not use this info unless you are using SuperWeb as well! Step 4: Finishing up Select "Next". Once more, a new dialog will appear, now select "Finish". The Dialup-adapter is complete now.... Step 5: Some details ... You're probably looking at the Dial-up-networking-window right now. You should see the newly made dialup. If you're not seeing the dialup, then double click on "My Computer". Now double click "Dial-Up Networking". Now you will see the dialup. Click it with the right mouse button and select "properties" of your newly made dialup connection. Tip: if you select "View" - "Details" from the Explorer menu, you will see much more info on the dialup adapter even when you're connected to the internet!
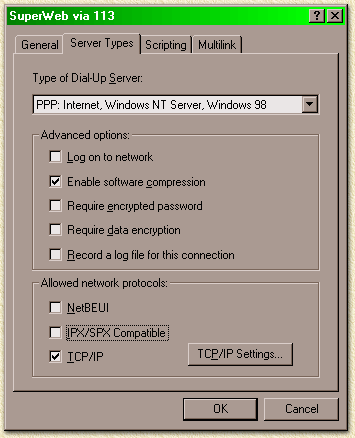
In the snapshot you'll see the settings for SUPERWEB ! Your ISP might require different values here - check their info ! Most ISP use the same settings at the tab "Server Types" - check it anyway. Click "TCP/IP Settings".
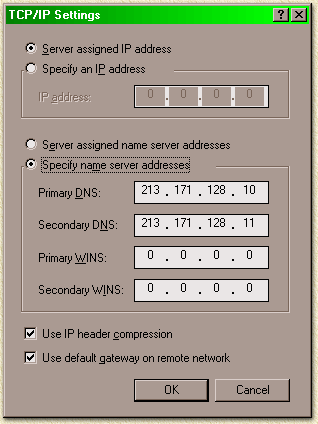
Now enter the DNS IP-address or addresses. In the example I'm using the SuperWeb DNS. Some provider have a secondary DNS (Tref for example does). Some providers assign you an DNS on connection. Select "OK" and once more "OK".
OPTIONAL - Step 6: Adjusting redial speed - WINDOWS 9x ONLY! This step is not required, but can be very helpfull for ISDN, if your dealing with an ISP that is hard to reach. Note: use this at your own risk. For me and several others this works great ! After applying this you will not need a Super Dialer again,.. you just made the dialup adapter a super dialer :) Note: This step will have impact on the redial behaviour of ALL dialup-adapters! Note: This tweak is designed
for Windows 9x - although it might work with other Windows
versions too.
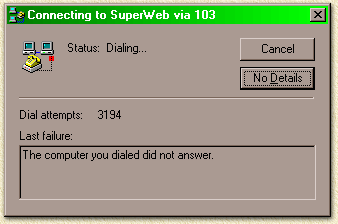
Answer both dialogs by clicking "OK". The changes are now activated ! Just to give you an example (it's crazy I know): 3194 redials and still NOT connected... I'm happy to say that I usually get a connection below 500 redials....
OPTIONAL - Step 7: Setup of the PROXY When and Why should I use a proxy?
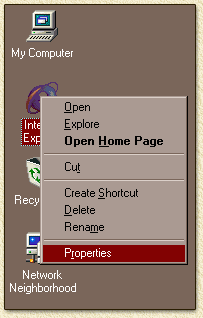
Now it's time to set the proper proxies for the dialup-adapters. Click with the right mouse button on the big blue "e" on the desktop and click "Properties".
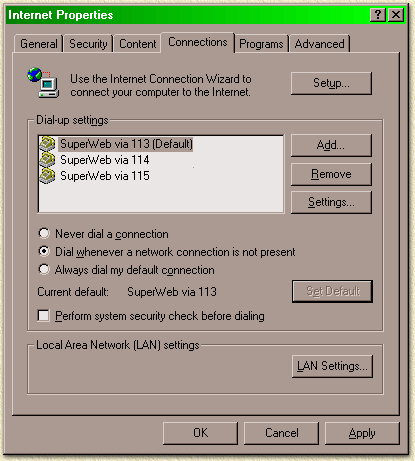
After clicking the tab "Connections" you will see this dialog:
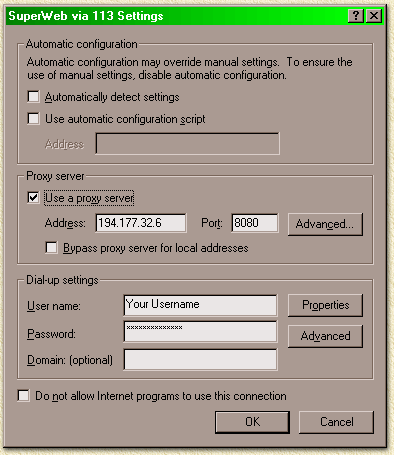
Note: This is a Internet Explorer 5.01 screendump. Yours might be different but basically the same. Make sure you're at least using IE 4.0 or better. If you have more than 1 dialup-adapter then these will appear here as well. Select the Dialup-Adapter you would like to set the proxy for (in this example: "SuperWeb via 113"). Now double click the dialup-adapter or click once on the dialup-adapter and click "Settings". This dialog will appear:
Check the option "Use a proxy server" and enter the proxy IP-address at the "Address"-field and the port number in the "Port" field. Note: in the picture I'm using a random IP-address and portnumber. You should use the address and port of YOUR PROXY. Internet by Satellite: Check the transponder page for Europe Online details. Don't forget that each transponder has a different ip-address for it's proxy ! Internet by Satellite: ONLY USE THE PROXY OF EON! OTHERWISE INTERNET BY SATELLITE WILL NOT WORK! Select "OK" and repeat this for the other dialup-adapters. |
|||||||||||||||||||||||||


