|

| Print this page - use Landscape |
Search the WeetHet Pages |
||||||||||||||||||||||||||||||||||||||||||||||||||||
| WeetHet is being updated! - Current articles will slowly move to www.tweaking4all.com For excellent webhosting that is reliable and affordable, we highly recommend: LiquidWeb |
|||||||||||||||||||||||||||||||||||||||||||||||||||||
|
On this page ...
Overview
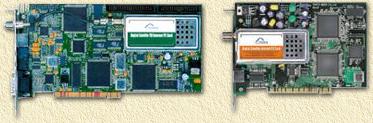
This guide is good to start working with the combination of Europe Online and the Pent@Media Pent@VISION board, even in combination with SuperWeb ! The great thing about the Pent@VISION is that it actually works instantly with the new login used by EON.
The now following text is based on my own experiences and the experiences of others. I can't guarantee that this is the best, fool proof method of installing. By my knowledge however, this is a very easy and good working method. PentaMedia Pent@VISION Setup Requirements Requirements:
Short briefing for the impatient & Step by Step guide The tabel below you can be used in two ways: 1. For the impatient (like me) 2. For the less experienced
Shutdown your computer, if you have not done so yet. Remove the power-cord. Remove the screw and finally remove the "hood" of the PC-case. !!! DO NOT SWITCH YOUR COMPUTER ON UNTIL STEP 8 !!!
This is not to hard
to find since most manufacturers use these color codes to identifcy the
slots:
INTERNAL AUDIO
EXTERNAL AUDIO
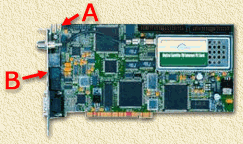
Check, just to be sure, that the card is inserted correctly
and not like often happens slightly tilted or not inserted far enough
into the slot (the golden contacts on the bottom of the card, should not
be visible).
The centre pin of the connector used is simply the same
wire used inside the antenna-cable and therefor not very strong.
Do not power your computer yet !
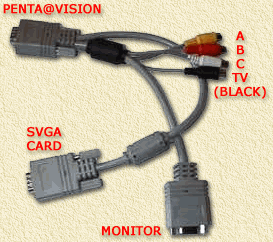
The Pent@VISION comes with a special cable for hooking up the monitor, (S)VGA card and video out. This cable is also equiped with connectors for Audio/Video in!
Install the cable as descibed.
After connecting all cables (including the powercord) you can switch your computer on so it will boot.
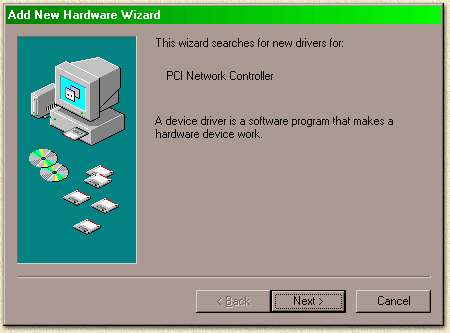
As soon as Windows (Windows 95, 98, 98SE, ME, 2000, XP) starts, it will come up with a notification that it found a PCI device (the Pent@VISION DVB-card). The next pictures illustrate this, using Windows 98 SE (Second Edition). Other Windows version will show similar dialogs with the exception of Windows NT. Note: Windows 95 (release 1) does not support more than 2 network cards. So if you have the Harmonic, a dialup adapter AND a regular ethernet adapter, then you MUST display the ethernet adapter in the device manager. My suggestion here: UPGRADE to Windows 98/98SE/ME ! Note: This setup is Windows 9x based, other Windows versions might work in a similar fashion. Note 2: WinSock 2.0 is required to get things up and running and Windows 95 does not include WinSock 2.0. Download the WinSock 2.0 update by Microsoft here.
Select "Next". Select "Next". Check "Search for the best driver for you device" and select "Next". If you plan to use the driver on the CD-Rom, check "CD-ROM", if you plan to use a newly downloaded driver, check "Specify Location". So you can select either the CDRom or the downloaded driver as a driver source. Check out the drivers page if you want to get the latest version. Select "Next". Windows will display a message that it found the Harmonic card. Select "Next". Windows will now inform you that it used the drivers and installed the card. This last dialog indicates that Windows finished the installation of the driver. Select "Finish" to complete. Windows will ask you to reboot, please do so or you PC might "freeze" (thrust me: I did this) !
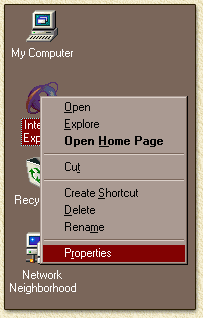
After the computer rebooted, installation of the driver can be checked by clicking with the right mouse button on "My Computer" and selecting "Properties". Select the tab "Device Manager" and open the group "Network Adapters ". Locate the DVB card ("Pent@Vision Satellite NIC") - if you find then all is OK. Just before we continue our journey, let's first check some settings for this card by clicking with the right mouse button on the "Network Neighborhood" icon on the Windows desktop. Look for the "TCP/IP -> Pent@Vision Satellite
NIC" and click it once with the left mouse button. The dialog that appears will show you the TCP/IP settings
for the Pent@Vision. Note that default it is set to "Obtain an
IP address automatically". Change this to "Specify an
IP address". After changing the IP-address and Subnet Mask, select
"OK" and "OK" again.
Start "SETUP.EXE" or "SETUP" of the Pent@Vision CDRom or of the installation diskette 1. There are 2 ways of doing this: 1. double click "My Computer".
2. click the "Start" button of Windows, select "Run..." and type the drive-letter of the CDRom-drive followed by ":\SETUP.EXE". For example D:\SETUP.EXE if D is the drive-letter of your CDRom-drive or A:\SETUP.EXE if you're installing from diskette. A dialog will appear. Select "Next". If you want to install the software on a different location,
then do this now by selecting "Browse". This is not required
but some people like to keep things neat and clean.... After installation is finished, select "Finish".
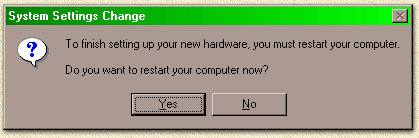
The computer will ask you for permission to reboot, please confirm by
selecting "Yes" and clicking "Finish".
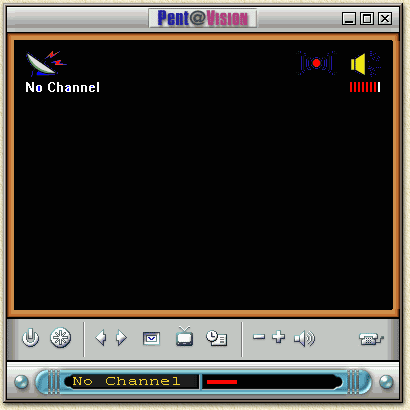
Once you're back in Windows, click on the Windows "Start" button and select "Programs", "PentaMedia", "Pent@VISION x.x" (where x.x identifies the version). The software will "fine tune" it's output the first time you run it ("Please allow 5 to 30 seconds ..."). This dialog will appear, please click "OK". Sometimes this is not enough and a more advanced setup start. A dialog will appear, telling you there is a problem with the video alignment, please confirm with "Yes". Finally the TV application will start, if you're looking at an image similar to this one, the all seems to be OK:
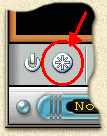
It's time to "tune-in". Click the tuner button, as indicated in the picture below:
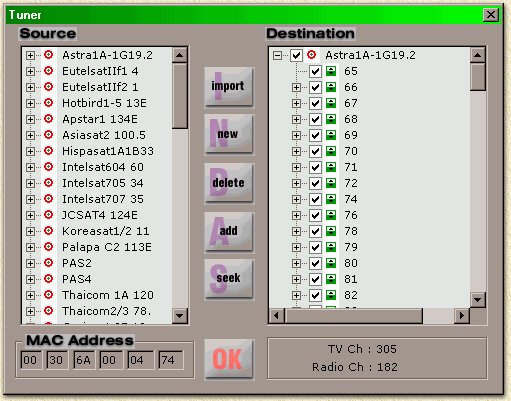
A Window will appear, where you can select the Satellite(s) you wish to use. If you're about to start using this card for Internet by Satellite then you'de want to start with the "Astra1A-1G19.2" since this is the one used by Europe Online.
In the "Source" listbox click "Astra1A-1G19.2" once with the lift mouse button and then click the "Add" button in the middle of the Window. Next select the "Astra1A-1G19.2" in
the destination window and select the "Seek" button in
the middle of the Window. The program will now start looking for all the
possible programs it can receive. In my test I found 305 TV channels and 185 Radio channels,... OK, most of them where not accessable due to encryption, but anyway...
So, now we're almost ready for our first INTERNET Test-drive, but first we need to do the proper settings for the Internet Explorer. Note: similar settings are required for
Netscape, Opera, etc. NetCaptor however uses the Internet Explorer settings.
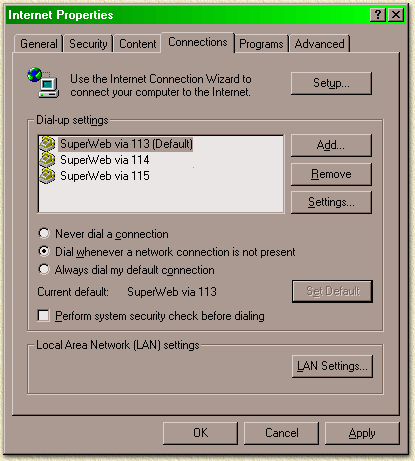
In the pictures above this text you will notice that I have 3 dialup-adapters in use. Take a look at the Dialup-page for more information and tips. I use 3 dialup-adapters so switching between transponders is easier. Select the dialup-adapter you want to use for Internet by Satellite and select "Settings".
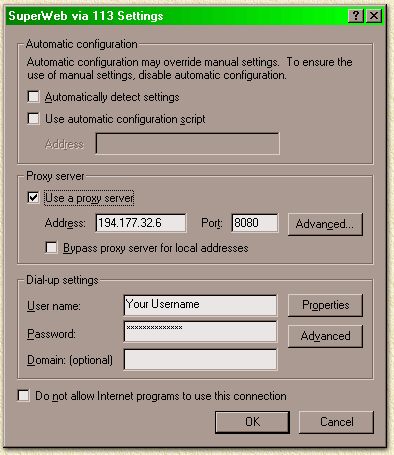
Make sure "Use a proxy server" is checked. Enter the proxy server's IP-address at the "Address" field. This should be the proxy that goes with the transponder you would like to use (take a look at the transponder page). For the transponder 113 the (new!) IP-address should be 194.177.32.11 (in picture above the old ip-address is mentioned). Next step is to enter the proper "Port"
number (8080). Here you can also enter the username and password
for the dialup adpater at the fields "User name" and
"Password". Select "OK" and repeat these steps for each individual Dialup-adapter. If you experience problems mind you to change the same settings for "LAN Settings" as well. When finished, close the window by selecting "OK".
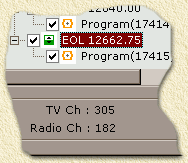
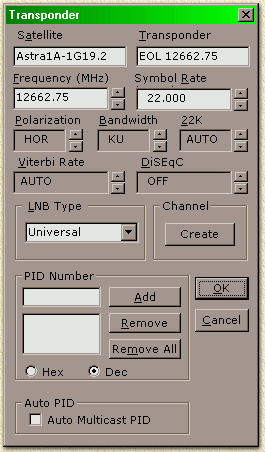
Unlike the older and more simple Pent@NET, the test drive starts by starting the Pent@VISION application by clicking the Windows "Start" button. Then select "Programs" - "PentaMedia" - "Pent@VISION x.x" (where x.x is the application version). Click on tuner button so we can select the proper transponder and frequency. The proper frequency can be found in the lower part of the destination listbox, as show above. Now double click the transponder you would like to use. For this example we'll asume transponder 115. The frequency for transponder 115 (take a look at the transponder-page) is 12.662750 GHz. Note: The frequency setting comes with the software installation as described above. Double click the frequency "EOL 12662.75", this dialog will appear: I'm used to call these transponder "EON 115"
instead of "EOL 12662.75", I changed the field called
"Transponder" to "EON 115" but found
the application crashing. The funny thing is that after a reboot the settings
where copied and working. Just don't forget to check the checkbox in front
of the "EON xxx" name and don't blame me if your machine
get's stuck ! These where the required settings to start with. Now select "OK". Now select the transponder you want to use. For our EON 115 example either select "EOL 12662.75" or incase you renamed it "EON 115" and select "OK". Your now back to your regular TV viewing application
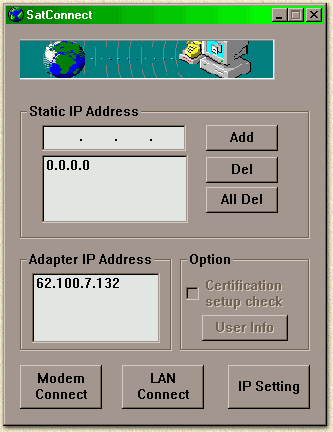
with a black screen. Now we start with the regular connection procedure. Click on the "Modem" connection button.
This dialog will now appear:
This is a nice feature of the Pent@VISION software: it is willing to work not only with dialup connections, but also with the LAN upstream connections :) Note: There is no "Static IP Address" required, so even the "0.0.0.0" can be removed. If you do have a fixed IP Address for your Internet connection then you can add this here. Let's assume we'd use a regular Internet connection by modem, so click the "Modem Connect" button. You'll see the regular dialup-adapter popping up. If username and password are correct, click "Connect". After realizing the modem connection, the "Sat Connect" dialog will prompt you with the found IP-address. Just select "OK" to continue, "Sat Connect" will now minimize. You may now also minimize (!) the Pent@VISION TV-application. Pent@VISION uses two different, yet very cool, indicators: 1. in the Systray (if you have set that option) a diamond is rotating when transfers are running.
2. in the Taskbar you will see the title of the Pent@VISION change to whatever transfer rate is running.
Disconnecting; |
|||||||||||||||||||||||||||||||||||||||||||||||||||||