|

| Print this page - use Landscape |
Search the WeetHet Pages |
|||
| WeetHet is being updated! - Current articles will slowly move to www.tweaking4all.com For excellent webhosting that is reliable and affordable, we highly recommend: LiquidWeb |
||||
|
On this page ...
Introduction: What format should I choose? Tip before we start: take a good look at the Video Formats page, for details! First of all, we need to know if our standalone DVD-player can handle CD-R or CD-RW media. Newer models, specially those that support MP3 playback, usually are capable of dealing with both media types. Older players usually don't. You will have to simply test this. If CD-R media doesn't work, then please try to use CD-RW media, since the reflection behavior of CD-RW is very similar to DVD. I tried this once with my old Toshiba DVD player and it usually works. If neither media type is supported (CD-R and CD-RW),
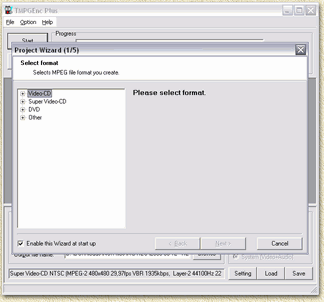
you're out of luck. Consider buying a new DVD player. What format should I use? VideoCD or Super VideoCD? Well this depends again on the capabilities of your DVD player. Does it support Super VideoCD? Then Super VideoCD (SVCD) is the choice to make because of the higher image and sound quality. If the DVD player does not support SVCD, then go for VideoCD (VCD). Unless that's not supported either, then you're back to the "buy a new DVD player" solution. See also the Video Formats page for more details on the two formats. So now we know the MEDIA TYPE and the VIDEO FORMAT we want to use. The required software Software for movie playback First try if you can playback the movie on your PC using the Window Media player. If not, then we will need to install (if not already) the Video Codec. For DivX go to the DivX homepage . This is needed for playback. MPEG Encoder uses the codec suitable for the movie, just as it does with basically any AVI file format. Software for transcoding Here we are at the core of our conversion process (called "transcoding"). Download TMPGEnc from the TMPGEnc website. First use the trial version to see if it works the way you expect it before buying the "Pro" version. I know I'm convinced that this is a tool worth it's money, but make sure you do too. Install it and run the application. Also keep in mind that the quality is similar to that of CCE and MainConcept MPEG Encoder, however, much slower than these two. Install the software first! The real work: TransCoding Transcoder means something like "converting from one format to another". After downloading and installing TMPGEnc, start it. You will see a window like this (I used version 2.59.47.155 Plus):
As you can see, TMPEnc can start with or without wizard. After a fresh install, TMPGEnc usually starts with the wizard. We will continue working with the wizard. Tip: In case the wizard is not visible, choose from the "File" menu the option "Project Wizard" (or simply press the key combination CTRL+W). Step 1: Select the proper format
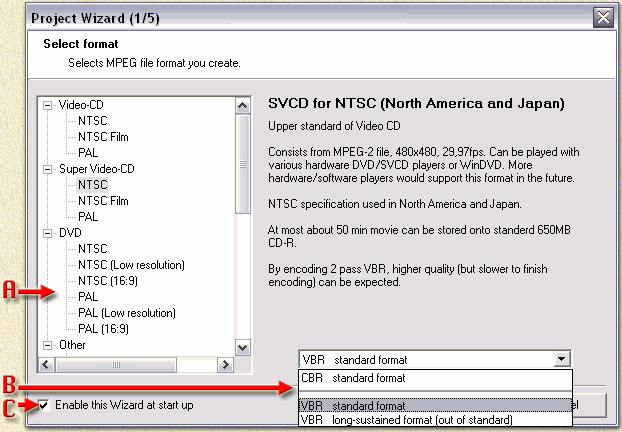
A: FORMAT In field A we can choose VideoCD (VCD), Super VideoCD (SVCD), DVD or a custom format. The TV-system, ie. PAL (25 fps), NTSC (±30 fps) or NTSC Film (±23 fps) is rather important. Two considerations here:
Note: Most movies you download fromthe internet are NTSC! B: VARIABELE BITRATE or CONSTANT BITRATE? Note: this option is not available when creating VideoCD, VCD only supports constant bitrate (CBR)! Both Super VideoCD and DVD support both constant bitrate and variable bitrate. Constant means that the available will be used fully,
even if it is not required (for example still-images). Praktically said: VBR (Variable BitRate) usually needs less storage space than CBR (Constante BitRate), with a similar picture quality. I always choose: VBR standard format at B. C: WIZARD? Check C if you want TMPGEnc to always start with the Wizard. Now click the "NEXT >" button. Step 2: Select Source file(s)
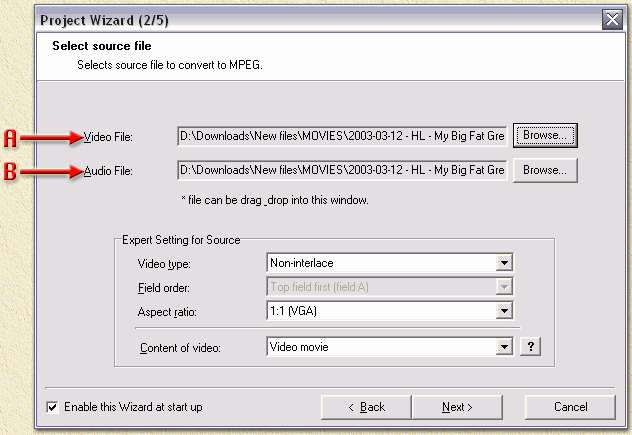
At "A" (Video) click the "Browse..." button, and choose the AVI you want to convert. Close the dialog (after selection) by clicking "OK". Verify at "B" (Audio) if it shows the same filename now (usually does). In case there is no filename here, the click "Browse..." for this option and SELECT THE SAME AVI FILE as you choose for Video. Note: Do NOT copy the other settings, like "Video type", "Field order", TMPGEnc will automatically enter data into these fields! Click "Next >" again. Step 3: Filter settings Leave this page as it is and click "Next >" again. Note: none of the checkboxes (except "Enable this Wizard at start up") are checked! This step is a bit more complicated, so please pay attention here! Note: bitrates, when creating a VideoCD, are FIXED. If you are creating a VCD (not a Super VideoCD!) then you can skip this step.
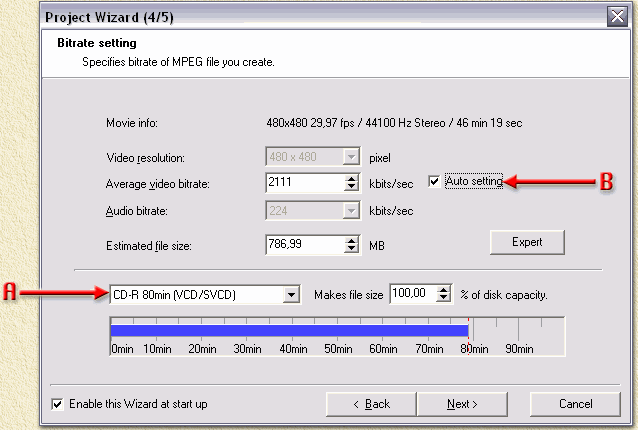
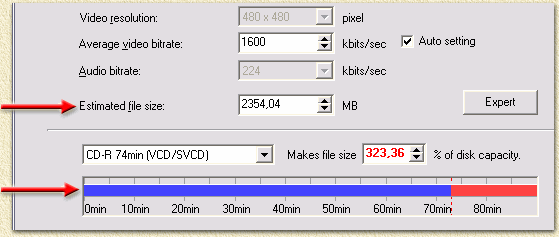
Previously we decided which format we will use for the movie, for example Super VideoCD. The question for this step: how many CD's do we want the movie to be put on? At "A" choose the type of disc (only use VCD/SVCD formats for VideoCD or Super VideoCD!) and check "B". Just below "A" you will see how much disc space will be used for this movie. Most likely, shit hits the fan now: When transcoding a 700 or 800 Mb movie, the most likely it will NOT fit on one CD. The bitrate calculation within TMPGEnc is not helping you very much here. Suppose you would like to create Super VideoCD formatted movie spread over 2 CD's, then you will see that TMPGEnc will not allow you go beyond a minimum bitrate. With SVCD movies commonly take 2 or 3 CD's and in that case you will see something like this:
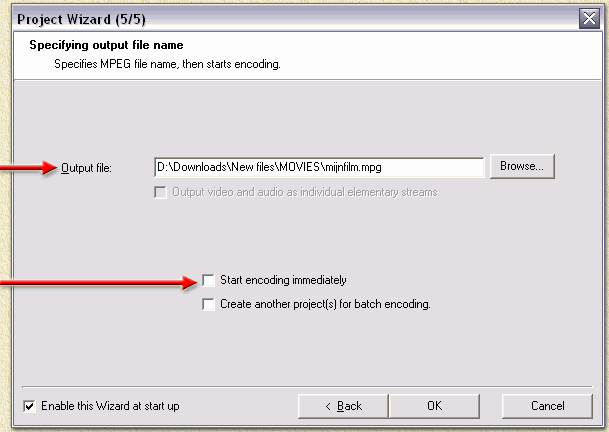
Don't worry, ignore it. We will fix this later! Just don't forget you had this problem in order to indeed fix this problem! Click "Next >". Note: TMPGEnc will warn you if a movie tends to become too large for a CD's. Just click "Yes" in order to continue! Step 5: Output File In the next window, we select the "Output file:", the filename of the transcoded movie. Either enter it manually or click "Browse...".
Remove the checkmark at "Start encoding immediately". Finally click "OK". Step 6: Ready to go? The next screen:
Please run through this checklist before we can start:
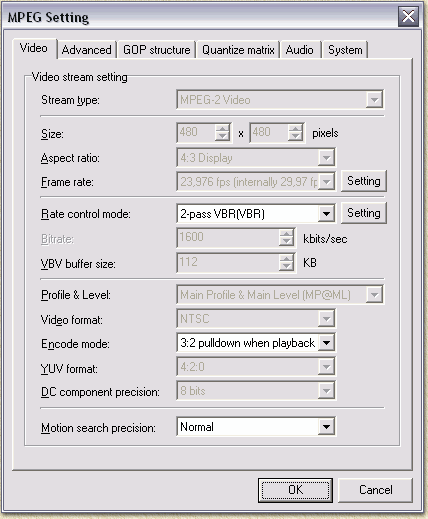
Step in between: adjust bitrate Note: Skip this step if you did not have a problem at Step 4! Note: With VideoCD you CANNOT change the bitrate and you can skip this part as well. Note: Later on you can cut a movie with TMPGEnc after transcoding. OK, so the movie will become too large. Commonly VideoCD and/or Super VideoCD, uses 2 to 3 CD's for one movie. Use the WeetHet Bitrate Calculator and determine the desired bitrate for video. Don't forget to set the Audio bitrate - in the Bitrate calculator - to 224 Kbps. So now we knop the video bitrate we will nee. Click "Setting" in TMPGEnc. This screen appears:
Next to the field "Rate control mode:" you see the button "Setting", click it. This window appears:
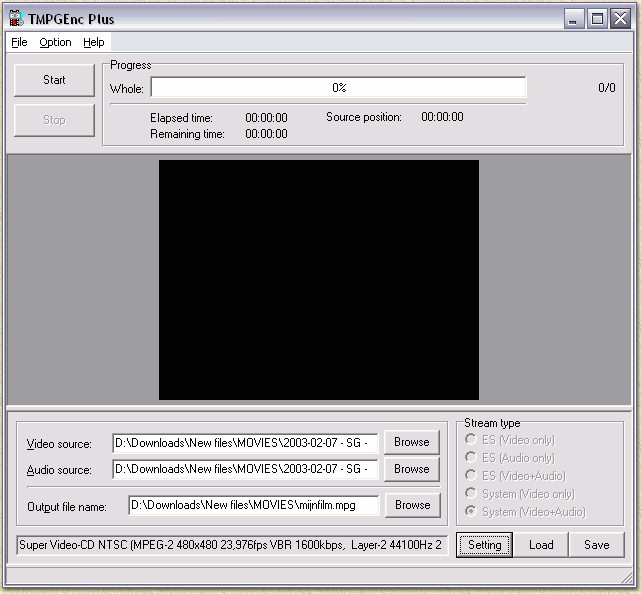
In the field "Average bitrate" you will have to enter the bitrate suggested by the bitrate calculator. Leave the other values as they are (or copy the ones from the screenshot - keep in mind that these are Super VideoCD settings. Click "OK" twice so you return to the main window of TMPGEnc. Final Step: Start transcoding This is simple: Click the "Start" button and wait a few hours ... (MainConcept MPEG Encoder is MUCH faster!).
|
||||