|

| Print this page - use Landscape |
Search the WeetHet Pages |
|||||||
| WeetHet is being updated! - Current articles will slowly move to www.tweaking4all.com For excellent webhosting that is reliable and affordable, we highly recommend: LiquidWeb |
||||||||
|
On this page...
Introduction Short intro: what do we need and what type of cables can we make? Cable types We only cover the so called UTP network cables. These are the cables with one of those flat little connectors ("jacks") that look very familiar to the connectors used on regular phones (POTS). There are two types of cable we can create: 1. Straight/Normal networkcable. These are the cables we normally use to connect a PC to hub, switch or router on their LAN connections. The other side is connected to the networkcard (NIC) of your PC or laptop. This is a 1 to 1 connection. We use these cables for either connecting one PC directly to another PC, or for creating an uplink from one hub/switch/router to another hub/switch/router. Transmission and reception signals are swapped. Tools and materials We will need: 1. RJ45 Crimp tool
These articles you can buy at a good computer store or electronics shop, like RadioShack ... The RJ45 crimptool is a special tool for RJ45 connectors. The connectors are rather cheap,... however can be used only once! Get a piecee of CAT-5 cable, the length does not
really matter, just keep it shorter than a 100 meters (app. 300
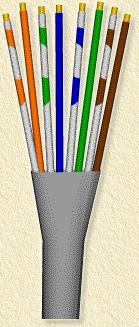
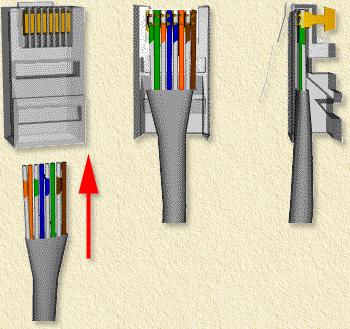
foot). CAT-5 is a quaity indication of the cable you're using. How to create a straight cable? Step 1: You do NOT need to strip the individual wires! Set the wires in the order described below. This order must be used on both cabel ends. Now hold the wires next to each other and use the siccors to cut them in 1 cut to the same lenght.
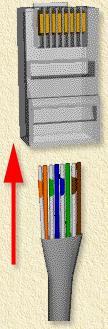
Step 2: Pay attention to these points: - Hold the connect as show in the images Tip: Make sure the mantel of the cabel also goes into the connector, so it will be crimped into the connector as well.
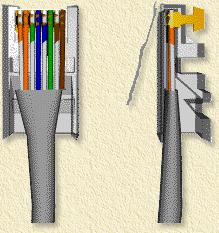
Step 3: Tip: Before crimping the connector, make sure the colors are in the right order. With most RJ45-crimptools, you might need to squeeze more than once, just to make sure the connector is connected properly. Now repeat these steps for the other end of the cable as well, and your cable will be finished. How to create a crossed cable? A crossed cable is created in the same way as a straight cable, with one minor difference. Step 1: For one end of the cable, do the steps as described for the straight cable. Note: ONLY for ONE end of the cable! Step 2: The other end is being done in the same way, only with this difference that the order of the wires should be different:
Note: Only for ONE end of the cable! The other end needs to be done in the same way as for a straight cable. Step 2: |
||||||||