Welcome to WeetHet!


Managed Web Hosting by Liquid Web

Your IP address:
3.149.239.79
     
 
Print this page
- use Landscape
Search the
WeetHet Pages
WeetHet is being updated! - Current articles will slowly move to www.tweaking4all.com
For excellent webhosting that is reliable and affordable, we highly recommend: LiquidWeb

On this page ...

How to boot from a USB device ...

USB - Universal Serial Bus - is a standard for connecting additional equipment to your computer, like printers, scanners, webcam's, digital camera's, keyboards, mouse, harddisks, etc. For more details, please read this article. One of these devices is the Thumbdrive, keychange disk, USB pen, etc however you want to call them. We'd like to use one of those to boot our PC from.

Meer en meer PC's staan het toe van een dergelijke thumbdrive te starten. Maar helemaal vlekkeloss en eenvoudig is dit niet. In dit artikel focussen we dus op een dergelijke thumbdrive. We willen deze drive voorbereiden vanuit iedere gewenste Windows versie (Ik deed het met Windows XP), d.m.v. MKBT.

Tip: niet alle PC's zijn instaat van een USB disk te starten. Kijk of jouw PC dit kan door te kijken welke BIOS instellingen beschikbaar zijn. Update eventueel de BIOS van je PC.

Note: helpful resources can be found here: BootDisk.info, Nu2 (Bart's bootable Windows XP), and How to make a USB bootable FlashDrive with/for Linux.

Note: Read the disclaimer first!

USB - How to make a USB BootDisk

Step 1: Getting some bootsectors

To be able to boot rom a device we need so called bootsectors.
The simple explanation is this: When the PC starts, the BIOS will scan the indicated storage devices and look for these bootsectors. They contain information for the BIOS to be able to start from this device. Bootsectors can be found on all bootable media (harddisk, floopy disk, CDRom, etc).

Option 1 - Using a floppy disk formatted in Windows

Before we can make a USB device bootable (specifically refering to USB thumbdrives!), we do need to get our hands on a bootable floppy. In all current Windows versions (including Windows 2000 and XP) we can do that by formatting a floppy disk.

Open the Windows Explorer and right click the A: drive.

Choose "Format..." from the upcoming popup menu.

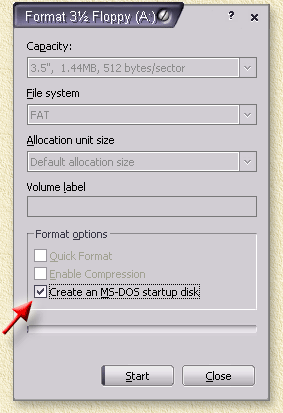
A window appears with some option: Check the option "Create an MS-DOS startup disk".
Verify if Windows is indeed formatting the right drive! Usually it should show "Format 3½ Floppy (A:)".
Once you're sure about the drive, click the "Start" button - Windows will now format the disk and make it bootable.

Windows - Creating a bootable floppy

After creating this bootable floppy, we will now extract the bootsectors from this floppy using Bart's MKBT.

Open a DOS Window and go to the directory where you extracted MKBT.
Type mkbt -c a: bootsect.bin as shown below (yellow text).

C:\Windows\System32\cmd.exe

D:\Downloads\mkbt20>mkbt -c a: bootsect.bin
* Copy bootsector mode (-c)

D:\Downloads\mkbt20>

Note: Here "a:" represents the drive that holds the newly made bootable floppy!

Once the command prompt returns, you will have a bootsector stored in the file "bootsect.bin".

Do not close this DOS window yet, we will need it again in step 3!

Option 2 - Using images of bootable floppies

On the Internet you can find a lot of bootable disks. Take a look at the BootCD.info website.
You will find plenty of floppy disk images and tools to write these images to floppy disk.
Most of these disks are specialized, for example direct network access, packed with handy tools, etc.
Follow the instructions there on how to make a bootable floppy.

One of the best network enabled bootdisks is "Bart's Network Boot Disk".
I highly recommend this disk for the advanced user!

Tip: Some .BAT files refer to the A: drive directly - this CAN cause problems during boot!

Step 2: Preparing the Thumbdrive

Format the tumbdrive in the same format you formatted the floppy disk (which is FAT!).
So if you used the option where we created a bootable floppy in Windows, the format the thumbdrive using FAT or FAT16.
You can try NTFS or FAT32, but I have to say that both faioled on the thumbdrives I tried.

Right click the drive letter of the thumbdrive and select the option "Format...".

Select the proper format (FAT) and click "Start".

Step 3: Copy the bootsectors to the ThumbDrive

Thanks to MKBT by Bart (visit his website for more fun tools!) we can now easily copy the bootsectors onto the USB thumbdrive.
Download the file either from his website (to get the most recent version, or to take a look at his other cool tools) or download version 2.0 from our website (see our downloads page).

Open a DOS Window and go to the directory where you extracted MKBT (if you haven't done so in step 1, or in case you closed the DOS window in step 1).

Type mkbt -x bootsect.bin G: as shown below (yellow text). Make SURE that you set the right drive letter here!
"G:" represents the thumbdrive! So if your thumbdrive has another drive letter, then change the "G" accordingly!

C:\Windows\System32\cmd.exe

D:\Downloads\mkbt20>mkbt -x bootsect.bin g:
* Expert mode (-x)
* Warning different filesystem ID
Size=0bytes OEM="(=_[sIHC" VolLabel="NO NAME" FileSys=""

D:\Downloads\mkbt20>

!! AGAIN: MAKE SURE YOU SELECT THE RIGHT DRIVE LETTER !!
Here "G:" represents the thumbdrive!

Once the command prompt returns, you will have a bootsector on your thumbdrive.

Step 4: Copy files to the thumbdrive

Once the drive is bootable, it would be nice to have some essential files on it, for the computer to make sense.
Copy all the files of the A: drive (from Step 1, either option 1 or 2) to the thumbdrive.
Naturally the boot floppy used to extract the bootsectors from should be in that A: drive.

Tip: if the boot floppy has a *.BAT or a CONFIG.SYS file, you might want to check if it uses absolute paths (ie. A:\...) or relative paths (ie. \...). Any reference directly to the A: drive might cause issues during boot!

Step 5: Restart and go into the BIOS

Now shutdown/restart your PC and go into the BIOS.

Entering the BIOS is commonly done by pressing the "Del" button on your keyboard.

Tip: Alternatives are "F1", "F2", "Insert", and "F10". Your PC's BIOS might even require a different key to be pressed. Commonly a PC will show a message like "Press [Del] to enter Setup" to indicate that you need to press the "Del" key.
Watch the boot screen carefully. Usually the BIOS shows you which key to press. Or refer the manual of the mainboard/PC.

Note: Some laptops allow you to set the boot devices using a Windows application. Toshiba for example does this with some of their laptops. The application is either a standalone application or a applet in the Control Panel.

Step 6: BIOS settings

Depending on the BIOS of your computer, you can set the USB stick as a boot device.
If your PC's BIOS does not seem to support this, check if there is an update for the available BIOS!
Your milage may vary :-)

For some reason most BIOS'es prefer to refer to the thumbdrive as a USB Removable Floppy Disk or USB Zip Disk.
Please email me settings if you found settings that work for a particular BIOS.
Please DO NOT send me questions. Please ask them in the FORUM so others can read the replies as well.

Tip: Some AMI BIOSes require you to enable the option "USB Keyboard Legacy support"!
For example: the Asus A7N8X-E Deluxe - with thanks for the tip to Fernando from Spain!


  • Generic approach

If your BIOS is not in the list below, or the settings do not seem to work with your PC, then do this:

- Go into the BIOS
- Go to the page that determines the boot order (usually called "Advanced Setup", "Boot options", or "Feature Setup")
- Try all USB drive variants. Start with "USB ZIP", then "USB FDD", "USB HDD ", etc.
- To speed up the testing, DISABLE ALL other boot devices. This goes for the 2nd, 3rd etc, but also for so called "Alternative boot devices".


  • AMI BIOS

Depending on the version of your AMI-BIOS (enter using the "Del" button):

Option 1;
This refers to an AMI-BIOS I found on my own spare computer.
AMI refers to it as "AMIBIOS SIMPLE SETYP UTILITY - VERSION 1.21.12".
(version number may vary)

Go to "Feature Setup".
"Enable" these options: "USB Function Support", "USB Function For DOS" and "ThumbDrive for DOS".

Go to "Advanced Setup".
Set the "1st Boot Device" to "USB RMD-FDD".

Reboot the PC and it now should boot from the Thumbdrive.

Option 2;
Settings I found on a German website (www.chip.de).

Go to "USB Mass Storage Device Configuration".
Select "Emulation Type" and set it to "Harddisk".
Go to the "Boot Menu" and set the "1st boot device" to "USB-Stick".
No you can exit the BIOS, saving the changes.
If this does not seem to work, then you can try (it sometimes seems to work) setting the "Emulation Type" value to "Floppy" or "Forced FDD".


  • PHOENIX/AWARD BIOS

On my Shuttle XPC (SN85G4), the Phoenix/Award BIOS:

Go to "Advanced BIOS Features".
Go to the "1st Boot device" and set it to "USB-ZIP".

Tip from Daniel Butler: I have a Phoenix BIOS, Revision 6. After a lot of frustration, I found that you need to go to the Boot Order screen and select "Harddisk" and hit enter, giving you a list of IDE hard drives - for some reason, this BIOS prefers to call a USB device an IDE harddrive...but whatever. :)

And that's all. Reboot the PC (Exit the BIOS saving the changes) and see if it wants to boot from the thumbdrive.
Of the 5 PC's I tried, 4 where succesfull.


Klik hier om te wisselen naar nederlandstalige pagina's You are currently on the English pages.