|

| Print this page - use Landscape |
Search the WeetHet Pages |
|||||||||||||
| WeetHet is being updated! - Current articles will slowly move to www.tweaking4all.com For excellent webhosting that is reliable and affordable, we highly recommend: LiquidWeb |
||||||||||||||
|
On this page...
New model Garmin eTrex connector Below you will find the connector pinout of the more recent Garmin eTrex connector. It is being used with the Garmin eTrex family (standard yellow one, Venture, Legend, and Vista).
You will need this info to hook your eTrex to a PDA or PC. The pin layout is as shown below;
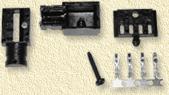
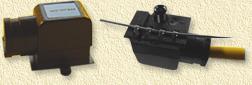
Tip: If you're busy with an eTrex connector anyways then you might want to consider adding external power for the eTrex aswell. Use a 3V powersupply and connect it to pin 1 (+) and 4 (-) of the eTrex connector. pFranc Assembly The pFranc-connector comes as a do-it-yourself assembly kit.
In the kit you will find 3 plastic parts,
one screw and a metal strip with pins on it.
After breaking the pins loose, we will
need to bend them.
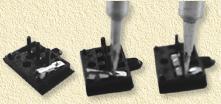
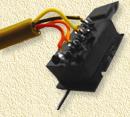
First lay the pin, with the bended part
facing down, in the plastic piece with the four square holes (picture
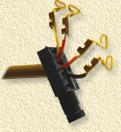
1). Now get your wires and connect (solder) them on the pins you just did bend. After doing so, gently push each pin, one at a time, through the plastic piece with the large rectangle opening as show in the image below.
Now we need to put the pins in the proper position in the plastic piece we just used for bending the pins. To make things a bit easier on you, use a needle to hold the pins in place. The illustration below shows you how.
Do this for all four pins. TIP: While you're at it, make a note which color cable you placed with what pin. If you're nor sure what the pin numbers are, then take a look at the image at the beginning of the page. After completing this for all four pins, gently move the two pieces of plastic together until it becomes one.
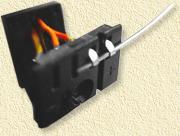
Do not yet remove the needle! The needle is good for some stability while assembling the connector. Now we need to place the "hood" over the connector. It's tha last piece of plastic which we gently put over the cable. Make sure that the cable do not make any kind of shortcut here!
After putting that together, gently rotate the connector and insert the screw in the hole (on the side where the pins stick out). Do not use excessive force when tightening the screw. After that you can remove the needle and your eTrex connector is finished. |
||||||||||||||