|
On this page ...
|
This page is based on the Parallax (OEM)
Basic Stamp II microcontroller.
We plan to control a Mitsubishi M50530 based
LCD display's.
Tip: for Hitachi
44780 based LCD displays see the Optrex
DMC2034 article.
I'll try to explain how to connect such an LCD display
to the (OEM) Basic
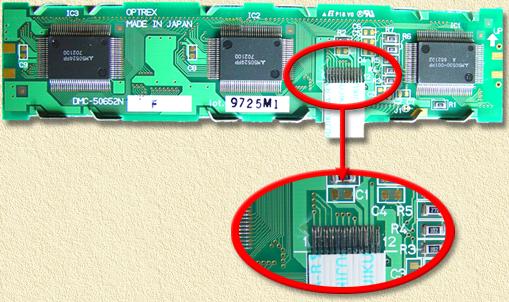
Stamp II,, based on a used LCD display from an Ericsson
phone (here we use the Optrex DMC-50652N or
the Seiko/IIS
C456002A) basically any Mitsubishi 50530 based
LCD should work.
Pictures of the LCD
in action can be seen here.
The displys I used, are an OPTREX DMC50652N (= Seiko/IIS
C456002A) which has 3 x 40 (3 lines, 40 characters) chars.
Note: I wouldn't have done
this article without the help of Peter
Pitzeier. He was the first one to get it running with
a BasicStamp
1.
Do not forget to read the disclaimer!
Note: The example code can be downloaded HERE. |
|
Overview
- How to connect the LCD display
to my OEM Basic Stamp 2
- Powersupply adjustments
- Handy BasicStamp2 instructions;
example 1, Text
- Handy BasicStamp2 instructions;
example 2, Running bar
- Original BasicStamp1 code
How to connect
the LCD to the Basic Stamp II
Here we show you how to make the proper connections.
Make these connections:
|
1
|
DB7 (databit 7) |
P7 |
|
2
|
DB6 (databit 6) |
P6 |
|
3
|
DB5 (databit 5) |
P5 |
|
4
|
DB4 (databit 4) |
P4 |
|
5
|
EX (Execute) |
P3 |
|
6
|
R/W (Read/Write) |
P2 |
|
7
|
I/OC1 (IO Control 1) |
P1 |
|
8
|
I/OC2 (IO Control 2) |
P0 |
|
9
|
VLCD (LCD power) |
+3 ... +12V (see schematics) |
|
10
|
VSS (GND) |
Vss (= Ground) |
|
11
|
Vdd (logic power) |
Vdd (= +5V) |
|
12
|
not used |
- |
LCD Powersupply
For pin 9 of the LCD we will need to create a little
powersupply adjustment.
On average (milega may vary) pin 9 needs approximately +11 Volt on pin 9 to
seen anything.
Below you will find an easy to build schematic. This
can also be used for powering your BasicStamp by connecting Vss
(ground)
and VDD (+5V) to the appropriate pins of the BasicStamp.
Required parts:
|
1
|
7805 voltage regulator |
|
1
|
Variable resistor of app. 10
KOhm |
|
1
|
Adjusted powersupply app.
8 to 15 Volts |
Schematics:
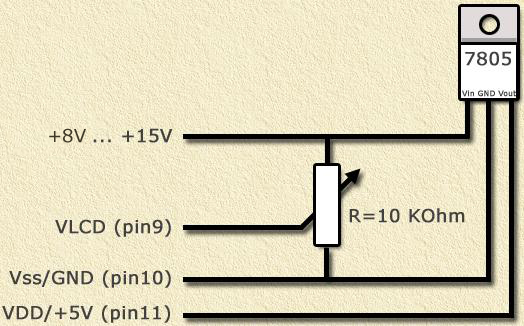
Note: pin out is based on info I got
from Peter
Pitzeier - Many thanks Peter!
Sending Data
4 bit wise
OK, so now we hooked to LCD up to our Basic Stamp 2.
How do we control a parallel controlled LCD panel by using only 6 wires?
The answer is actually pretty simple (thanks to Jon's
work): the LCD panel can be controlled using 8-bits or 4-bits. 4-bit
mode is working identical to 8-bit mode mode, however we transmit the
upper 4 bits and the lower 4 bits in sequence instead of 8 bits parallel.
See the Optrex
DMC2034 article for
more details.
Handy
instructions,
Example 1
Sending instructions is basically the same as sending
characters, we only need to use different values for the control pins
(E, IOC1, IOC2). To save you a lot of work, I create som subroutines
that do this job for you.
An overview of the GOSUB routines:
| LCD_Init |
GOSUB LCD_Init |
Initialize the display. |
| LCD_WriteInstr |
TheData = %xxxxxxxx
GOSUB LCD_WriteInstr
|
Write control instrcution. An instruction is 8 bit,
binaire code.
Define TheData as VAR byte. |
| LCD_WriteChar |
TheChar = "A"
GOSUB LCD_WriteChar |
Send character to display.
DefineTheChar as VAR byte. |
| LCD_SetFunction |
GOSUB LCD_SetFunction |
Set communicaton and font settings. |
| LCD_ClearHome |
GOSUB LCD_ClearHome |
Clear display and set cursor in home position. |
| LCD_SetDisplay |
GOSUB LCD_SetDisplay |
Cursor mode (blink, underline, etc). |
| LCD_Entry |
GOSUB LCD_Entry |
Define cursor direction |
| LCD_CursorXY |
TheCursorX = X
TheCursorY = Y
GOSUB LCD_CursorXY |
Move cursor to line X (0, 1 or 2) and column Y (0 ...
39).
Define TheCursorX and TheCursorY as
VAR byte. |
| LCD_CursorHome |
GOSUB LCD_CursorHome |
Like LCD_ClearHome, without clearing the screen. |
Note: For some of these functions,
you will need to pre-define variables (see table).
Some of these routines are used in this example (example
2 uses them all), which show static text;
'{$STAMP BS2}
'{$PBASIC 2.0}
' OPTREX DMC50625N LCD display controle routines
' (C) 2003 Hans Luyten
' Many thanks to Peter Pitzeier
' Variables
TheData VAR byte	' Variable for LCD data/char
TheChar VAR byte	' Variable for sending characters to LCD
' Data
DATA "Welcome to Hansies OPTREX DMC50625N test"
DATA "The LCD is connected to a BasicStamp II!"
DATA "-= Enjoy the BS2 code for LCD control =-"
Main:	GOSUB LCD_Init
        GOSUB_ClearHome
        FOR b2 = 0 TO 119
           READ b2, TheChar
           GOSUB LCD_WriteChar
        NEXT
        END
LCD_Init:	    ' Initialize LCD display
                GOSUB LCD_SetFunction
                GOSUB LCD_ClearHome
                GOSUB LCD_SetDisplay
                GOSUB LCD_SetEntry
                RETURN
LCD_WriteInstr: ' Write LCD instruction (TheCode) and LCD Data (TheData)
                Dirs = %11111111
                OutB = TheData.HIGHNIB
                OutA = %0000
                pulsout 3, 1
                OutB = TheData.LOWNIB
                pulsout 3, 1
                RETURN
LCD_WriteChar:	' Write character to LCD display
                Dirs = %11111111
                OutB = TheChar.HIGHNIB
                OutA = %0001
                pulsout 3, 1
                OutB = TheChar.LOWNIB
                pulsout 3, 1
                RETURN
LCD_SetFunction:' SF: Nibble mode, 5x7 font, 4x40 chars
                TheData = %11011011
                GOSUB LCD_WriteInstr
                RETURN
LCD_ClearHome:	' CH: Clear screen, cursor home
                TheData = %00000001
                GOSUB LCD_WriteInstr
                RETURN
LCD_SetDisplay:	' SD: Display, Cursor, Underline, Blink: ON
                TheData = %00111111
                GOSUB LCD_WriteInstr
                RETURN
LCD_SetEntry:	' SE: Cursor direction
                TheData = %01011000
                GOSUB LCD_WriteInstr
                RETURN
|
Handy instructions, Example
2
This example uses all the defined GOSUB routines. It
shows text and a gauge bar that runs up and down;
'{$STAMP BS2}
'{$PBASIC 2.0}
' OPTREX DMC50625N LCD display controle routines
' (C) 2003 Hans Luyten
' Many thanks to Peter Pitzeier
' Variables
TheData VAR byte	' Variable for LCD data/char
TheChar VAR byte	' Variable for sending characters to LCD
TheCursorX VAR byte	' Move cursor X (column) position
TheCursorY VAR byte	' Move cursor Y (line) position
' Data
DATA "Welcome to Hansies OPTREX DMC50625N test"
DATA "The LCD is connected to a BasicStamp II!"
DATA "BAR/GAUGE: ",$88,$97,$97,$97,$97,$97,$97,$97,$97,$97,$97,$97,$97
DATA $97,$97,$97,$97,$97,$97,$97,$97,$97,$97,$97,$97,$97,$97,$97,$89
Main:  GOSUB LCD_Init
       GOSUB_ClearHome
       FOR b2 = 0 TO 119
         READ b2, TheChar
         GOSUB LCD_WriteChar
       NEXT
Gauge: FOR b2 = 11 to 39
         TheCursorX = b2
         TheCursorY = 2
         GOSUB LCD_CursorXY
         TheChar = $9B
         GOSUB LCD_WriteChar
       NEXT
       TheCursorX = 39
       TheCursorY = 2
       GOSUB LCD_CursorXY
       TheChar = $89
       GOSUB LCD_WriteChar
       FOR b2 = 38 to 12
         TheCursorX = b2
         TheCursorY = 2
         GOSUB LCD_CursorXY
         TheChar = $97
         GOSUB LCD_WriteChar
       NEXT
       TheCursorX = 11
       TheCursorY = 2
       GOSUB LCD_CursorXY
       TheChar = $88
       GOSUB LCD_WriteChar
GOTO Gauge
END
LCD_Init:	   ' Initialize LCD display
                GOSUB LCD_SetFunction
                GOSUB LCD_ClearHome
                GOSUB LCD_SetDisplay
                GOSUB LCD_SetEntry
                RETURN
LCD_WriteInstr: ' Write LCD instruction (TheCode) and LCD Data (TheData)
                Dirs = %11111111
                OutB = TheData.HIGHNIB
                OutA = %0000
                pulsout 3, 1
                OutB = TheData.LOWNIB
                pulsout 3, 1
                RETURN
LCD_WriteChar:	' Write character to LCD display
                Dirs = %11111111
                OutB = TheChar.HIGHNIB
                OutA = %0001
                pulsout 3, 1
                OutB = TheChar.LOWNIB
                pulsout 3, 1
                RETURN
LCD_SetFunction:' SF: Nibble mode, 5x7 font, 4x40 chars
                TheData = %11011011
                GOSUB LCD_WriteInstr
                RETURN
LCD_ClearHome:	' CH: Clear screen, cursor home
                TheData = %00000001
                GOSUB LCD_WriteInstr
                RETURN
LCD_SetDisplay: ' SD: Display, Cursor, Underline, Blink: ON
                TheData = %00111111
                GOSUB LCD_WriteInstr
                RETURN
LCD_SetEntry:   ' SE: Cursor direction
                TheData = %01011000
                GOSUB LCD_WriteInstr
                RETURN
LCD_CursorHome: 'MH: Move cursor to home position
                TheData = %00000011
                GOSUB LCD_WriteInstr
                RETURN
LCD_CursorXY:   ' MA: Move cursor to X,Y
                ' (Y=line: 0 to 1, X=Column: 0 to 39)
                GOSUB LCD_CursorHome
                FOR b1 = 1 TO (TheCursorY*40)+TheCursorX
                  TheData = %00011000
                  GOSUB LCD_WriteInstr
                NEXT
                RETURN
|
The original BasicStamp1
code
This page would not have been compleet without the
original BasicStamp
1 code by Peter Pitzeier;
'{$STAMP BS1}
'Copyright Peter Pitzeier!

eeprom 00, ("           OPTREX DMC-50625N            ")
eeprom 40, ("  MITSUBISHI M50530 DOT MATRIX LIQUID   ")
eeprom 80, ("   CRYSTAL DISPLAY CONTROLLER-DRIVER    ")
start:
' SF instruction (Set Function)
' I/O = 4 bit mode
' FONT = 8
' 4 line display DT0=0, DT1=1
' 4 line * 40 words RA0=1, RA1=1
dirs = %11111111
pins = %11010000
pulsout 3, 1
pins = %10110000
pulsout 3, 1
' CH instruction (Clear Home)
dirs = %11111111
pins = %00000000
pulsout 3, 1
pins = %00010000
pulsout 3, 1
pause 1
' SD instruction (Set Display)
' DSP on
' CSR on
' UND on
' CSR blink
' CHR blink
dirs = %11111111
pins = %00110000
pulsout 3, 1
pins = %11110000
pulsout 3, 1
' SE instruction (Set Entry)
' CSR D/I increment
' CSR CONDITION W
dirs = %11111111
pins = %01010000
pulsout 3, 1
pins = %10000000
pulsout 3, 1
REM dirs=%00001111:low 0:low 1:high 2:pulsout 3,1:b2=pins:pulsout 3,1:
b3=pins:low 2:debug %b2,%b3
main:
' CH instruction (Clear Home)
dirs = %11111111
pins = %00000000
pulsout 3, 1
pins = %00010000
pulsout 3, 1
FOR b2 = 0 TO 119
READ b2, b4
b3=b4 & %11110000
b3=b3 | %00000001
dirs = %11111111
pins = b3
pulsout 3, 1
b3=b4 & %00001111
b3 = b3 + b3
b3 = b3 + b3
b3 = b3 + b3
b3 = b3 + b3
b3=b3 | 1
pins = b3
pulsout 3, 1
NEXT b2
END
GOTO main
|
|
