|
On this page ...
|
In this brief article I will try to explain to
you how to setup an ADSL connection at home using the Do-it-yourself
kit. It's easy and will save you some bucks.
In this situation: I used the KPN
MXStream-Basic version for ISDN using Ethernet - the USB works
in a similar fashion, with the exception that the wire form the
ADSL modem to your PC is in fact an USB cable. The
PSTN (Analog) variant setup can be found here.
|
 |
Overview
What do we
need?
- The KPN
Do-it-yourself kit
- Screwdrivers (a regular one and a Philips)
- Drilling machine (optional)
The Do-it-yourself kit has to be ordered from one of
the provider that offer the KPN
MXStream:
What can we find
in the Do-it-yourself-kit?
Content Picture:
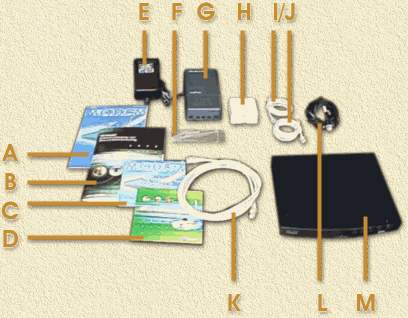 |
| Alcatel brochure (get
rid of it!) |
| KPN MXStream manual |
| Alcatel CD-ROM (not
required!) |
| KPN CD-ROM |
| Modem powersupply |
| Screws etc. for mounting
the splitter |
| Splitter |
| Mount box (ISRA) |
| Phone-cables |
| Standard Network cable
(UTP) |
| Modem cable |
| Alcatel Speed Touch Home
modem |
|
Personally I would have rather choose myself which modem
I want to use, so I can use hardware from Ericsson,
Zyxel and Fritz
instead - but hey, it works OK.
Which steps
to follow?
- Locate the KPN main Phone-wire.
|
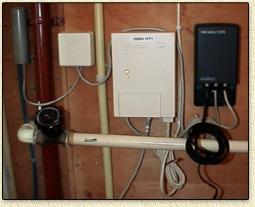
Often found in the closet where you find the
gas and power meters as well:
| Incoming
KPN main-wire |
| Old phone-line
connector (used to be used for analog phones) now still
hooked to the NT1-box |
| NT1-box |
| cable
from the old phone connector (B) to the NT1-box. |
| ISDN
connection. |
|
|
- Disconnect all cables!
Disconnect the cable from the old phone connector (B) - you might not
have one of these.
Also remove all cables from the NT1-box. Powersupply of the NT1-box
can stay connected - if used at all.
Note: you could have an older NT1-box, these boxes do
not have a connector but use bare wires. Remember where the red and
blue wire where connected, you will need them again at connection 3.
- Study this overview.
Here I have drawn a layout of connections (each colored line will be
explained below):
|
|
| Green |
Incoming phone line |
(4) |
| Blue |
ISRA to splitter |
(5) |
| Orange |
Splitter to NT1 |
(6) |
| Purple |
ISDN connection |
(7) |
| Red |
Modem conection |
(8) |
| Yellow |
Computer/Network |
(9) |
|
- Connection 1 (GREEN): KPN main-wire
to mount box (ISRA)
 |
Open the old analog phone connector
(this once was used for analog lines) indicated as (B) photo
above Disconnect the cable from the socket and remove the socket
entirely.
Now open the ISRA-mount box carefully
(displayed on the left).
|
Picture on the right;
Move the wire you just disconnected
underneath the jack of the ISRA-mount box.
Connect the red wire to (B) and the
blue wire to (A) as indicated in the picture on the right.
Tip: there are some wires already in place, match the new
red and blue wire with the ones already in place.
After connecting the cables you can
mount the ISRA-mount box to the wall an close it.
|
|
| |
- Connection 2 (BLUE): Connect mount
box (ISRA) to the splitter.
| Use the supplied
phone-wires (indicated in the content
picture as I/J). Connect the cable to the ISRA box, and the
middle connector of the splitter. |
|
- Connection 3 (ORANGE): Connect
splitter to NT1.
Use a similar cable as in connection 1 (content
picture indicated as I/J) and click on of the connectors in the
most right jack of the splitter (a phone icon is to be found there).
Connect the other end of this cable to the NT1-box.
Note: you might have an older NT1-box. You will need to cut the cable
you just used on the side of the NT1-box and connect the blue and red
wire to the connections in the NT1-box previously used.
|
The LED "Line" of the NT1-box
will glow now.
You can now mount the splitter to the wall - do not close it
yet.
|
 |
- Connection 4 (PURPLE): Reconnect
the ISDN phones.
Reconnect the ISDN cable as it was connected before and try a phone
- see if it works all right.
- Connection 5 (RED): Connecting
the ADSL modem to the splitter.
Now use the black cable (see: content
picture indicated as cable L) to connect the modem to the splitter.
Connect one end to the left most jack of the splitter and the other
end into the right most jack on the back of the ADSL modem.
|
|
| On/Off
switch |
| Powersupply |
| Network
(UTP) |
| Reset
switch |
| Splitter
connector |
|
- Connection 6 (YELLOW): Connect
modem to computer.
Use the network-cable that came with the kit (indicated in the content-picture
as cable K) to connect the modem to your computer. Connect the cable
to connector C of the modem (see picture above) and the UTP network-card
connector of your PC.
Note: Even if you plan to use several other computer as
well, TEST YOUR CONNECTION WITH 1 COMPUTER FIRST!
- Connect powersupply to the modem.
First make sure the modem is switched OFF (switch A). Now connect the
powersupply to connector B of the modem and put the powersupply in the
power-outlet
Things could look similar to this picture (the modem is not visible
here);
-
First start ... does it work?
We are about to check the connection between ADSL and your computer.
Switch the modem ON. A red LED will start to glow/blink, eventually
it will turn orange and finally green. Next to this LED an additional
green LED will start to glow.
If this is OK the your connection to KPN ADSL is OK.
Now boot your PC. As soon as Windows is up and running, you will see
a green light on the back of the modem: your network-connection is
working OK too.
Finally
You're now ready to start to setup your Internet connection
over ADSL. The required setup is very specific for your ISP, so please
consult their guide for details. Also: you might consider the Alcatal
Hack. and take a look at the meaning
of the indicators on the modem, they help you solve problems (sometimes).
|